NPC spawning
In Terraria, enemies, critters, and other NPCs will spawn off-screen and enter the screen area based on their AI. The rate at which enemies are spawned, the maximum number of enemies, and the type of enemies spawned are all dependent on the time of day, biome, the tile type of the ground, and other factors.
Spawn rates
Basics
The game determines new enemy spawns every tick.[1] There are two variables it takes into consideration when doing so: spawn rate and max spawns, with the spawn rate setting the chance of an enemy spawning at each tick, and the max spawns limiting the number of enemies that are active at a time.[2]
The default spawn rate is 1/600.[3] This means that each tick, there is a chance of 1/600 (0.17%) that an enemy is spawned. Since there are 60 ticks in 1 second, there is a 9.52% chance that at least one enemy will spawn in a given second.
The default max spawns is 5.[4] This means that a new enemy can only be spawned if the sum of the NPC slots of all current active enemies is lower than 5. Most enemies occupy 1 NPC slot by default; see the following table for a list of all enemies with a higher or lower number of NPC slots. Active enemies exclude many enemies considered part of the same enemy, for example, body and tail parts of worms, because a Giant Worm, which has 6–8 segments (i.e. individual enemies), would otherwise occupy a disproportionate number of NPC slots. Town NPCs are not considered active NPCs for the purposes of NPC spawning. See the following table for a list of enemies that are not considered active.
|
Natural spawn rates
| 1/x: spawn rate y: max spawns |
Spawn rate and max spawns have set values, which are different depending on the environment. They are formally defined for the environments mentioned in the following tables. Events that are not listed usually employ separate mechanisms to control spawn rates; bosses usually occupy enough NPC slots to block most other spawns.
Pre-Hardmode
| Biome/Event/ Boss fight |
Surface | Underground | Cavern | Underworld | ||
|---|---|---|---|---|---|---|
| Day | Night | |||||
| 1/600 5 | 1/360 6 | 1/108 10 | 1/300 8 | 1/240 9 |
1/600 10 | |
nearby)[c] | 1/240 7 | 1/144 9 | 1/43[d] 15 | 1/120 12 | 1/96 13 | n/a |
nearby)[e] | 1/330 7 | 1/198 8 | 1/59[d] 14 | 1/165 11 | 1/132 12 | n/a |
nearby)[e] | 1/420 6 | 1/251 7 | 1/75 13 | 1/210 10 | 1/168 11 | n/a |
NPCs nearby)[e] | 1/510 6 | 1/306 7 | 1/91 12 | 1/255 9 | 1/204 10 | n/a |
| 1/390 6 | 1/234 7 | 1/70 13 | 1/195 10 | 1/156 11 | n/a | |
| n/a | n/a | n/a | 1/90 14 | 1/72 16[f] | n/a | |
| 1/240 5 | 1/144 6 | 1/43[d] 11 | 1/120 8 | 1/96 9 | n/a | |
| 1/480 6 | 1/288 7 | 1/86 12 | 1/240 9 | 1/192 10 | n/a | |
| 1/540 6 | 1/324 7 | 1/97 12 | n/a | n/a | n/a | |
Desert(Desktop, Console and Mobile versions) | 1/120 15 | 1/72 18[f] | 1/21[d] 30[f] | 1/60 24[f] | 1/48[d] 27[f] | n/a |
| 1/20 10 + 1.5 per player |
n/a | n/a | n/a | |||
Flesh fight |
n/a | n/a | n/a | n/a | n/a | 1/1800 3 |
| 1/600 5 | 1/360 6 | 1/108 10 | 1/300 8 |
1/156 11 |
n/a | |
Hardmode
| Biome/Event/ Boss fight |
Surface | Underground | Cavern | Underworld | |||
|---|---|---|---|---|---|---|---|
| Day | Night | ||||||
| 1/540 6 | 1/324 7 | 1/97 12 | 1/108 11 | 1/243 10 | 1/216 11 |
1/540 12 | |
nearby)[c] | 1/216 9 | 1/129 10 | 1/38[d] 18[f] | 1/43[d] 16[f] | 1/97 15 | 1/86 16[f] | n/a |
nearby)[e] | 1/297 8 | 1/178 9 | 1/53[d] 16[f] | 1/59[d] 15 | 1/133 14 | 1/118 15 | n/a |
nearby)[e] | 1/378 7 | 1/226 9 | 1/67 15 | 1/75 14 | 1/170 13 | 1/151 14 | n/a |
NPCs nearby)[e] | 1/459 7 | 1/275 8 | 1/82 14 | 1/91 13 | 1/206 12 | 1/183 13 | n/a |
| 1/351 7 | 1/210 9 | 1/63 15 | 1/70 14 | 1/157 13 | 1/140 14 | n/a | |
| n/a | n/a | n/a | n/a | 1/72 18[f] | 1/64 19[f] | n/a | |
| 1/216 6 | 1/129 7 | 1/38[d] 13 | 1/43[d] 12 | 1/97 11 | 1/86 12 | n/a | |
| 1/432 7 | 1/259 8 | 1/77 14 | 1/86 13 | 1/194 12 | 1/172 13 | n/a | |
| 1/216 9 | 1/129 10 | 1/38[d] 18[f] | 1/43[d] 16[f] | n/a | n/a | n/a | |
Desert(Desktop, Console and Mobile versions) | 1/108 18[f] | 1/64 21[f] | 1/19[d] 36[f] | 1/21[d] 33[f] | 1/48[d] 30[f] | 1/43[d] 33[f] | n/a |
|
|
1/20 10 + 1.5 per player |
n/a | n/a | n/a | |||
Flesh fight |
n/a | n/a | n/a | n/a | n/a | n/a | 1/1620 3 |
| 1/540 6 | 1/324 7 | 1/97 12 | 1/108 11 | 1/243 10 |
1/157 13 |
n/a | |
Additionally, the spawn rate will be modified by the number of active enemies in the area. The fewer active enemies there are, the faster new ones will spawn:
- If the sum of the NPC slots of all active enemies is lower than 20% of max spawns, the denominator of the spawn rate will be multiplied by 0.6.
- If the sum of the NPC slots of all active enemies is lower than 40% and greater or equal 20% of max spawns, the denominator of the spawn rate will be multiplied by 0.7.
- If the sum of the NPC slots of all active enemies is lower than 60% and greater or equal 40% of max spawns, the denominator of the spawn rate will be multiplied by 0.8.
- If the sum of the NPC slots of all active enemies is lower than 80% and greater or equal 60% of max spawns, the denominator of the spawn rate will be multiplied by 0.9.
(Note that all products are rounded down if they are decimals.)
The following table lists some examples for this mechanic. It is to be read in the following way: If the natural spawn rate and max spawns (as determined from the overview above) and sum of the NPC slots of all active enemies are equal to the values in the first three columns, then the spawn rate is altered as shown in the last column.
| Spawn rate | Max spawns | NPC slots sum | Altered spawn rate |
|---|---|---|---|
| 1/600 | 6 | 0.8 (13.3% of max spawns) |
1/360 |
| 1/173 | 15 | 10 (66.7% of max spawns) |
1/155 |
| 1/430 | 12 | 10 (83.3% of max spawns) |
1/430 |
A second pass of this is performed if the player is in The Corruption or The Crimson or below the vertical center of the Underground layer:
- If the sum of the NPC slots of all active enemies is lower than 20% of max spawns, the denominator of the spawn rate will be multiplied by 0.7.
- If the sum of the NPC slots of all active enemies is lower than 40% and greater or equal 20% of max spawns, the denominator of the spawn rate will be multiplied by 0.9.
Manual alteration of spawn rates
Certain items can be used to change the spawn rate and max spawns when used or placed, as per the following table.[6] All effects are multiplicative rather than additive.
| Item | Spawn rate factor[k] | Effective spawn rate | Max spawns |
|---|---|---|---|
| 1/0.75 | +33% | +50% | |
| 1/0.5 | +100% | +100% | |
| (Desktop, Console and Mobile versions) 1/1.65 (Old-gen console and 3DS versions) 1/1.2 |
(Desktop, Console and Mobile versions) −39% (Old-gen console and 3DS versions) −17% |
(Desktop, Console and Mobile versions) −40% (Old-gen console and 3DS versions) −20% | |
| 1/1.2 | −17% | −20% | |
| 1/1.3 | −23% | −30% | |
| 1/1.2 | −17% | −20% | |
| 1/1.3 | −23% | −30% |
These effects do not stack with themselves, i.e., a single Water Candle, Peace Candle, or Sunflower has the same effect as multiple of each one.
On the ![]() Old-gen console version and Nintendo
Old-gen console version and Nintendo ![]() version, placed and held Water Candles stack with each other.
version, placed and held Water Candles stack with each other.
Water and Peace Candles cancel each other out, even though they do not alter spawn rates by the same absolute values. If both are active (e.g. a Peace Candle is held while a Water Candle is placed nearby), none is applied.
On ![]() Desktop,
Desktop, ![]() Console, and
Console, and ![]() Mobile, there is one exception to this: Water Candles placed (explicitly not held) in Space[l] always increase spawn rates, regardless of nearby Peace Candles. Their effectiveness depends on nearby Peace Candles, however:
Mobile, there is one exception to this: Water Candles placed (explicitly not held) in Space[l] always increase spawn rates, regardless of nearby Peace Candles. Their effectiveness depends on nearby Peace Candles, however:
| Item | Spawn rate factor[k] | Effective spawn rate | Max spawns |
|---|---|---|---|
| 1/0.375 | +167% | +50% | |
| 1/0.5 | +100% | +50% |
In addition, nearby Fairies(Desktop, Console and Mobile versions) have the same effect as Sunflowers and (Desktop, Console and Mobile versions) Invisibility Potions, reducing the effective spawn rate by 17% and decreasing the max spawns by 20%.
Up to this point, spawn rates cannot be increased to fractions greater than 1/60 and max spawns cannot be increased to values greater than 15. Both will be cut off there. The spawn rates and max spawns of the invasion events listed in the tables above are exempt from this. There is no lower limit for spawn rates and max spawns.
Effect of town NPCs on spawn rates
The presence of nearby town NPCs (including the Old Man, Traveling Merchant(Desktop, Console, Old-gen console and Mobile versions), and town pets(Desktop, Console and Mobile versions), but excluding the Skeleton Merchant(Desktop, Console and Mobile versions)) generally reduces spawn rates and max spawns.[7] All town NPCs within a 240×135-tile rectangle centered on the player are considered.[8]
On ![]() Desktop,
Desktop, ![]() Console, and
Console, and ![]() Mobile, this effect is adjusted in the Underworld and in Graveyards(Desktop, Console and Mobile versions). If the player has the Shadow Candle(Desktop, Console and Mobile versions) debuff, town NPCs do not affect spawn rates and max spawns whatsoever and none of these effects are applicable.
Mobile, this effect is adjusted in the Underworld and in Graveyards(Desktop, Console and Mobile versions). If the player has the Shadow Candle(Desktop, Console and Mobile versions) debuff, town NPCs do not affect spawn rates and max spawns whatsoever and none of these effects are applicable.
When there are town NPCs nearby, the player is considered as in front of safe walls. However, this effect is not guaranteed if the player is in Underworld ("safe wall chance" in the following table). They also increases the chance for using a special critter spawning pool ("critter chance" in the following table) instead of the ordinary spawning pool (which is a mixture of enemies and critters). If that happens, the max spawn will be reduced, otherwise the spawn rate will be reduced.
None of these effects will apply during any invasion event, Pumpkin Moon, Frost Moon, Blood Moon, or Solar Eclipse, or if the player is in the Corruption, the Crimson, Dungeon or the Meteorite biome.
| Number of nearby town NPCs |
Safe wall chance | Critter chance | Critter max spawns |
Spawn rate [k][m] | Effective spawn rate[n] |
|---|---|---|---|---|---|
| 1 | 100% | 1/3 (33.33%) | 60% | 1/2 (50%) | 1/3 (33.33%) [o] |
| 2 | 100% | 2/3 (66.67%) | 60% | 1/3 (33.33%) | 1/9 (11.11%) [p] |
| ≥3 | 100% | 100% [q] | 60% | 1 [r] | 0 [s] |
| Number of nearby town NPCs |
Safe wall chance | Critter chance | Critter max spawns |
Spawn rate [k][m] | Effective spawn rate [n] |
|---|---|---|---|---|---|
| 1 | 1/2 (50%) | 1/10 (10%) | 50% | 1/1.25 (80%) | 18/25 (72%) [t] |
| 2 | 3/4 (75%) | 1/5 (20%) | 50% | 1/1.5 (66.67%) | 8/15 (53.33%) [u] |
| ≥3 | 9/10 (90%) | 1/3 (33.33%) | 50% | 1/2 (50%) | 1/3 (33.33%) [v] |
| Number of nearby town NPCs |
Safe wall chance | Critter chance | Critter max spawns |
Spawn rate[k][w] | Effective spawn rate[n] |
|---|---|---|---|---|---|
| 1 | 100% | 1/9 (11.11%) | 60% | 1/1.66 (60.24%) | 8/15 (53.33%) [x] |
| 2 | 100% | 1/6 (16.67%) | 60% | 1/2.33 (42.92%) | 5/14 (35.71%) [y] |
| ≥3 | 100% | 1/3 (33.33%) | 60% | 1/3 (33.33%) | 2/9 (22.22%) [z] |
When 3 or more town NPCs are present nearby, a town(Desktop, Console and Mobile versions) mini-biome is formed and no enemies will spawn. This is only valid for areas outside of the Underworld and Graveyards, and only for Classic worlds – in Expert Mode(Desktop, Console and Mobile versions), there is still a 1/30 (3.33%) chance an enemy may spawn that tick. Enemies from events as well as bosses (and their servants) will bypass this restriction.
Journey Mode
Spawn rates can be manually altered in Journey Mode(Desktop, Console and Mobile versions), from 0× (disabling spawns) to 10× the normal rate. Even with the spawn rate set to 0×, bosses may still be summoned, mining up Tombstones can still cause Ghosts to spawn, and certain Celestial enemies can spawn.
Spawn locations
Each player in the game will spawn their own enemies. If two players are in the same area, enemies will appear twice as fast as they would with only one player. Max Spawns rule are still used, which means that even if 2 players are in the same spot, it is impossible to gather 30 normal enemies near the spot. Note that some enemies occupies more or less than 1 NPC slot. See above for details.
Choosing a spot to spawn the enemy
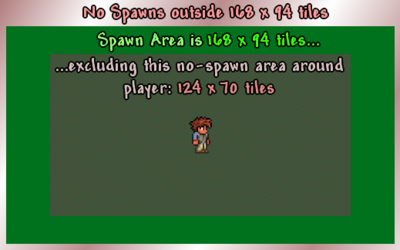
When the game decides to spawn an enemy, it will first choose a random tile within a rectangle around the player (specifically, the tile containing the top left corner of the player's hitbox). The maximum distance from the player it can choose from is 84 tiles west, 83 east, 46 up, and 45 down. [9]
Using certain items causes enemies to spawn further out than normal. Equipping a Rifle Scope or Sniper Scope does so only when the player has a compatible gun selected, whether or not the player is zoomed out.
| Items | Spawn range | Safe range | ||
|---|---|---|---|---|
| Horizontal | Vertical | Horizontal | Vertical | |
| Normal | 84 | 46 | 62 | 34 |
| Rifle Scope (or derivatives) | 114 | 62 | 92 | 50 |
| Binoculars | 124 | 68 | 102 | 56 |
| Sniper Rifle | 124 | 68 | 102 | 56 |
| Sniper Rifle with Rifle Scope (or derivatives) | 132 | 72 | 110 | 60 |
Note: If using the Depth Meter, Compass, or similar, each tile is equal to 2 feet, so double all measurements to get distances in feet
The game then start checking whether the spot is valid for spawning:
If the picked tile is a solid block, or it has a player-placed wall that blocks enemies from spawning, the attempt is considered invalid. Tiles that are actuated out do not count as solid.
The game then check the height of the chosen tile to see whether this is a flying enemy spawning attempt (>65% altitude during pre-Hardmode and >55% altitude during Hardmode; see Space § Notes). If it is not a flying enemy spawning attempt, it moves down until it finds the ground. If there is no solid block within the spawning area (up to 45 tiles down to the player) or the block is within the safe area (starting from the tile containing the top left corner of the player's hitbox, 62 tiles west, 61 east, 35 up and 34 down), the attempt is considered invalid. Note that a flying enemy spawning attempt will not be considered invalid even if the chosen tile is within the safe area during this stage.
After that, the game check the 2×3 area above the chosen tile to see if there is enough space for spawning. If any of the 6 tiles is outside the edge of the world, solid, or contains lava, the attempt is considered invalid. Note that the area is 1 tile left to the chosen tile as shown in the image.
The process described above will repeat for at most 50 times to find a valid spot. However, the attempt may still fail for following reasons, there will be no retrying in these cases.
The chosen tile space must be completely outside 2088×1172-pixel rectangles centered on the center of each player's hitbox. If the player is not riding a mount, the top edge of this is 34 + 3/16 tiles above the top left corner tile mentioned above, meaning that NPCs can spawn on ground exactly 35 tiles above a player standing on half blocks, but not a player standing on full blocks.
When the the player is in Dungeon, the chosen tile must be a Dungeon Brick with wall above it (the wall type does not matter, even player-placed safe walls will meet the requirement), this is to prevent Dungeon enemies spawning outside the Dungeon.
When the two tiles right above the chosen tile are both liquid, the liquid above must be water. This means no enemies will spawn in Shimmer or honey that is at least 2 tiles deep (any attempt in lava would have be considered invalid in the previous stage).
Choosing a type of enemy to spawn
The type of enemy spawned will depend on many factors including, but not limited to:
- Time of day
- Weather (e.g., Angry Nimbus and Ice Golem require Rain/Blizzard)
- Depth
- Distance East or West (Ocean enemies, Martian Probes, Goblin Scouts, etc.)
- Player's Current biome (Corruption, Meteor, Jungle, etc., in the case of most biome-specific flying enemies)
- Tile the enemy spawns on (Jungle Grass, Ebonstone, Marble, etc. in the case of most biome-specific grounded enemies)
- Wall behind the player (Lihzahrd Brick Wall, Dungeon Brick Wall, etc.)
- Wall behind the enemy's spawn location (Dungeon Brick Wall variants)
- Special events (Blood Moon, Solar Eclipse, invasion events, etc)
- Randomness
Notes
- When standing on the left or right edge of the world, the enemies can spawn on screen, as long they are at least 62 tiles from the player. The screen is around 85 blocks wide, so in this case the enemies can spawn in the farthest quarter of the screen. (This may not necessarily be the case, some players have larger screens, as big as 120 blocks wide).
History
- Desktop 1.4.4:
- Reduced the natural spawn rates and max spawns in the Jungle if there are town NPCs nearby.
- Added separate spawn rate and max spawns values for the Jungle Temple.
- Increased the spawn rate reduction of the Calming Potion from 23% to 39% and its max spawns reduction from 30% to 40%.
- Desktop 1.4.0.1:
- Added the following enemies to the list of NPCs that are never considered active: Skeletron Hand, Prime Cannon, Prime Saw, Prime Vice, Prime Laser, Martian Saucer, Martian Saucer Turret, Martian Saucer Cannon, and Dutchman Cannon.
- Increased the natural spawn rates and max spawns in the Dungeon:
- Increased spawn rates in the Underground layer from 1/120 (pre-Hardmode) and 1/97 (Hardmode) to 1/90 (pre-Hardmode) and 1/72 (Hardmode).
- Increased spawn rates in the Cavern layer from 1/96 (pre-Hardmode) and 1/86 (Hardmode) to 1/72 (pre-Hardmode) and 1/64 (Hardmode).
- Increased max spawns in the Underground layer in pre-Hardmode from 13 to 14.
- Increased the natural spawn rates and max spawns in the Underground Desert:
- Increased spawn rates on the surface during the day in pre-Hardmode from 1/180 to 1/120.
- Increased spawn rates on the surface during the night in pre-Hardmode from 1/108 to 1/72.
- Increased spawn rates in the Underground layer in pre-Hardmode from 1/90 to 1/60.
- Increased spawn rates in the Cavern layer in pre-Hardmode from 1/72 to 1/60.
- Increased max spawns on the surface to 15. The old max spawns were 10 (pre-Hardmode) / 12 (Hardmode) during the day, and 12 (pre-Hardmode) / 14 (Hardmode) during the night. Max spawns in the Underground Desert are now 15 at all times and under all conditions.
- The Invisibility Potion now reduces spawn rates by 17% and max spawns by 20%.
- Desktop 1.3.0.1:
- Changed the effect of nearby town NPCs on spawn rates and max spawns:
- The effect is now less intense in the Underworld.
- 1 nearby town NPC now reduces spawn rates by 33% instead of 17% and reduces max spawns by 13% instead of 27%.
- 2 nearby town NPCs now reduce spawn rates by 22% instead of 44% and reduce max spawns by 27% instead of 13%.
- Placed and held Water Candles no longer stack.
- Added an additional spawn rate increase for Water Candles placed in Space.
- Increased the spawn rate reduction of the Calming Potion from 17% to 23% and its max spawns reduction from 20% to 30%.
- Sunflowers now grant the Happy! buff, which reduces spawn rates by 17% and max spawns by 20%.
- Changed the effect of nearby town NPCs on spawn rates and max spawns:
- Desktop 1.2.4: Fixed bug where spawn rates would increase underground when a moon event is happening.
- Desktop 1.2.3: Fixed bug where spawn rates were higher than intended everywhere rather than when below the middle of dirt layer.
References
- ↑ A tick is a time unit countable by the software. Most of Terraria's updating logic happens every tick. A tick has the length of 1/60th of a second, hence there are 60 ticks in a second and 3600 ticks in a minute.
- ↑ Information taken from the
 Desktop 1.4.4.9 source code, method
 SpawnNPC()inTerraria.NPC.cs. - ↑ Information taken from the
 Desktop 1.4.4.9 source code, field
 defaultSpawnRateinTerraria.NPC.cs. - ↑ Information taken from the
 Desktop 1.4.4.9 source code, field
 defaultMaxSpawnsinTerraria.NPC.cs. - ↑ Information taken from the
 Desktop 1.4.4.9 source code, method
 DoesntDespawnToInactivity()inTerraria.NPC.cs. - ↑ Information taken from the
 Desktop 1.4.4.9 source code, method
 SpawnNPC()inTerraria.NPC.cs. - ↑ Information taken from the
 Desktop 1.4.4.9 source code, method
 SpawnNPC()inTerraria.NPC.cs. - ↑ Information taken from the
 Desktop 1.4.4.9 source code, method
 AddIntoPlayersTownNPCSlots()inTerraria.NPC.cs. - ↑ Information taken from the
 Desktop 1.4.4.9 source code, method
 SpawnNPC()inTerraria.NPC.cs.
- ↑ 1.0 1.1 Blood Moons only affect the spawn rates above the surface.
- ↑ 2.0 2.1 Weather additionally affects spawn rates and max spawns in the Snow biome.
- ↑ 3.0 3.1 Nearby means within a 240×135-tile rectangle centered on the player. The Old Man, Traveling Merchant(Desktop, Console, Old-gen console and Mobile versions), and town pets(Desktop, Console and Mobile versions) are considered town NPCs here, but the Skeleton Merchant(Desktop, Console and Mobile versions) is not.
- ↑ 4.00 4.01 4.02 4.03 4.04 4.05 4.06 4.07 4.08 4.09 4.10 4.11 4.12 4.13 4.14 4.15 4.16 Note that the spawn rate will be capped at 1/60; see below.
- ↑ 5.0 5.1 5.2 5.3 5.4 5.5 Nearby means within a 240×135-tile rectangle centered on the player. The Old Man, Traveling Merchant(Desktop, Console, Old-gen console and Mobile versions), and town pets(Desktop, Console and Mobile versions) are considered town NPCs here, but the Skeleton Merchant(Desktop, Console and Mobile versions) is not. This is active even if the player has the Shadow Candle(Desktop, Console and Mobile versions) debuff, which otherwise nullifies the effect of town NPCs on NPC spawning.
- ↑ 6.00 6.01 6.02 6.03 6.04 6.05 6.06 6.07 6.08 6.09 6.10 6.11 6.12 6.13 6.14 6.15 6.16 6.17 6.18 Note that the max spawns will be capped at 15; see below.
- ↑ 7.0 7.1 Only applied if the Meteorite biome does not overlap with the Dungeon, the Underground Desert, the Desert during a Sandstorm, the Jungle, or the evil biomes. If it does overlap with any of those biomes, then the overlapping biome's spawn rate and max spawns are used.
- ↑ 8.0 8.1 More precisely: If the player is standing in front of unsafe Lihzahrd Brick Walls (wall ID 87), i.e. also in the entrance area of the temple.
- ↑ If artificially created.
- ↑ Solar Eclipses only affect the spawn rates above the surface.
- ↑ 11.0 11.1 11.2 11.3 11.4 11.5 The product of the denominators is rounded down if it is a decimal.
- ↑ More precisely, above an altitude of 65% between the surface line and the top of the world, i.e. the same area where Space-exclusive enemies spawn in pre-Hardmode. See Space § Notes.
- ↑ 13.0 13.1 This only applies if not using the critter spawning pool.
- ↑ 14.0 14.1 14.2 Here we only count enemy spawns and do not count critter spawns, so this value indicates how "safe" a town is.
- ↑ There is a 1/3 (33.33%) chance for not try to spawn enemies at all and 2/3 (66.67%) chance to try with 1/2 spawn rate. Hence, the effective spawn rate is [math]\displaystyle{ \frac{2}{3} * \frac{1}{2}= \frac{1}{3} }[/math].
- ↑ There is a 2/3 (66.67%) chance for not try to spawn enemies at all and 1/3 (33.33%) chance to try with 1/3 spawn rate. Hence, the effective spawn rate is [math]\displaystyle{ \frac{1}{3} * \frac{1}{3}= \frac{1}{9} }[/math].
- ↑ 29/30 (96.67%) in Expert Mode(Desktop, Console and Mobile versions)
- ↑ The spawn rate is untouched here, but since critters are always spawned, this value is completely irrelevant.
- ↑ No enemies will spawn at all
- ↑ There is a 1/10 (10%) chance for not try to spawn enemies at all and 9/10 (90%) chance to try with 4/5 spawn rate. Hence, the effective spawn rate is [math]\displaystyle{ \frac{9}{10} * \frac{4}{5}= \frac{18}{25} }[/math].
- ↑ There is a 1/5 (20%) chance for not try to spawn enemies at all and 4/5 (80%) chance to try with 2/3 spawn rate. Hence, the effective spawn rate is [math]\displaystyle{ \frac{4}{5} * \frac{2}{3}= \frac{8}{15} }[/math].
- ↑ There is a 1/3 (33.33%) chance for not try to spawn enemies at all and 2/3 (66.67%) chance to try with 1/2 spawn rate. Hence, the effective spawn rate is [math]\displaystyle{ \frac{2}{3} * \frac{1}{2}= \frac{1}{3} }[/math].
- ↑ This is applied regardless of whether the critter spawning pool is used.
- ↑ There is a 1/9 (11.11%) chance for not try to spawn enemies at all and 8/9 (88.89%) chance to try with 3/5 spawn rate. Hence, the effective spawn rate is [math]\displaystyle{ \frac{8}{9} * \frac{3}{5}= \frac{8}{15} }[/math].
- ↑ There is a 1/6 (16.67%) chance for not try to spawn enemies at all and 5/6 (83.33%) chance to try with 3/7 spawn rate. Hence, the effective spawn rate is [math]\displaystyle{ \frac{5}{6} * \frac{3}{7}= \frac{5}{14} }[/math].
- ↑ There is a 1/3 (33.33%) chance for not try to spawn enemies at all and 2/3 (66.67%) chance to try with 1/3 spawn rate. Hence, the effective spawn rate is [math]\displaystyle{ \frac{2}{3} * \frac{1}{3}= \frac{2}{9} }[/math].
- ↑ There is a 1/3 (33.33%) chance for the denominator to be multiplied by 2. Hence, the spawn rate factor is [math]\displaystyle{ \frac{1}{3} * \frac{1}{2} }[/math] (denominator multiplied by 2) plus [math]\displaystyle{ \frac{2}{3} * \frac{1}{1} }[/math] (denominator left unchanged). This is equivalent to [math]\displaystyle{ \frac{1}{3}*\frac{1}{2} + \frac{2}{3} = \frac{5}{6} }[/math] or [math]\displaystyle{ 1/\frac{6}{5} = 1/1.2 }[/math].
- ↑ There is a 2/3 (66.67%) chance for the max spawns to be multiplied by 0.6. Hence, the max spawns factor is [math]\displaystyle{ \frac{2}{3} * \frac{6}{10} }[/math] (max spawns multiplied by 0.6) plus [math]\displaystyle{ \frac{1}{3} * 1 }[/math] (max spawns left unchanged). This is equivalent to [math]\displaystyle{ \frac{2}{3}*\frac{6}{10} + \frac{1}{3} = \frac{11}{15} }[/math], which as a percentage is [math]\displaystyle{ \frac{11}{15} - 1 = -\frac{4}{15} = -0.266\cdots \approx -27 \% }[/math].
- ↑ There is a 2/3 (66.67%) chance for the denominator to be multiplied by 3. Hence, the spawn rate factor is [math]\displaystyle{ \frac{2}{3} * \frac{1}{3} }[/math] (denominator multiplied by 3) plus [math]\displaystyle{ \frac{1}{3} * \frac{1}{1} }[/math] (denominator left unchanged). This is equivalent to [math]\displaystyle{ \frac{2}{3}*\frac{1}{3} + \frac{1}{3} = \frac{5}{9} }[/math] or [math]\displaystyle{ 1/\frac{9}{5} = 1/1.8 }[/math].
- ↑ There is a 1/3 (33.33%) chance for the max spawns to be multiplied by 0.6. Hence, the max spawns factor is [math]\displaystyle{ \frac{1}{3} * \frac{6}{10} }[/math] (max spawns multiplied by 0.6) plus [math]\displaystyle{ \frac{2}{3} * 1 }[/math] (max spawns left unchanged). This is equivalent to [math]\displaystyle{ \frac{1}{3}*\frac{6}{10} + \frac{2}{3} = \frac{13}{15} }[/math], which as a percentage is [math]\displaystyle{ \frac{13}{15} - 1 = -\frac{2}{15} = -0.133\cdots \approx -13 \% }[/math].
- ↑ 31.0 31.1 No enemies will spawn at all

