指南:入門

歡迎來到泰拉瑞亞!
本指南會幫助你在世界中揚帆遠航。這篇文章會涵蓋角色的創建、戰鬥和遊戲初期的小貼士之類的遊戲基本技巧,還會引導玩家查閱其他指南以便獲得進一步的建議。讀下去吧,我們會手把手地教你玩泰拉瑞亞!
遊戲模式
在泰拉瑞亞的標題畫面中,玩家可以選擇想要遊玩的遊戲模式。在這個例子中,我們會選擇「單人模式」,但如果你想和朋友一起遊玩,你也可以選擇「多人模式」!在![]() 電腦版、
電腦版、![]() 主機版、和
主機版、和![]() 移動版中,備選項包括單人模式和多人模式,而在
移動版中,備選項包括單人模式和多人模式,而在![]() 前代主機版和任天堂
前代主機版和任天堂![]() 版中則只有進入遊戲。注意,目前沒有官方的跨版本聯機的方法。
版中則只有進入遊戲。注意,目前沒有官方的跨版本聯機的方法。
![]() 主機版、
主機版、![]() 移動版、
移動版、![]() 前代主機版和任天堂
前代主機版和任天堂![]() 版有內置的教程,推薦先將它們玩完。
版有內置的教程,推薦先將它們玩完。
本指南會假設你玩的是單人模式,因為在這個模式中更容易學習遊戲的操作。但這和與朋友一起玩並不衝突。
那麼,就讓我們一起來學習如何成為遊戲早期的高手吧!
人物創建

.jpg)
在確定想要遊玩的模式後,就必須通過點擊選擇玩家界面上的新建來創建一個新角色。一旦你處於角色創建界面,你將可以看到許多可以定製的角色屬性,這包括髮型、發色、衣着及其顏色、膚色和眼睛的顏色!
名字和難度
人物的名字會在加入世界時、在聊天在發送消息時、以及死亡時出現。角色的名字不一定要和 Steam 的用戶名或者主機的用戶名相同。在![]() 電腦版、
電腦版、![]() 主機版、和
主機版、和![]() 移動版中,可以在任何時候改變角色的名字。在
移動版中,可以在任何時候改變角色的名字。在![]() 前代主機版和任天堂
前代主機版和任天堂![]() 版中,角色的名字是不可更改的。
版中,角色的名字是不可更改的。
你可以選擇不同的角色難度選項:旅行(電腦版、主機版、和移動版)、軟核模式(也叫軟核)、中核、和硬核。備註:在任天堂![]() 版中,所有玩家都只能遊玩經典模式的角色,並且沒有難度設置。
版中,所有玩家都只能遊玩經典模式的角色,並且沒有難度設置。
角色難度設定決定當角色死亡時會發生什麼——它不會影響其它方面的遊戲體驗,包括敵怪的難度。
- 旅行模式會提供給玩家「研究」物品、並使用若干種作弊選項的能力,就如同限制版的創造模式一樣。玩家可以通過按下 C 來打開作弊菜單,這允許玩家啟用無敵模式、複製物品、設置時間和天氣、禁用enemy spawning等。不過,旅行模式的人物只能進入旅行模式的世界,在遊玩多人模式時也同樣如此。
- 經典或者軟核,意味着你會在死亡時掉落一部分錢幣,掉落量取決於世界難度。玩家會失去一半、3/4 抑或全部的錢幣。丟失的錢幣可以在返回後重新拾取,但玩家可能需要擊敗敵怪才能把它們拿回來。
- 中核意味着玩家會在死亡時丟失全部物品。如果是被熔岩或爆炸物殺死,抑或是在死亡後離開了世界,物品可能就會永久性地消失。
- 硬核則意味着玩家只有一條生命。死亡後,人物會被永久性地刪除。注意:硬核與困難模式不是同一個東西。困難模式指的是已經擊敗過血肉牆的世界所處的遊戲狀態。
初次遊玩時,推薦選擇「經典」或「軟核」模式,這樣就能玩得更輕鬆,不那麼挫敗。
外觀(可選)
可以從視覺上調整人物的外觀,玩家能夠改變角色的性別、髮型、眼睛的顏色、膚色和衣着。所有屬性(在 1.4 前,不包括眼睛的顏色和膚色)都可以在遊戲中通過使用特定的物品加以改變。

這些外觀選項除了影響視覺效果、玩家受傷聲音效果和偶爾的NPC引用外,在遊戲玩法上沒有任何影響。


- 顏色選擇欄使用色調/飽和度/亮度系統。頂部欄改變顏色;中部欄改變顏色的飽和度;底部欄將顏色從白色變暗或黑色變亮。 See HSV (Wikipedia) for a more technical explanation.
- Clothing will be obscured by your armor and vanity items. This can be undone by wearing the Familiar set as you progress.
- To change your clothing in-game later, use a Dresser. To change hairstyle, find the Stylist NPC. To change your gender appearance, drink a Gender Change Potion.
Once you are finished, click Create to confirm character creation with the settings chosen. Now, click Play on your character to enter the World Selection screen.
World Creation

Click the New button on the Select World screen to generate your first world. Players are not locked to a single world; however, we recommend completing the game using a single world at first to keep things simple.
Name and Seed
These two options won't have much effect if you're starting out.
- Your world's name is displayed on the Select World screen, and it will be shown to other players if you hosted a Multiplayer session. It also appears in a few death messages.
- The world seed is a randomly-generated number which represents the world that has been created. It can be copied and pasted to create an identical world.
世界大小
There are three options:
- Small worlds are relatively compact and easy to traverse; it will take you less time to travel between biomes and descend into caves. This makes the game easier at first, since traveling is relatively risky. However, small worlds generate fewer treasure items and natural resources, so you may have a hard time later on.
- Medium worlds are 50% larger than small worlds; they take a bit longer to travel through but have more space to generate treasure and extra biomes.
- Large worlds are twice the size of small worlds. It takes a long time to travel between biomes, but the size allows for nearly all possible terrain, treasure, and resources to generate in large quantities, aside from a few very rare structures. These worlds are useful if you are looking to build.
While world sizes are mostly similar in gameplay they can notably affect the length of a playthrough; which world size is best will vary from player to player and often depends on the amount of time one has on hand. Also note that that the bigger world option you choose, the longer the wait time will be for the world to generate.
難度
- Classic/Normal Mode worlds offer the standard Terraria experience.
- 專家模式(電腦版、主機版、和移動版) worlds have enhanced enemies and bosses, hazards, and valuable Expert-only treasure. Many of the Expert-only items can significantly help you, and can be worth the challenge.
- 大師模式(電腦版、主機版、和移動版) worlds have even more dangerous enemies and bosses, but don't provide much loot in return other than vanity items, bragging rights, and one extra accessory slot. All Expert items appear in Master Mode.
- 旅行模式(電腦版、主機版、和移動版) worlds are for Journey Mode characters only; they are the only worlds where the cheat menu can be used. Your Classic/Softcore character can't even log into a Journey world. Note that Journey mode has difficulty sliders ranging from 0.5x (the easiest) to 3.0x (equivalent Master mode). Sliding to 2x will enable all Expert mode features.
We recommend that you select Classic (also known as Normal) for your first playthrough.
世界邪惡
All Terraria worlds have one of two Evil biomes, that affect your ability to receive certain loot and changes a boss that you fight. On the ![]() 電腦版、
電腦版、![]() 主機版、和
主機版、和![]() 移動版, the world evil can be selected, whereas it is always random on the
移動版, the world evil can be selected, whereas it is always random on the ![]() 前代主機版和任天堂
前代主機版和任天堂![]() 版. While seeds for the non-native world evil can be bought later, artificial biome creation can be difficult.
版. While seeds for the non-native world evil can be bought later, artificial biome creation can be difficult.
- The Corruption, a purple-colored biome that generally offers both lower risk and reward, making it ideal for new players.
- The Crimson, a red-colored biome with themes of flesh and gore. Overall, its items are slightly more powerful, but the enemies are more dangerous. This makes it appealing to experienced players.

Click Create or Accept to generate your world; the game will display a progress bar until it is complete. Afterwards, press Play on the created world to start your adventure!
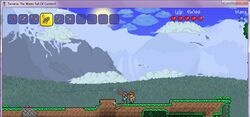
Beginning Gameplay

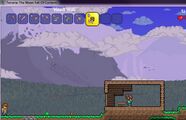
Upon entering a world for the first time, your character will appear at the center of the map, so you have half of the world to explore to the left, and half to the right. This location is known as the Spawn Point and will be where your character appears after you die, or whenever you enter the world. It's also marked with a Green Arrow on the Map in ![]() 電腦版、
電腦版、![]() 主機版、和
主機版、和![]() 移動版. Note: Avoid building exactly on this spot, as you could potentially break blocks when spawning in.
移動版. Note: Avoid building exactly on this spot, as you could potentially break blocks when spawning in.
You will notice you have a set of starter tools in your inventory, including a ![]() 銅短劍 (
銅短劍 (![]() 木劍 if playing on the 任天堂
木劍 if playing on the 任天堂![]() 版),
版), ![]() 銅鎬 and
銅鎬 and ![]() 銅斧.
銅斧.
Movement and Tool Use
- On
 電腦版 version, the game can be controlled using the Mouse and Keyboard. If you are using a controller, please see the console section further below.
- The cursor on the screen is moved using the mouse.
- ⚒ 使用/攻擊 (left-click) will activate the item currently selected in the hotbar, or attached to the cursor. This usually results in attacking with a weapon, placing/breaking a block, drinking a potion, etc.
- The WASD keys move the character (note that W is not for jumping).
- ↷ 跳 (spacebar) will make the character jump (or fly/swim/etc depending on your accessories).
- ⚷ 打開/激活 (right-click) will interact with placed objects like Chests and Doors. It is also for talking to NPCs and splitting stacks of items.
- T will cause your character to drop the currently selected item. It is recommended that you unbind this function or reassign it to a key that you won't press on accident, since it is not necessary for normal gameplay. (Items can also be thrown by dragging them out of the inventory and right-clicking).
- On the
 移動版, there will be a left joystick for movement, a right joystick for using items (alternatively tap anywhere on the screen to use an item or place a block), and other buttons to do various things, such as quick heal and Mounts. There is also a lightbulb button that will show each button's function once tapped that can be toggled on and off.
 - The console versions use controllers
 / Joy-Cons
  to control the game. The
  任天堂Switch版 also has touch screen capability when it isn’t docked, so some gameplay elements have mobile-like controls (e.g, main menu, inventory).
Hotbar and Inventory
物品欄
In the upper-left corner of the screen, you will see ten inventory slots labeled 1 through 10. These slots are referred to as the hotbar. They are a quick way of accessing commonly-used items. You can place any item into them from the inventory. To use the item, select the hotbar slot by pressing the associated number on the number row on the keyboard, use the scroll wheel to scroll to the right slot, or click a slot with the cursor. When you have selected a slot, you can press ⚒ 使用/攻擊 anywhere on the screen to use the selected item.
By pressing Esc or 物品欄 you open up the inventory. It consists of 40 inventory slots, 10 hotbar slots, 4 slots each for coins and ammo, a trash slot, and various armor/accessory slots. It also contains the crafting menu, which is used to craft items.
All newly created characters (in Classic/Softcore mode) begin with the following items in their inventory:
 銅短劍 (電腦版、主機版、前代主機版、和移動版) or
  木劍 (3DS版), used for killing enemies.
 銅鎬, used to dig blocks, as well as detaching placed items like Furniture.
 銅斧, used for chopping down Trees and Cactus to obtain Wood.
Note: Items may have a word as their prefix, such as "Demonic Copper Pickaxe" or "Broken Copper Shortsword". These will increase or decrease the item's base stats; see the Modifiers page for more information.
Rearranging the Inventory
Items in the inventory can be moved using the cursor. Pressing ⚒ 使用/攻擊 on an item will remove it from its slot and attach it to your cursor. Clicking again on another slot will set the item back down, swapping it for another if the slot already contains an item.
Moving a held item out of the inventory screen allows you to ⚒ 使用/攻擊 as if it were held in the hotbar; this can be used, for example, to drink a potion. Pressing ⚷ 打開/激活will throw the item onto the ground. this can be used to pass an item to another player in Multiplayer.
Certain inventory slots act in a special way.
- The ammo slots can only contain items that are either ammunition for Ranged weapons, wires for Wrenches or bait for Fishing poles. Keep in mind that the top-most Slot for ammo will be used first, followed by subsequent slots.
- The Coin slots can only hold coins, which may be dropped when you die. When you collect coins, they will be deposited into the Coin slots, automatically converting to the next highest denomination when appropriate (ex: 100 = 1, 100 = 1, etc). You can move coins to your normal inventory instead of the Coin slots (though subsequent money will still deposit to the Coin slots by default). This does not prevent Coin loss upon death.
- While you can drag items into the Trash slot (located in the lower-right section of your Inventory) to get rid of them, pressing Ctrlwhile clicking an item in your inventory will do so automatically. The last item placed in the Trash slot will remain until you trash another one, so be careful when quickly removing items, as you can only retrieve the last item placed there. Trashed items are also removed when logging out.
- Alternatively, while shopping with an NPC, you can drag/drop to sell items, or by pressing Ctrland clicking said item (instead of a trash icon, you'll see a coin icon, indicating a sale) . If you accidentally sell an item, you can buy it back for the same price - if it is still visible in the NPC's shop, but beware: once you sell an item and leave the dialogue, your sold items will disappear.
- If the NPC's inventory is full when you sell an item, it cannot be bought back. For this reason, it may be optimal to sell your items to an NPC who offers few items for sale (eg: not the
 酒館老闆(電腦版、主機版、和移動版), who may have a full inventory as-is).
- If the NPC's inventory is full when you sell an item, it cannot be bought back. For this reason, it may be optimal to sell your items to an NPC who offers few items for sale (eg: not the
- The equipment slots on the bottom-right/equipment menu/right are for items your character wears, such as armor and accessories. The Inventory will show you your character's Armor and Equipment slots. Upon clicking the icons at the top of those slots, you can see your "alternative" Equipment, such as Mounts, Pets, Hooks, Minecarts, and Light Pets.
Other interface elements
These red hearts beside the inventory indicate the character's Health. Each red heart equals 20 health. All characters begin with 100 health. This can be raised to 400 health using ![]() 生命水晶 found underground, and later 500 health with
生命水晶 found underground, and later 500 health with ![]() 生命果 found in the Jungle during Hardmode.
生命果 found in the Jungle during Hardmode.
You must keep your health above 0, or your character will die and re-appear at your Spawn Point. Health regenerates after a short period of not taking damage.
The blue star on the right side of the screen indicates the character's Mana. Each blue star is 20 mana.
All characters begin with 20 mana. This can be raised to 200 mana using ![]() 魔力水晶 and temporarily boosted further with some accessories and armor.
魔力水晶 and temporarily boosted further with some accessories and armor.
Mana is used to power Magic weapons; it regenerates similar to health, but at a much faster rate.
The First Day
After loading the world your character will be standing at the spawn point, with an NPC nearby, the ![]() 嚮導. You can talk to him by pressing ⚷ 打開/激活 with your mouse over him. He has some tips for new players, (電腦版、主機版、前代主機版、和移動版) and will show you the available crafting recipes if you give him a material. This option can be used at any point in the game.
嚮導. You can talk to him by pressing ⚷ 打開/激活 with your mouse over him. He has some tips for new players, (電腦版、主機版、前代主機版、和移動版) and will show you the available crafting recipes if you give him a material. This option can be used at any point in the game.
Digging and Placing
To dig, you first select your Copper Pickaxe. You are going to use this tool a lot, so you want to keep it on your hotbar. Now, if you move the cursor over a block near your character and press ⚒ 使用/攻擊, you will swing your Copper Pickaxe. After a few swings at the block, it will disappear and turn into a collectible item. Standing close to an item will cause you to collect it, which will put it in your inventory.
To place blocks, select a block by either putting it on your hotbar and selecting the hotbar slot or attaching it to the cursor and moving the cursor out of the inventory screen. Now move the cursor adjacent to a nearby block and click ⚒ 使用/攻擊. You will place the block. Holding down the button and moving the cursor to another empty space adjacent to a different block will place another block.
You can remove any previously placed blocks by digging them back out with your pickaxe, even the block originally connecting to the ground - blocks above it will not fall due to gravity.
Your axe must be used to destroy trees or blocks under trees, however.
There are some exceptions, such as ![]() 沙 and
沙 and ![]() 泥沙, which fall when there are no supporting blocks below them.
泥沙, which fall when there are no supporting blocks below them.
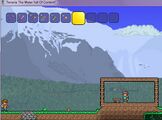
Safety and House building

Upon spawning your first goal should be to make yourself a ![]() 工作檯 from 10
工作檯 from 10 ![]() 木材, as it allows for the crafting of furniture as well as weapons that are crucial to survival.
木材, as it allows for the crafting of furniture as well as weapons that are crucial to survival.
- Making yourself a木劍 and
 木弓 will help greatly with enemies, although arrows will be required to use a bow, which can be made with Wood and
  石塊 later.
Once equipped, your goal should be to build a house. This will help you shelter from enemies which spawn during the night, helping you survive early on. A house designed for a player may consist of two walls and a roof; however, for a house to be habitable by an NPC, it must also be fully covered by background walls, have a ![]() 門 and light source, and contain at least one
門 and light source, and contain at least one ![]() 椅子 and one adjacent Work Bench or
椅子 and one adjacent Work Bench or ![]() 桌子 .
桌子 .
 火把 can be crafted with 1
  凝膠 dropped from
  史萊姆 and 1 Wood in groups of 3, and can be used to make useful tools such as a
  篝火(which will regenerate health) and
  烈焰箭.
烈焰箭.
- Despite producing light, Campfires will not count as a light source for NPC housing.
Every world spawns with you and the Guide at the spawn point. He is a valuable resource of information and help, so you want to protect him, although he can respawn later during the day with a valid house available.
Once you have collected about 200 wood, return to where you initially spawned and dig out 1 block underneath where you first appeared.
Time to get building!
- Steps of building a suitable House
1. Lay down the wood foundation;
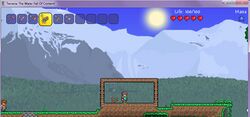
2. Make a box;

3. Craft a
 工作檯;
工作檯;
4. Place the Work bench down;
5. Craft 1
 門 and replace a side wall with it; (tip: replace both walls if you want mobility)
6. Craft
 木牆 and cover the interior of the house with it;
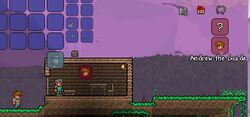
8. Assign the house to an NPC, in this case the
 嚮導.
嚮導.


You likely won't want to build more than 3 NPC houses in close proximity to one another to prevent increased prices.
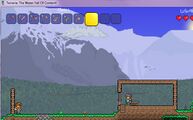
If you can't build a house before sunset, you can dig yourself 8 blocks into the ground and cover yourself up with ![]() 土.
土.
When Night falls, all NPCs will return to their designated houses and stop moving. NPCs without a house will walk around aimlessly. You can temporarily surround them with blocks to prevent enemies from reaching them.
Continuing on
Weapons

During your adventures in Terraria you will encounter many enemies. To fight them you use weapons. There are 5 main types of weapons:
- Melee weapons: These weapons are the most straight-forward. They are weapons that physically hit the enemy like Swords, Boomerangs and Flails.
- Ranged weapons: These weapons use a form of ammo to fire projectiles at distant enemies, such as Bows.
- Magic weapons: Magic weapons have various different attacks, but generally they shoot a magical projectile that costs Mana. Examples include the different Staves.
- Summoning weapons: These weapons summon a minion that targets enemies and combats them itself. The Slime Staff is an example of a summoning weapon.
- Throwing weapons: This is a minor weapon type that uses consumable, one use items to deal damage. They deal Ranged damage. In 1.3.0.1(電腦版、主機版、和移動版), they were made to have their own damage type, but were merged back with Ranged weapons in 1.4.0.1(電腦版、主機版、和移動版).
Good weapons in the early-game include:
- While a 木劍 will provide some protection you may be able to quickly upgrade to a
 針葉木(電腦版、主機版、前代主機版、和移動版) or
  仙人掌劍 if close by, although Deserts can be troubling for unequipped players.
- 木弓: While basic the Wooden Bow is extremely easy to obtain for its power, costing only 10 Wood and can be easily replaced if the player can find Boreal or Palm Wood in a nearby Desert or Tundra.
 雪球 are a cheap and surprisingly effective way to deal damage, gaining 15 Snowballs per
  雪塊 and dealing 8 damage per hit.
- Mages and Summoners are lacking in early-game weapons, but
 火花魔棒(電腦版、主機版、和移動版) and
  雀杖(電腦版、主機版、和移動版) can be found in Surface
  寶箱 with enough luck.
Armor
 木盔甲 is usually the first set of armor made, but swapping it with
  針葉(電腦版、主機版、前代主機版、和移動版) or
  仙人掌盔甲 can help if those resources are available.
- Wearing a matched set of armor is usually recommended, as the user will get a set bonus from wearing all pieces.
Healing
In Terraria, any damage done to the player will appear above their head as a red number. Damage done to enemies by players is shown with an orange number. When the player heals, the amount healed will be shown as a green number. To avoid dying, you can heal yourself using one of several healing items, with the H key or selecting the potion and pressing ⚒ 使用/攻擊.
 蘑菇 can be used to restore 15 health, but are rather ineffective and have better uses.
Note: Consumables like these give the ![]() 耐藥性 between uses. It prevents you to use any healing items for 60 seconds, so it's a good idea to avoid taking damage as much as you can.
耐藥性 between uses. It prevents you to use any healing items for 60 seconds, so it's a good idea to avoid taking damage as much as you can.
Mining and Exploration

Eventually, a ![]() 熔爐 will be needed. A Furnace can transform Ore into Bars, which are the materials of better Weapons, Tools, and Armor. Find deposits of Stone and mine up at least 20 blocks. Torches are also needed for creating a Furnace, so make sure to kill a few Slimes to get
熔爐 will be needed. A Furnace can transform Ore into Bars, which are the materials of better Weapons, Tools, and Armor. Find deposits of Stone and mine up at least 20 blocks. Torches are also needed for creating a Furnace, so make sure to kill a few Slimes to get ![]() 凝膠. Get
凝膠. Get ![]() 木材, head to the Work Bench, craft a Furnace and place it down.
木材, head to the Work Bench, craft a Furnace and place it down.
While exploring the world keep an eye out for oddly colored blocks, as these will most likely be ore deposits.
You will need to make an ![]() 鐵砧 or
鐵砧 or ![]() 鉛砧 (some worlds will have Lead instead of Iron). Anvils are used to create Items from Bars. Go find some
鉛砧 (some worlds will have Lead instead of Iron). Anvils are used to create Items from Bars. Go find some ![]() 鐵 or
鐵 or ![]() 鉛礦. In order to smelt one
鉛礦. In order to smelt one ![]() 鐵/
鐵/![]() 鉛錠, you need three ores. As you need five Bars to create the Anvil, 15 Iron/Lead Ore is needed. Once the ore is gathered and smelted at the Furnace, head to the work bench and create an Anvil. When placed down (preferably next to the Furnace) new Recipes become available.
鉛錠, you need three ores. As you need five Bars to create the Anvil, 15 Iron/Lead Ore is needed. Once the ore is gathered and smelted at the Furnace, head to the work bench and create an Anvil. When placed down (preferably next to the Furnace) new Recipes become available.
Cave exploration
There are a few options when choosing how to dig: Digging straight down or searching for an open cave to explore. At this early stage in the game use caution when digging holes. Using the blocks picked up while digging or creating ![]() 木平台, you can build a way back.
木平台, you can build a way back.
To illuminate your area you can hold a torch in your hand by putting torches in your hotbar and selecting it. You can put a torch on a wall or the ground by left clicking to place it. This will not only let you see mobs so you can fight them, mark the way back, and show where and how far you've gone if you come back to the same cave to explore further. In addition to placing torches, you can drop one in item form, which is useful for seeing what's at the bottom of a pit, and how far down it goes.
When exploring caves, you may find Pots. You can smash these with a weapon or tool to get some loot. You can also find Chests or ![]() 金箱. When you are near a chest you can right-click, which will show your inventory and the contents of the chest. You can click on a chest item to grab it, then click again on an inventory square to put it in your inventory. Alternatively, you could click "Loot All" to the right of the chest contents to grab everything. Once the chest is empty you can use your pickaxe to pick it up, take it with you, and then place it elsewhere, like you'd place any other piece of furniture (you can't mine chests if it's not completely empty however). It's recommended that you take a few of the chests you find back to your house to store stuff with, since crafting your own chests will use Iron Bars, and you'll want to save your iron for other purposes.
金箱. When you are near a chest you can right-click, which will show your inventory and the contents of the chest. You can click on a chest item to grab it, then click again on an inventory square to put it in your inventory. Alternatively, you could click "Loot All" to the right of the chest contents to grab everything. Once the chest is empty you can use your pickaxe to pick it up, take it with you, and then place it elsewhere, like you'd place any other piece of furniture (you can't mine chests if it's not completely empty however). It's recommended that you take a few of the chests you find back to your house to store stuff with, since crafting your own chests will use Iron Bars, and you'll want to save your iron for other purposes.
You'll find ![]() 蛛網 and can cut them down with any weapon or tool and then pick them up. Cobweb can be turned into
蛛網 and can cut them down with any weapon or tool and then pick them up. Cobweb can be turned into ![]() 絲綢, to make a
絲綢, to make a ![]() 床 at a loom, used to change your spawn point. The Green Arrow on the Map will not disappear when you do this. Silk can make decorative items and vanity clothing.
床 at a loom, used to change your spawn point. The Green Arrow on the Map will not disappear when you do this. Silk can make decorative items and vanity clothing.
While underground it is possible to come across pools of water. Torches do not work underwater, so you must use ![]() 熒光棒, but they cannot be crafted. You can throw them, but they will bounce and move around. You can craft
熒光棒, but they cannot be crafted. You can throw them, but they will bounce and move around. You can craft ![]() 粘性熒光棒 by combining Gel with a Glowstick; these will stick to walls when thrown, making them easier to place. No matter which you use, however, glowsticks are not permanent when thrown, unlike placed torches.
粘性熒光棒 by combining Gel with a Glowstick; these will stick to walls when thrown, making them easier to place. No matter which you use, however, glowsticks are not permanent when thrown, unlike placed torches.

When stepping into a pool of water the character will sink as if weighted down. Don't fear diving down underwater to continue moving downwards, as the character has a rather large air meter. However, if close to running out of air there is a way to regain air quickly. First either find a wall or make a small shaft at the bottom of the water, and then dig a tunnel in the wall and then upward in the ceiling. The water will not fill the upper squares. As the air supply runs low, jump into the hole. This will refill the meter.
If you see an area that glows blue and has blue mushrooms, congrats - you have found a Glowing Mushroom biome. This place is useful as it grows glowing mushrooms, so take some while you're there. When you return home, craft a bottle, place it on a table, and craft healing potions out of lesser healing potions and those glowing mushrooms. They heal for twice as much as lesser healing potions do, and are some of the best healing items pre-Hardmode, after ![]() 蜂蜜魚. A Gold Chest and a few
蜂蜜魚. A Gold Chest and a few ![]() 生命水晶 may also appear, feel free to loot them.
生命水晶 may also appear, feel free to loot them.
You may also encounter Gems or Gem Trees underground, which can be destroyed with a Pickaxe or Axe for Gems and Gemcorns.
In the event one encounters a Fairy following them is recommended, as they can lead to valuable ores and treasures that would otherwise be missed.
Afterward
Now that you've learned how to play and survive, the best thing to do would be to simply continue playing, discovering new things on your own. If you do get stuck, find something you're unsure about, or simply want detailed information about one of your items, look up what you need on the wiki, or check out the wiki's Walkthrough. It may be handy to check the Armor or Weapons pages for info on what direction to head next. You might also want to look at the pages about the Bosses of the game so you know what your long term task will be. And remember, you can play the game your way, so don't feel bound by the information on this wiki.
Tips
- Exiting the game then re-entering the world will bring you to your spawn point.
- Despite not being their primary use, Gel and Fallen Stars can be stored as ammo in the inventory, saving space.
- If you want to take full advantage of Magic or Summon weapons, gathering fallen stars at night to craft
 魔力水晶 to increase your maximum mana is vital.
- If you want to take full advantage of Magic or Summon weapons, gathering fallen stars at night to craft
- If you find
 向日葵, place some around your house. It gives some helpful bonuses that can make surviving easier.
- It's best to build your base close to the original Spawn point so you have less trouble returning to it at Night or if you respawn.
- When digging deep, it's useful to leave a way back up. The easiest way would be to leave Platforms on a side of the passage as a makeshift ladder, or placing
 繩 while digging the shaft.
 - Torches last forever so bring plenty along and place them liberally when going mining and exploring.
- Avoid the Corruption / Crimson early on as they contain tough enemies that will kill you.
- If you want an Anvil but do not want to use Bars or coins, you can find them in ruined houses underground.
- Placing NPCs in their favored biome and other liked NPCs can be an effective way to get discounts on goods; see NPCs/preferences for more details.
- Finding a Living Tree is an easy way to get a free NPC house by placing torches. Only works in pre-1.4 versions. 1.4 players may also find deadly gnomes. Leading them to an area without background walls during the day will turn them into objects, and will increase luck to nearby players.
- It is highly advisable to begin gathering materials for a few Buffs. You can quickly gather
 沙 and
沙 and  太陽花, as well as the
  太陽花種子 and
  粘土 used to begin Gardening with
  罐子.
罐子.
- If you travel far enough into or past the Snow biome, you will eventually come across a dark brick-patterned structure known as the Dungeon. Entering before summoning and killing the Dungeon's boss Skeletron is highly advised against, as
 地牢守衛 will spawn and instantly kill you.
更多信息
有關更多的進階信息,請查看下面列出的指南。
- 製作101——這是一篇關於製作的指南。它包含了製作的詳細解釋,以及製作站理想的配置方法。
- NPC——除了
 嚮導之外,這裡有更多你會想給它們建家的 NPC。
 - 基地——如何建造一座高效運轉的基地。
- 採礦技巧——此指南詳細解釋了採礦的簡單方法和比較困難的方法,以及向下探索泰拉瑞亞時會得到什麼。
- 園藝——如何種樹、蘑菇和其它一些東西。如果需要學習如何正確地建設和維護花園,這會是個很好的指南。
- 武器列表——可能找到的所有武器都會在這裡介紹。
- PvP——尋找與 PvP 戰鬥有關的信息的好地方。不太適合初學者,但適合那些曾經玩過 PvP 的玩家。
- 克蘇魯之眼的 Boss 戰——世界中,玩家需要與之對抗的 Boss 之一。
- 史萊姆王的 Boss 戰——玩家會在早期遇到的另一個 Boss。
所有指南下方,都有一個指南的詳細列表(就像本指南下面的那樣),你可以用此列表在不同指南之間快速移動。如果想了解更多信息,可以閱讀這些指南。