Guide:Farming resources
This guide will cover ways to farm various useful resources that generate naturally in the world, particularly plants. Many rare resources will naturally generate over time with certain conditions, which can be exploited by the player to safely obtain large quantities of them with less time and risk than normal exploration. For farming enemy drops, check the guides for enemy farming and money farming.
In general, if a farm here can be done on the surface, it should be done on the surface. Surface farms generate resources up to 6x faster than an equivalent underground farm.
Plants
Herbs
This content is transcluded from Herbs § Types.There are 7 different types of herbs.
| Plant | Seeds | Suitable soil | Blooming condition[1] | |
|---|---|---|---|---|
| BlinkrootInternal Item ID: 315 | At random | |||
| DaybloomInternal Item ID: 313 |
|
Daytime (4:30 AM to 7:29 PM) | ||
| DeathweedInternal Item ID: 316 |
|
Blood Moon or (Desktop, Console and Mobile versions) Full Moon at nighttime (7:30 PM to 4:29 AM) | ||
| FireblossomInternal Item ID: 318 | (Desktop, Console and Mobile versions) Sunset (3:45 PM to 7:30 PM) unless it is raining (Old-gen console and 3DS versions) Submersion in lava | |||
| MoonglowInternal Item ID: 314 | Nighttime (7:30 PM to 4:29 AM) | |||
| Shiverthorn(Desktop, Console, Old-gen console and Mobile versions)Internal Item ID: 2358 | At random, blooms permanently until harvested | |||
| WaterleafInternal Item ID: 317 | (Desktop, Console, Old-gen console and Mobile versions) Rain (3DS version) Submersion in water | |||
Herbs are a critical resource for potions, which drastically improve every aspect of play. While herbs do spawn naturally around the world, they regrow slowly, so farming your own herbs can give you far more potions to work with. To farm herbs, you need herb seeds, which you can get by breaking herbs when they are blooming, based on the conditions above, or by using a Staff of Regrowth.
The Staff of Regrowth or Axe of Regrowth(Desktop, Console and Mobile versions) is a major improvement both for collecting seeds and for farming herbs, as it provides 50% better average yield for both herbs and their seeds, and lets the player harvest seeds from mature herbs without worrying about blooming conditions. Herb farming can be done without it, but this may require you to actively seek out rare herb seeds when the conditions are right, and it will be slower.
Save herbs and seeds you get from exploration - it takes a while for herb farming to cover all of your potion making needs, and any herbs you get in the meantime let you make useful potions now. Holding onto seeds lets you get faster returns on herb farming.
If you need more herb seeds than what you get from exploration, you can create a bridge of blocks of the appropriate soil type with nothing above them. The more vertical space this bridge has above it, the faster herbs will spawn on the bridge, and this can also function as a way to farm Fallen Stars and Dyes as a sky bridge.
Herb seeds can be planted in soil, Clay Pots or Planter Boxes.
- Clay Pots can be placed on any tile, host any herb sprout, and their sprouts will not be destroyed accidentally from attacks or Hooks.
- This makes them safe and reliable for herb farming. If the player has Clay, this is the option to use earlygame.
- Planter Boxes do not need a supporting block and are bought instead of crafted, otherwise being similar to Clay Pots.
- This makes them more compact and generally the ideal option once the Dryad moves in.
- Despite Planter Boxes having several different variants, all Planter Box types work for all Herbs.
- Herbs can be farmed on bare soil, but they can be easily destroyed by a careless player. Planting seeds 2 blocks underground makes this option much safer and more appealing, and it's a good option for farming Blinkroot and Shiverthorn early on.
- Plain soil allows the Staff of Regrowth to harvest stage 2 herbs directly without them blooming. This can be useful for herbs like Shiverthorn and Waterleaf where blooming otherwise takes a long time, but their fragility is a very inconvenient downside.
- While Dart Traps could harvest a line of plain soil herbs all at once, this would waste a lot of immature sprouts and thus herb seeds that the player would have to spend more time replanting. Manual harvesting is best.

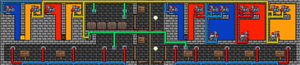
A simple Planter Box farm.

Herbs planted in soil underground to avoid being accidentally broken. Note that wood is used in the Blinkroot farm to prevent grass spread.


Trees

| Wood type | Grows in |
|---|---|
Trees provide Fruit, wood wands, and Fairies by Shaking them and various wood types from chopping them down.
The player can use smart cursor to place acorns automatically or place them manually 3 or more blocks apart. Trees need large vertical clearance (16 tiles for most trees, 24 for Jungle trees and 30 for Palm trees) to grow consistently. Most tree types can be farmed by just replacing acorns in natural terrain, but gem trees and ash trees may warrant clearing out an open space with flat ground for easier collection.
Overcrowded acorn sprouts will not grow, and sprouts without enough vertical space will grow shorter and more slowly.
- Most trees need at least one tile of empty ground (with matching soil) on either side of the sapling (Palm trees can get by without).
- If saplings are to be placed near each other, they also need an additional tile of space between them.
- Vertically, most tree types need 16 tiles of free vertical space above them; Jungle and Palm trees respectively need 24 and 30 tiles of space instead.
- Trees will not grow Underground (below 0 depth) or if the bottom tile of the sapling is covered by a wall, with the exception of fences and Glass Walls. Palm trees will not grow in front of any wall.
- Gemcorns will instead not grow above the surface, needing to be planted in the Underground or Cavern. Ash trees can grow at any height.
If farming wood, upgrade your Axe when possible, preferably to an Axe of Regrowth to save time replanting.
Gem Trees are slow. Not only do they mature slower due to being underground, they can also not drop gemcorns for replanting or gems. Save your gems for a Hook, then consider farming gems like Amber for Crate Potions once you have a good starting supply. You can instead find gems naturally underground or by using the Extractinator on Silt, Slush and Desert Fossils, and unless you want thousands of gems this will likely be your best option. You can also farm Geodes(Desktop, Console and Mobile versions) from Granite Cave enemies if you have an enemy farm set up. For more detailed instructions on Gem tree farming, see this Guide.
All tree saplings can be instantly grown using Fertilizer post-Skeletron. If the sprout does not grow, then it is not in valid conditions for growing at all and the farm will need to be changed.
Cacti, Bamboo, and Giant Glowing Mushrooms cannot be manually planted, but they will automatically grow on their respective surfaces if all conditions are met. Rich Mahogany Trees will grow automatically as well, but are faster to replant manually with Acorns. Both cacti and bamboo grow far faster from existing plants than in new spots; always leave the bottom tile in place to regrow when farming. Bamboo can also be fished from Jungle Crates if need be, but this is slow.
Pumpkin Seeds can be bought from the Dryad and planted every 2 blocks on flat ground, then harvested later by any weapon. Pumpkin can be used for Pumpkin Pies as a cheap and powerful food buff, for Pumpkin armor, for Pumpkin Medallions, or shimmered into Cactus more quickly than normal cactus farming. During Halloween, pumpkins can also drop a Magical Pumpkin Seed upon harvesting, even if those pumpkins were planted earlier.
Mushrooms
| Mushroom | Grows in |
|---|---|
All Mushroom types will grow naturally on their respective Grass surface. Usually, mushroom farms consist of several layers of dirt with 3 block tall gaps in between. All of these farms can use Fences as background walls to prevent enemy spawns.
Both vines from the layer above and grass on that layer will block further mushroom spawns. In layers where the player plans to walk through for collection, they can use platforms at the top to block vine spawns without bloating the farm.
Regular Mushrooms are used for Regeneration Potions, a fantastic and easy to craft earlygame buff that is equivalent to wearing an extra two Bands of Regeneration for free, as well as Restoration Potions and Lesser Healing Potions. This farm can also be used to farm Hay with the Sickle should the player need more blocks.
Vile and Vicious Mushroom farms are used for Vile and Vicious Powder, which allow you to craft boss summoning items for the Eater of Worlds or Brain of Cthulhu, respectively, or create your own evil stone or sand blocks. Cover the bottom with platforms or some other block to prevent the vines from corrupting the ground beneath, and use dirt instead of mud for faster mushroom growth. Thrown powders can also be shimmered into Purification Powder, making it obtainable in don't dig up worlds.
Glowing Mushrooms are used for Healing Potions and Shine Potions, have their own furniture set, and are required for Shroomite Bars in Hardmode. They grow very quickly, especially on the surface, and the vines can be harvested for mushrooms as well. Giant Glowing Mushrooms can also grow, but take up space and are annoying to harvest. Try to farm Glowing Mushrooms on the surface as with other farms, they grow much faster there.
Mushrooms can be automatically harvested with Dart Traps or Actuators. On the ![]() Old-gen console version and Nintendo
Old-gen console version and Nintendo ![]() version, Glowing Mushrooms have the unique ability to grow on actuated Mushroom grass; they will be immediately harvested as soon as they spawn, having their usual chance to drop as an item and/or seeds. This can be taken advantage of by building a large mushroom farm in the surface layer and letting it produce and harvest Glowing Mushrooms without player intervention. Note that such a farm may crowd the limit for loose items (which is 400), causing other loose items to despawn unexpectedly.
version, Glowing Mushrooms have the unique ability to grow on actuated Mushroom grass; they will be immediately harvested as soon as they spawn, having their usual chance to drop as an item and/or seeds. This can be taken advantage of by building a large mushroom farm in the surface layer and letting it produce and harvest Glowing Mushrooms without player intervention. Note that such a farm may crowd the limit for loose items (which is 400), causing other loose items to despawn unexpectedly.

Compact Mushroom farm.

Safely bounded Vile Mushroom farm.

A Glowing Mushroom farm.


Dyes
This content is transcluded from Dyes § Basic Dyes. Many dye materials grow naturally on blocks of the correct type, shown below:
| Basic Dye | Ingredients | Soil |
|---|---|---|
Orange Dye |
Bloodroot |
|
Yellow Dye |
Marigold |
|
Lime Dye |
||
Green Dye |
Mushroom |
|
Teal Dye |
Mushroom |
|
Sky Blue Dye |
Flower |
|
Blue Dye |
Berries |
|
Pink Dye |
Pear |
Grows on Cacti |
Most of these dyes can be farmed in the same way as the mushroom farms above, but dye plants will never grow within 90 tiles of another dye plant, and Strange Plants will never grow within 240 tiles of another Strange Plant. As these ranges can cover most or all of a farm, a better option is to make a sky bridge that can hold several dye plants on it for collection. A single layer skybridge over a whole small world will generate basic dyes around once per 100 seconds, and strange dyes once in 8~9 minutes; you can add a second layer just below the first to double dye production as well, but beware that vines will block dye plant spawns.
Yellow Marigolds and Blueberries will not spawn in front of any wall type, including fences. Pink Prickly Pears need cactus to grow on, making them easier to get while farming for cactus. Strange plants will grow on dirt and any grass that grows on it, or on Moss.
As dye plants need a large area for separation from other dye plants, it may be best to have the sky bridge high enough up that dye plants on the surface do not interfere with it; but this can also cause Harpies and Wyverns to spawn.
Jungle plants

Jungle grass can grow Jungle Spores, plant detritus that can be broken to catch critters for bait, and in Hardmode, Life Fruit and Plantera's Bulbs. This farm will need to be Underground or below for Life Fruit and in Cavern or below for Jungle Spores. Jungle plants are unique in that they can grow over each other; vines can block Jungle Spores, but plant detritus can break spores and vines, and Life Fruit and Bulbs will break everything but each other. Because of this, there is no need to block vine spawns in Jungle farms. If farming Jungle Spores, you will have to clear out plant detritus to make room, but if farming Life Fruit, you will not.
Move the Dryad to a Glowing Mushroom biome and buy Mushroom Grass Seeds, then transmute them into Jungle Grass Seeds to plant the farm. Use background walls to completely cover inside the farm to prevent enemy spawns and allow for torches to be placed without blocking plant growth.
It is worth considering making this farm far away from the actual Jungle. This guarantees the farm can always spawn a Plantera's Bulb and prevents dangerous Jungle enemies from spawning around your farm, giving you the safety to sleep and grow Life Fruit faster. A Metal Detector can let you monitor a huge range for Life Fruit spawns while sleeping. Using Actuators can instantly break all jungle plants and free them up for harvest, but will not produce as many critters as breaking all the detritus manually and collecting the critters as you go. It will also spawn Plantera if a bulb has grown.
Fishing
Fishing is a slow, but renewable and safe source for many otherwise-finite resources obtained from exploring. This requires a fishing pole, bait, and a liquid body to fish in.
Bait farming
Getting good bait can be a pain normally. When actively farming bait, best are Worms, Buggies, and Underworld critters like the Magma Snail.
For worms, you can farm large amounts of these with a surface enemy farm during Rain at an NPC town. With good spawn rates, you can get hundreds of worms in a single rain, and you also have a good chance of getting a Gold Worm that you can shimmer into a Gummy Worm or craft into a Golden Delight. Crafting worms into Enchanted Nightcrawlers is also helpful if you have the stars to spare. Unfortunately, rain is luck-dependent, and worm farming without rain is far slower, requiring a cavern layer farm without a town.
For Buggies, use the jungle plant farm mentioned above and break the large 3x2 plants. This gives three critter types, and Buggies are the best while Grubbies are the worst. Buggies are normally rare, but you can craft all jungle bait into Buggy Statues then decraft them at the Shimmer to convert all of them into Buggies. This approach has no time-dependence and slightly higher bait power, but requires more building and finding The Aether.
Underworld critters are unique in that they let you fish in Lava for Wet Bombs and Obsidifish. They can be farmed in the Underworld similar to farming worms on the surface, but more enemies will spawn in Underworld towns than Surface towns. To get around this, and to get higher spawn rates, position yourself in the cavern layer while your spawning surface is 10 blocks or more below the Underworld boundary; this will spawn lava critters much more quickly and with fewer enemy spawns. Note that you need a Lavaproof Bug Net or Golden Bug Net to catch Underworld critters.
Flower Boots(Desktop, Console and Mobile versions) can be combined with shooting a Flare at your feet to constantly produce and break flowers, but this does not produce critters due to Flower Boots drastically reducing critter spawns from breaking flowers. This can be an alternative way of getting Jungle Grass Seeds if the player has not found the Shimmer yet, though.
Liquids
Most fishing lakes require 300 or more tiles of liquid for optimal fishing, while oceans require 1001 tiles for ocean fish and honey only requires 200. You can find natural lakes that meet these size requirements around the world, but with no control over their location, they can be time-consuming to get to on return trips. Artificial lakes let you fish in the safety of your towns and Pylons.
The fastest liquid duplication is from liquid rockets, followed by liquid bombs, then Bottomless Buckets, then liquid duplication from buckets. Liquid rockets are post-Plantera, Bottomless Buckets require extensive fishing to obtain, and normal bucket liquid duplication is slow, so liquid bombs are often the best. They require fishing in lava, but the Underworld provides easy access to large lava pools; the main downside is that catching lava critters requires either beating the Eater of Worlds or Brain of Cthulhu for the Lavaproof Bug Net, or completing fishing quests for the Golden Bug Net.
Buckets work for liquid duplication because while they release a full tile of liquid, they only need half of a tile to be filled. This means you can place liquid on top of a split between a basin you want to fill and a side pocket, and fill the bucket from the side pocket. Water is best for this, as it flows quickly; lava and honey flow more slowly and require waiting for the liquid to flow for a bit before refilling the bucket. Instead of using bucket duplication on lava or honey, it is faster to duplicate large amounts of water, gather it in buckets, then shimmer those buckets into another liquid type. You can also let lava spread for a moment along flat ground, then fill your bucket again to cover a floor in lava without using up your bucket.
Besides preparing fishing pools, this also lets the player farm Obsidian, Honey Blocks, Crispy Honey Blocks, and Aetherium Blocks from colliding liquids. Note that Shimmer is very difficult to duplicate pre-Moon Lord, as it can only be moved by pumps, which are difficult to duplicate liquids with. This means the player has to instead abuse liquid flow mechanics to increase Shimmer amounts.

Use of a single liquid bucket to fill a fishing lake. Use only 1 bucket and hold ⚒ Use / Attack, with or without Smart Cursor. If duping lava or honey, wait between placing and collecting the liquid.
(Old-gen console and 3DS versions) Automated liquid generator, using pumps wired to a timer.

Use of a single tile's worth of Shimmer to fill a much larger container. Easiest when done with pumps.


Fishing items

The most important parts of fishing are catching as many catches with as high fishing power as possible, and fishing with a specific goal in mind so you know when to stop, which depends on what you are fishing for.
You should use your most powerful Fishing Pole and Bait, and that includes using Master Bait as you get it from Crates. You will eventually get more Master Bait than you can use anyways. Ale and a Toilet are easy to craft and give nice fishing power bonuses, or an Inner Tube can replace the toilet and Sake has a longer duration if you can obtain it. Use Fishing Potions always, and Crate Potions whenever you fish for crates or if you want more Master Bait. If Waterleaf is not a concern, then a Flipper Potion can also be used to sit on a toilet while using the Inner Tube, but this bonus is small.
Stacking these bonuses is a massive boost to fishing power. A Reinforced Fishing Pole and Enchanted Nightcrawler is 50 base fishing power, and adding in potions, ale, and a toilet brings that up to 75. Earlygame, your best fishing pole is the Fisher of Souls or Fleshcatcher, which can be upgraded into a Scarab Fishing Rod or Fiberglass Fishing Pole if obtained. Post-Skeletron, you can buy a Mechanic's Rod or Sitting Duck's Fishing Pole for another upgrade. Stacking fishing power with a Fleshcatcher and Nightcrawler lets you reach 82 base fishing power, and using a Mechanic's Rod and Master Bait lets you reach 110 base fishing power.
Fishing power gives a higher chance of better catches and makes catches faster, as well. Doubling fishing power will in general double the rate the player gets fishing catches, with an even bigger boost if the player is under 125 fishing power. This also doubles the rate of getting rare catches such as Golden Crates or Balloon Pufferfish, but has little effect on common catches like Armored Cavefish if the player already has high (~100) fishing power. Luck can improve fishing power, but only when generating a catch; it does nothing to speed up fishing catches, making it far less useful than fishing power.
When you should fish depends on how many Crate Potions you have. The best times to use Crate Potions are starting at 3:00~4:00 AM or 4:00~5:00 PM, due to these times offering high fishing power. If you have more Crate Potions or it is raining and/or a Full Moon, it can be worth it to use 2 potions consecutively, starting at 2:00~2:30 AM or 1:30~2:00 PM. More than 4 Crate Potions in one day is generally not efficient due to the remaining time having heavy fishing power penalties. If not fishing for crates, Ale or Sake can also be used to time fishing sessions. It is never worth it to blindly fish without stacking fishing power and potions, as this time can be better spent farming potions or doing anything else. Chum Buckets are also generally not worth it, due to the difficulty of farming for them and having to reapply them constantly.
With Crate Potions active, it is possible to have a permanently growing stack of Master Bait with no fishing accessories and 90 fishing power or more. Once you have a consistent stack of good bait, there is no reason to use Sonar Potions.
Fishing catch progress only occurs when the bobber is on the surface; it does not occur while the bobber is floating to the surface, while the bobber is being reeled in, or while a catch is currently tugging on the line. Especially at high fishing power, players can get much faster fishing catches by placing a block so that the bobber rebounds immediately to the surface at their position, letting them always work on the next catch. High fishing powers also make bite timings very consistent, so the player can time clicking to when the next fishing catch will come for even faster catches, but should be wary of reeling in too fast for a catch to occur.
Fishing is most often used to farm the following resources:
- Special fish which can be used for potions, such as Prismite or Armored Cavefish.
- Primary loot from Crates that matches Chests in that environment, most useful for rare loot like Shiny Red Balloons, Sandstorm in a Bottle, and Water Walking Boots or for duplicates in multiplayer worlds.
- Almost every chest item can be renewably obtained through fishing, with the notable exceptions of Gold Chest loot in pure caverns and Biome Chest weapons.
- Weapons, tools, and accessories exclusive to fishing, such as Liquid Bombs, Crystal Serpent, Reaver Shark, and Frog Leg. Note that Balloon Pufferfish can be shimmered into Shiny Red Balloons.
- Ores and bars from Crates, including Hardmode ores from their Hardmode variants, as well as potions, though normal mining and potion crafting is much faster.
Fishing also gives renewable access to some environmental resources such as clouds or Life Crystals, but these are so slow that you should only fish for these if you need more than what the world generated with. While fish can be cooked into food, players can also get food through Fruit, Cooked Marshmallows, or Pumpkin Pies much more quickly and easily, making this only a side benefit.
A full list of where you can catch what item can be found here.
The Angler
The Angler is not required for good fishing, but he does improve it with large fishing power boosts through the Angler Tackle Bag, Angler armor, Golden Fishing Rod, Fishing Bobbers, and potion/bait rewards as well as give unique items like the fishing Informational Accessories, the Fuzzy Carrot, and various Vanity Sets. You can turn in a new quest each time the time hits 4:30 AM; artificial fishing pools near Pylons can let you quickly find quest fish, while sleeping or using the Enchanted Sundial or Enchanted Moondial can pass time until the next quest more quickly.
The Angler's quest rewards are affected by happiness, so it is best to house him with the Demolitionist and Party Girl. He likes the Ocean, but the Demolitionist does not; however, as long as he is near the edge of the map, he will consider the underground layer to also be ocean, while the Demolitionist will be happy with being underground and the Party Girl can be made happy with an artificial Hallow biome.
When giving a reward, the Angler groups the components for the Tackle Bag, the Fish Finder, and the Fishing Bobber into one pool, and checks for the chance of giving any of them; if that succeeds, then he chooses one of the accessories the player does not have uniformly at random. This can be manipulated; if you want more Tackle Bag components for stacking Angler Earrings, you can throw your existing Tackle Bag or other components forward to remove them from your inventory. You can also shimmer Tackle Bag and Fish Finder components if need be; generally the Angler Earring is better than the High Test Fishing Line is better than the Tackle Box, while the Weather Radio is the best part of the Fish Finder as Sandstorms and rain can otherwise be hard to keep track of.
Miscellaneous resources
Shimmer
Shimmer allows easy farming of several resources by decrafting bought items or other easily farmed resources into forms that are otherwise harder to farm.
- Furnaces can be bought from the Merchant in the Jungle, and Iron Anvils can be bought whenever, which decraft into 20 stone, 4 wood, and 3 torches per furnace and 5 iron bars per anvil.
- Ale bought from the Tavernkeep can be shimmered into Mugs, then glass, then 2 Sand Blocks per ale bought.
- Mushroom Grass Seeds can be bought from the Dryad while in the Glowing Mushroom biome and then shimmered into Jungle Grass Seeds.
- Granite Blocks from Granite Cave enemies can be shimmered into Marble Blocks and vice versa.
- Dungeon Walls, Spider Walls, Lihzahrd Brick Walls, and Sandstone Walls can be shimmered into dangerous variants that can be used for enemy farming or farming Cobwebs.
- Honey Blocks and Crispy Honey Blocks can be shimmered into Hive, making the Abeemination and thus Queen Bee renewable.
Crystal Shards

Crystal Shards are used in Greater Healing Potions, Super Mana Potions, various weapons, and crystal-related ammo, as well as a high sell price. If looking to farm them for money, farm Pixie Dust as well to craft them into Greater Healing Potions at an Alchemy Table for better efficiency.
For farming, the easiest option is to place single horizontal rows of Pearlstone, separated by three tile-wide gaps for walking and harvesting. The farm must be in the Cavern layer or below. If the farm is not built in the Hallow, it should be sealed in a frame of non-infectable blocks with a three-block gap outside to prevent the Hallow from spreading. Note that there are some limits to how densely crystals can spawn, so farms should be harvested regularly to make room. If using actuators and wires, the up-front cost can make this less appealing as a money-making option.
Actuators can be used to switch Pearlstone to an inactive state, causing all Crystal Shards to drop for easy harvesting. For even greater convenience, Conveyor Belts can be used to move all dropped Crystals for easier collection.
On the Nintendo ![]() version, Crystal Shards are also dropped by Arch Demons, which can be used to farm shards through enemy farming.
version, Crystal Shards are also dropped by Arch Demons, which can be used to farm shards through enemy farming.
Meteorite
Meteors can fall after defeating the Eater of Worlds or Brain of Cthulhu, and the resulting Meteorite Ore can be used for Meteor Shot and Star Cannon. Meteors will try to fall straight down from near the top of the world, and you can control where they can land by making a sky bridge over portions of the world. Sky bridges are too thin, so the meteor will land elsewhere, making it easier to find them for collection.
Meteors will in general not land in water or on sky islands, and there needs to be 600 blocks in a 30x30 area for a meteor to land, but a meteorite's conversion zone is larger than this. Dirt Bombs and Sand can be used to speed up repairing meteor strikes.
You can force multiple meteors to spawn in a single night by defeating Eater of Worlds or Brain of Cthulhu multiple times between 12:00 AM and 4:30 AM.
Meteor Heads can drop Meteorite Ore in pre-hardmode, but at very low rates, taking hours to match the returns of a single meteorite even with optimal farming.
Chlorophyte
Chlorophyte Ore spawns naturally when Mud Blocks are within 10 tiles of Jungle Grass below halfway into the Underground layer. It then spreads to adjacent mud and jungle grass blocks naturally at any height, giving a few options for farming it. The fastest method is to farm it above the surface, due to the high update rate, while Cavern layer farms have a higher capacity relative to their size but spread more slowly and require clearing out underground spaces.
If farming on the surface, place 5x5 squares of mud with a couple chlorophyte ore inside, separated with at least 52 tiles of space between them. Doing this above a sky bridge allows for easy collection and large scale farming, and you can use Block Swap to seamlessly collect chlorophyte and place mud to be converted. This farm will reach capacity in around 15~20 minutes, faster if using more than 1 starting chlorophyte.
If farming in the Cavern or Underworld, place 7x7 squares of mud with at least 35 tiles of separation. The Underworld has more space for building, but also more dangerous spawns. Make this farm away from the natural Jungle to prevent natural chlorophyte from blocking spread. This farm will take upwards of 2 hours to reach capacity.
Chlorophyte Bricks can be used in place of chlorophyte to reduce the resources needed for starting the farm, as both spread as chlorophyte. In the don't dig up seed, chlorophyte has a far higher max capacity at all heights; there, use 7x7 squares of mud with 31 tiles of separation on the surface.
Other resources
- Cobwebs automatically regenerate on naturally occurring Infested Spider Walls found in Spider Nests. The player can also craft these walls and place them on the surface for faster generation.
- In for the worthy, Black Recluses and Jungle Creepers can place huge amounts of cobwebs with their web spit attack, far outpacing natural generation and quickly reaching even 100+ cobwebs per second.
- Fallen Stars fall from the sky every night, and can be easily collected with a sky bridge.
- Coral spawns spontaneously on submerged sand blocks above the surface in the Ocean biome. This occurs at a lesser rate with 1 tile of water, but is much faster with at least 5 tiles of water above the sand. This can also be used to farm other items like Starfish and Seashells. Note that actuating the sand beneath coral does not break it, though it does for everything else.
- Sandgun can shoot more sand than it uses with ammo conservation buffs, most useful for duplicating Ebonsand or Crimsand.
- Use Fossil Armor and an Ammo Reservation Potion for best results. Hardmode gives more options, but at that point you can just let evil biomes spread naturally.
- (Desktop, Console and Mobile versions) Dirt bombs can be crafted with 25 dirt and can yield 56 dirt when exploding on a single floating block, making dirt renewable without Shimmer.

A surface cobweb farm. Will not spawn spiders outside of The Constant.

A farm for Coral and other Ocean placeables. Coral must be manually collected.


Non-renewable
A complete list of items that are not renewable can be found at Non-renewable items. These can generally only be gathered by mining quickly through large areas.