Guide:Frost Moon strategies
The Frost Moon is one of the two post-Plantera Moon events, the other being the Pumpkin Moon. The event is significantly harder than its counterpart and yields less money; however, it drops more powerful weapons.
Due to the large variety of strong enemies and bosses, it can be hard to survive the event at first.
Event
Like the Pumpkin Moon, the event consists of multiple waves, with a final wave that will last until the night is over. While the Pumpkin Moon consists of 15 waves, the Frost Moon consists of 20. In order to progress through waves, the player must kill enemies, with stronger foes giving more points than weaker ones.
On the first Waves, the player will only encounter basic enemies, such as the ![]() Zombie Elves or
Zombie Elves or ![]() Elf Archers. As the event goes on, stronger enemies will spawn, including unique bosses.
Elf Archers. As the event goes on, stronger enemies will spawn, including unique bosses.
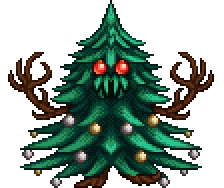
Starting at Wave 4, the first Everscream will appear, a miniboss enemy who behaves similarly to the Mourning Wood. Despite the high damage and the frequency of its attacks, it is not a difficult enemy to deal with due to its incredibly poor vertical reach and relatively low health for a miniboss.
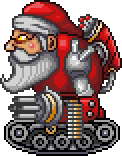
Starting at Wave 7, the powerful Santa-NK1 miniboss will start spawning. It will shoot bullets at a high rate with its Chain Gun, a barrage of Rockets, and Presents that will parachute from the sky. It also leaves Spiky Balls on the ground, which deal massive contact damage, being capable of killing a player in one hit on Master Mode. When it gets to half health, it will become more aggressive. The high damage and rate of fire of its Chain Gun make this miniboss extremely dangerous and a very high priority in the event.
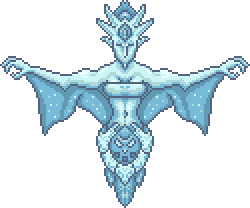
Starting at Wave 11, the Ice Queen will start spawning. She shoots Frost Waves, which deal moderate damage and have a high chance to inflict the ![]() Chilled and
Chilled and ![]() Frozen debuffs, which will greatly limit or stop mobility. She will also perform an "Ice Twirl" attack, where she will start spinning and shoot Frost Shards in all directions. While this attack can be hard to dodge, she also becomes extremely vulnerable to attacks since she will completely stop moving. A well prepared player will not have many issues with her, as a Warmth potion will make all her attacks deal significantly less damage, and the effects of the Chilled debuff can be negated with a Mount.
Frozen debuffs, which will greatly limit or stop mobility. She will also perform an "Ice Twirl" attack, where she will start spinning and shoot Frost Shards in all directions. While this attack can be hard to dodge, she also becomes extremely vulnerable to attacks since she will completely stop moving. A well prepared player will not have many issues with her, as a Warmth potion will make all her attacks deal significantly less damage, and the effects of the Chilled debuff can be negated with a Mount.
Throughout the event, Present Mimics will occasionally spawn in place of other enemies. This enemy, while not hard to kill, drops Hearts as if it were a miniboss, making it a valuable target.
Like with the Pumpkin Moon, focusing on damage is more important than prioritizing defense, as the goal is to progress through the event as fast as possible in order to obtain the best loot.

| Type | |
|---|---|
| Environment | |
| AI Type | Mourning Wood AI |
| Damage | 110/165/247 (contact) 86172258 (Pine Needle) 114228342 (Ornament) 80160240 (Ornament Shrapnel) [3] |
| Max Life | 13000/16900/21547 |
| Defense | 38 |
| KB Resist | 100% |
| Immune to |
| Coins | 1 GC2 GC50 SC |
|---|
- Item (Quantity)Rate
- Higher item drop chances in later waves[4]
- One of the following 4 items may be dropped
- One of these will always be dropped
during wave 14 and up - 3.46–10.37%6.22–31.11%
- 3.46–10.37%6.22–31.11%
- 3.46–10.37%6.22–31.11%
- 0.74–2.22%1.33–6.67%
 Everscream TrophyDuring wave 15 and up
 Shrub Star(Desktop, Console and Mobile versions)
 Everscream Relic(Desktop, Console and Mobile versions)

- Pine Needle (hostile)
")
- Ornament (hostile)
")
- Ornament Shrapnel

| Hurt | |
|---|---|
| Killed | |
| Pine Needle | |
| Ornament |
- Internal NPC ID: 344
- Internal Projectile ID: 345, 346, 347
| Type | |
|---|---|
| Environment | |
| AI Type | Santa-NK1 AI |
| Damage | 120/180/270 (contact) 72144216 (Bullet) 160320480 (Spike) 84168252 (Missile) 100200300 (Present) [1] |
| Max Life | 18000/23400/29835 |
| Defense | 56 |
| KB Resist | 100% |
| Immune to |
| Coins | 1 GC2 GC50 SC |
|---|
- Item (Quantity)Rate
- Higher item drop chances in later waves[2]
- One of the following 2 items may be dropped
- One of these will always be dropped
during wave 14 and up - 6.25–16.67%12.5–50%
- 6.25–16.67%12.5–50%
 Santa-NK1 TrophyDuring wave 15 and up
 Toy Tank(Desktop, Console and Mobile versions)
 Santa-NK1 Relic(Desktop, Console and Mobile versions)
- Deadeye Bullet

- Missile

- Present

- Spike

| Hurt | |
|---|---|
| Killed | |
| Bullet | |
| Missile |
- Internal NPC ID: 346
- Internal Projectile ID: 180, 350, 351, 352
| Type | |
|---|---|
| Environment | |
| AI Type | Ice Queen AI |
| Damage | 120/180/270 (Desktop, Console and Mobile versions) (contact) 110 (Old-gen console version) (contact) 84 (Frost Wave) 70–74 (Frost Shard)(contact) 168 (Frost Wave) 140–148 (Frost Shard)(contact) 252 (Frost Wave) 210–222 (Frost Shard)[5] |
| Max Life | 34000/44200/56355 |
| Defense | 38 |
| KB Resist | 100% |
| Immune to |
| Debuff | |
|---|---|
| Debuff tooltip | Your movement speed has been reduced |
| Chance | 100% (Frost Wave) 66.67% (Frost Shard) |
| Duration | 5–10 seconds10–20 seconds12.5–25 seconds (see Notes) |
| Debuff | |
|---|---|
| Debuff tooltip | You can't move! |
| Chance | 16.54% (Frost Wave) |
| Duration | ≤ 1 ≤ 2 ≤ 2.5 (see Notes) |
| Coins | 5 GC12 GC50 SC |
|---|
- Item (Quantity)Rate
- Higher item drop chances in later waves[6]
- One of the following 4 items may be dropped
- One of these will always be dropped
during wave 14 and up - 5.19–10.37%15.56–31.11%
- 5.19–10.37%15.56–31.11%
- 5.19–10.37%15.56–31.11%
- 1.11–2.22%3.33–6.67%
 Reindeer BellsDuring wave 15 and up
 Ice Queen TrophyDuring wave 15 and up
 Frozen Crown(Desktop, Console and Mobile versions)
 Ice Queen Relic(Desktop, Console and Mobile versions)


- Frost Wave

- Frost Shard

| Hurt | |
|---|---|
| Killed | |
| Frost Wave | |
| Frost Shard |
- Internal NPC ID: 345
- Internal Buff ID: 46, 47
- Internal Projectile ID: 348, 349
General Strategies
General Tips
This content is transcluded from Guide:Practical tips § Combat.
- For nocturnal bosses, starting the battle just after the sun sets (7:30 PM) will provide the maximum amount of time to defeat the boss. In Hardmode, the
 Moon Charm and/or
  Moon Stone and their upgrades are also useful at night.
 - Boss battles can be won or lost before the battle ever starts. Choose your equipment and have it ready; find and/or make potions and placed buffs; use the highest-tier food you have available; set up an arena appropriate to the boss; learn the strategies for the boss you're facing.
- Prepare your Boss-fighting arena with adequate lighting,
 Campfires and
  Heart Lanterns for health regeneration, and
  Stars in Bottles for mana regeneration if you use magic.
  Bast Statues(Desktop, Console and Mobile versions) will provide a significant defensive boost.
  Garden Gnomes(Desktop, Console and Mobile versions) and (Desktop, Console and Mobile versions) (if underground) proper torch placement will reduce damage taken and increase damage dealt due to the luck. The Torch God's Favor(Desktop, Console and Mobile versions) helps with this.
  Honey pools can also be used for extra health regeneration.
 - (Desktop, Console and Mobile versions)
 Sunflowers provide the
  Happy!(Desktop, Console and Mobile versions) buff to nearby players, which grants a +10% movement speed bonus and 17% reduction in enemy spawn rate.
 - Always carry around a stack of the highest-tier healing potion available, as relying only on natural Health Regeneration is not a good idea. Depending on the game stage, this can include items such as
 Lesser Healing Potions or
  Honeyfins. On the
  Desktop,
  Console, and
  Mobile versions,
  Restoration Potions are healing potions with a shorter cooldown.
- Likewise carry mana potions, if you use Magic.
- The
 Strange Brew(Desktop, Console and Mobile versions) is also an option, which yields very similar healing abilities to Healing Potion with added chances to trigger periods of invulnerability upon consumption.
 - On the
 Old-gen console version and Nintendo
  version, Restoration Potions can save a slot, but will likewise trigger both cooldowns.
- It is suggested to build houses for the
 Dryad and the
  Nurse NPCs in your arena. The former casts the
  Dryad's Blessing(Desktop, Console and Mobile versions) buff, which increases your defense and provides you with a thorns-like effect, while the latter can heal and remove debuffs instantly, at the cost of some
  coins.
 - Bosses are displayed on the Minimap: Follow the boss's icon to track it when you're struggling to find it. You can identify the boss icons by checking their respective wiki pages.
- Once you have freed the
 Mechanic in the Dungeon, you can use
  Wire to enhance your arena with
  Traps and helpful
  Heart and
  Star Statues. The former helps to damage the enemies, though be careful to set them up correctly in order not to hurt yourself during the battle. The latter will spawn heart and star pickups, respectively. Connect these devices to
  timers to activate them infinitely.
 - In Hardmode, the
 Brand of the Inferno(Desktop, Console and Mobile versions) and
  Sergeant United Shield(Desktop, Console and Mobile versions) can be used to parry incoming contact damage.
 - It may be useful to summon and kill the Eye of Cthulhu or King Slime before summoning any harder boss in order to spawn an extra one-use pool of Hearts. Note that this will prevent any Heart Statues from spawning new Hearts.
- Remember to use the
 Sharpening Station(Desktop, Console and Mobile versions),
  Ammo Box(Desktop, Console, Old-gen console and Mobile versions),
  Crystal Ball,
  Bewitching Table(Desktop, Console and Mobile versions),
  War Table(Desktop, Console and Mobile versions), and
  Slice of Cake(Desktop, Console and Mobile versions) before you go to explore or battle bosses/invasions. These will give boosts that are useful to have, with the first five being class-specific. They give
  Sharpened(Desktop, Console and Mobile versions),
  Ammo Box(Desktop, Console, Old-gen console and Mobile versions),
  Clairvoyance,
  Bewitched(Desktop, Console and Mobile versions),
  Strategist(Desktop, Console and Mobile versions), and
  Sugar Rush(Desktop, Console and Mobile versions), respectively.
Terrain Preparation
This content is transcluded from Guide:Arena.


The Pumpkin and Frost Moons are much easier to handle with the proper arena.
A flat surface about 168 blocks wide (See NPC spawning) will focus all spawns on the arena. Above it there should be a long platform of the same width, high above the ground in order to keep grounded enemies out of reach.
Since the player will mostly focus on the Bosses on the later waves, Lava pit and Traps may be helpful to take out the weaker enemies more easily. However, on higher difficulties the Traps' low damage is practically useless against the higher-health enemies, making them almost a liability due to the invincibility frames they provide and the risk of being hit by them and taking massive damage in the process.
It's also a good idea to make a room with a ![]() Bed near the Arena, so in case of death you can quickly get back to it.
Bed near the Arena, so in case of death you can quickly get back to it.
Gearing up
The event can be summoned at any time post-Plantera, however due to its difficulty it is usually done after Duke Fishron and the Pumpkin Moon, but before the Empress of Light and the Celestial Events.
Armor
- For Melee,
 Beetle armor with Scale Mail for offense. While Beetle Shell greatly increases survivability, it is better to maximize DPS when doing the event to increase the chances of getting loot out of it.
 - Rangers should use the


 Shroomite armor with the headpiece that suits their weapon. Its set bonus is situational but very useful in multiplayer mode and the earlier waves.
- It is better to swap the Shroomite Leggings for Spooky Greaves, as one extra minion and increased summon damage are generally more useful than the slight increase in critical strike chance and the set bonus. Additionally, the Shroomite Breastplate can be replaced with the Red Riding Dress, which will give a massive 25% summon damage bonus at the cost of an insignificant amount of ranged DPS.
- For a mage, the
 Spectre armor(Desktop, Console, Old-gen console and Mobile versions) should be used with the Spectre Mask. The
  Hood should only be used to heal in a critical situation.
- A hybrid set consisting of
 Hallowed Headgear,
  Valhalla Knight's Breastplate(Desktop, Console and Mobile versions), and
  Dark Artist's Leggings(Desktop, Console and Mobile versions) provides comparable offensive bonuses along with rapid health regeneration.
- A hybrid set consisting of
- The best armor for Summoners is the
 Spooky armor.
 - The sentry set bonuses from the


 armors sold by the Tavernkeep shine in the moon events, as they can kill all of the grounded enemies easily.
Weapons
- For melee users
- The
 Terra Blade,
  Influx Waver(Desktop, Console and Mobile versions) and
  Seedler(Desktop, Console and Mobile versions) are very reliable swords for both single targets and crowds. However, the
  Flying Dragon(Desktop, Console and Mobile versions) is an immensely devastating option, that, although requires beating the post-Golem Old One's Army, contends well with all of the Frost Moon's enemies with the right gear.
 - The
 Keybrand has high DPS against enemies below 40% health, but it requires a Cross Necklace to be used efficiently. The
  Psycho Knife(Desktop, Console and Mobile versions) is stronger against enemies with higher health.
  Starlight(Desktop, Console and Mobile versions) is a safer and stronger alternative, however, it requires defeating the difficult Empress of Light.
- Once obtained, the
 North Pole can be used to easily clear out hordes of enemies by firing spears into the air, blanketing enemies in large amounts of damaging snowflakes.
 - The
 Flairon can be strong against the Ice Queens, but it is very underperforming against grounded enemies and crowds.
  Vampire Knives can be used to quickly heal in critical situations, but has low DPS.
- A
 Flask of Ichor significantly boosts damage output the most out of all other flasks.
- For ranged users
 Tsunami with
  Holy Arrows is an extremely powerful weapon, being one of if not the best when it comes to reaching the final wave without endgame equipment.
- The
 Electrosphere Launcher(Desktop, Console and Mobile versions) is very effective for crowd control and single targets alike. The
  Stynger is a weaker alternative. The
  Snowman Cannon becomes a powerful option as well after it is obtained, especially when paired with
  Mini Nuke I(Desktop, Console and Mobile versions)s or
  Rocket IIIs.
 - The
 Xenopopper(Desktop, Console and Mobile versions) (or
  Chain Gun, once obtained) paired with
  Crystal Bullets is the strongest gun available.
- For magic users
- The
 Razorblade Typhoon can plow through waves of enemies, although its single target DPS against bosses is rather lacking.
 - The
 Bubble Gun,
  Laser Machinegun(Desktop, Console and Mobile versions),
  Charged Blaster Cannon(Desktop, Console and Mobile versions) are best used against minibosses on the Desktop version, Console version, and Mobile version.
 - If playing on the Old-gen console version and Nintendo version, the
 Bat Scepter,
  Heat Ray and
  Spectre Staff all help against enemies with higher health. The
  Razorpine and
  Blizzard Staff are by far the best options once they are obtained, as both possess high single-target damage.
 - The
 Magnet Sphere,
  Rainbow Gun,
  Nimbus Rod,
  Golden Shower, and
  Betsy's Wrath(Desktop, Console and Mobile versions) are very good secondary weapons.
- For summoners
- The
 Kaleidoscope(Desktop, Console and Mobile versions),
  Morning Star(Desktop, Console and Mobile versions), and
  Dark Harvest(Desktop, Console and Mobile versions) are the best whips in the game. They can serve specific scenarios and summoning-based playstyles.
- The Morning Star and Kaleidoscope are relatively interchangeable whips that provide large summon tag damage boosts to minions and sentries.
- Although it doesn't provide summon tag damage boosts, the Dark Harvest provides a useful attack speed buff while attacking enemies and deals damage to nearby enemies while hitting in tandem with a minion.
- The
 Xeno Staff(Desktop, Console and Mobile versions) is an extremely powerful and competent minion with consistent DPS. It is much more suited to taking down single targets, however.
  Tempest Staff has slightly lower DPS and a much less competent AI, but is still viable against crowds of enemies.
- The
 Terraprisma(Desktop, Console and Mobile versions) is an extremely powerful and useful minion that can clear waves of enemies and weaker minibosses alike. However, it can be difficult to obtain, due to it being dropped after defeating the daytime Empress of Light.
 - Summon weapons that enhance only a single minion at one time, such as the
 Desert Tiger Staff(Desktop, Console and Mobile versions), are not recommended, due to the large number of spawned enemies.
 - The
 Ballista Staff(Desktop, Console and Mobile versions),
  Flameburst Staff(Desktop, Console and Mobile versions), and
  Explosive Trap Staff(Desktop, Console and Mobile versions) are reliable damage-dealing sentries that can be even further enhanced by wearing Tavernkeep armors.
 - The
 Staff of the Frost Hydra is the best sentry available if you don't want to fight the Old One's Army. Its projectiles inflict Frostbite(Desktop, Console and Mobile versions) and deal relatively high damage.
Accessories
- Wings, particularly those with hovering abilities such as Betsy's Wings or the Hoverboard are helpful. However, it's much better to use Mounts instead, as they are unaffected by the Chilled debuff and save accessory slots that would be used for mobility items.
- For melee users:
- The
 Fire Gauntlet is the best accessory to have at this stage, especially on Desktop version, Console version, and Mobile version, due to its useful flame debuff ((Desktop, Console and Mobile versions)Hellfire or (Old-gen console and 3DS versions)On Fire!), boosts to melee damage, and, on the Desktop version, Console version, and Mobile version, the ability to grant autoswing to all melee weapons.
 - The
 Frozen Shield(Desktop, Console and Mobile versions), is great for survivability, and can also be worn by other classes for extra protection.
- The
- For magic users:
- The
 Celestial Cuffs(Desktop, Console, Old-gen console and Mobile versions),
  Mana Cloak(Desktop, Console and Mobile versions), and/or
  Magnet Flower(Desktop, Console and Mobile versions) are the best magic-focused accessories at this stage and suit many different playstyles.
- The
- For ranged users:
- The
 Magic Quiver and/or
  Sniper Scope should be equipped to maximize damage dealt by the player's arrows and bullets. On the Desktop version, Console version, and Mobile version, the Magic Quiver can be upgraded into the
  Molten Quiver(Desktop, Console and Mobile versions) or the
  Stalker's Quiver(Desktop, Console and Mobile versions), while the Sniper Scope can be upgraded into the
  Recon Scope(Desktop, Console and Mobile versions). However, these upgrades add relatively few advantages to their precursors.
- The
- For summoners:
- The
 Papyrus Scarab can be obtained as soon as the Pumpkin Moon is cleared and provides a powerful boost to summon damage.
 - The
 Pygmy Necklace can also be obtained relatively easily from the Witch Doctor.
 - Generally, most damage-increasing accessories such as class-specific Emblems,
 Destroyer Emblem,
  Celestial Shell(Desktop, Console and Mobile versions), and/or the
  Celestial Stone are extremely important to progress in the events.
 - If the player can obtain one, a
 Hand Warmer(Desktop, Console, Old-gen console and Mobile versions) can prove helpful while fighting Ice Queens due to providing immunity to the Chilled and Frozen debuffs.
Accessories should be modified to Lucky or Menacing for the event.
Mounts
Mounts allow you to use another accessory instead of Wings and other support mobility items and are unaffected by the Chilled debuff, making them a much-preferred movement option.
- The
 Brain Scrambler(Desktop, Console and Mobile versions) and the Master Mode exclusive
  Toy Tank(Desktop, Console and Mobile versions) are the most efficient mounts due to their incredibly grounded mobility and their helpful passive attack.
 - The
 Shrimpy Truffle(Desktop, Console and Mobile versions),
  Witch's Broom(Desktop, Console and Mobile versions)
  Cosmic Car Key(Desktop, Console and Mobile versions) provide permanent flight but are much slower overall.
Potions
 Heartreach Potion is extremely helpful against the minibosses, as it will allow you to pick up their dropped hearts with no effort.
 Warmth Potion(Desktop, Console, Old-gen console and Mobile versions) makes the Ice Queen significantly easier to deal with.
 Regeneration Potion,
  Endurance Potion,
  Lifeforce Potion, and
  Ironskin Potion will greatly increase survivability.
- Any food item that provides the
 Well Fed buff is good.
  Mana Regeneration Potion is a must for mages.
 Rage Potion and
  Wrath Potion will improve DPS.
 Magic Power Potion,
  Archery Potion,
  Ale or
  Sake(Desktop, Console, Old-gen console and Mobile versions) and
  Summoning Potion will further improve it for Mages, Rangers, Melee, and Summoner users respectively.
Fighting enemies and bosses
- Present Mimics can appear at any time during the event, and drop as many hearts as regular mini-bosses do upon being killed. However, they spawn as stationary enemies, so be on the lookout for them and preferably fire projectiles in all directions on occasion to have better chances of hitting them.
- Elf Copters, which start appearing at Wave 6, can be annoying encounters, as they hover a little beyond the player's reach and shoot bullets that are extremely quick. Players may not notice them while contending with other enemies, so it incentivizes constant movement on the player's end to avoid getting hit.
- Yetis, which start appearing at Wave 12, are very tanky enemies that deal immense contact damage on top of being immune to knockback. With a high defense value of 50, prioritize keeping your distance and lowering their defense as much as possible with area-of-effect attacks, preferably with a combination of ichor-inflicting weapons and the Betsy's Wrath(Desktop, Console and Mobile versions). Lowering their contact damage with a Warmth Potion(Desktop, Console, Old-gen console and Mobile versions) is also a good strategy.
In priority for mini-bosses that should be taken down first:
1. Santa-NK1
- The Santa-NK1 deals by far the highest amounts of damage throughout the entire event, especially with its missiles and presents. Do not attempt to fight them on the ground while traveling on the same horizontal level as them, as they move exponentially faster as their health lowers while also releasing big red spiky balls, which linger on solid tiles and deal incredibly lethal damage, especially on Master Mode difficulty.
- Be careful with attempting to pick up their drops after defeating them as well, as the hearts they drop blend in with lingering spiky balls. Using a Heartreach Potion can alleviate this issue.
- The Santa-NK1's bullets and missiles aim directly at the player, while the presents are only fired directly above themselves.
- Using wings to fly over their bullets is recommended, but remember to also watch out for missiles and presents. Missiles emit light, but presents do not, so remember to keep your eyes peeled and fight these powerful minibosses in a well-lit arena.
- As with other tanky, high-defense enemies, lowering their defense helps make taking them out quick and easy.
- If they are too big of an issue to handle, it may be preferred to make them despawn by fighting Frost Moon enemies in an arena with platforms. They, alongside Everscreams, will simply fall through platforms until they land on solid tiles, making them despawn. However, the player will miss out on obtaining their valuable drops.
2. Ice Queen
- An arena of platforms can help a player avoid her attacks. Running along a straight line of platforms above ground level with a pair of boots or a high-speed land-based mount, such as
 Lilith's Necklace(Desktop, Console and Mobile versions), the Brain Scrambler(Desktop, Console and Mobile versions) or the Master-exclusive
  Toy Tank(Desktop, Console and Mobile versions) or
  Hexxed Branch(Desktop, Console and Mobile versions), helps in avoiding her Frost Waves and the attack where she drops icicles on top of the player. Frost Waves can be avoided by dashing (with items like the
  Master Ninja Gear) below her as she fires them, which can maneuver players through gaps. Stray Frost Waves that hit the player can have also their damage potentially negated with the Expert-exclusive Brain of Confusion or Master Ninja Gear as well.
 - It may be helpful to bring along an
 Ice Rod to contend with her, as the temporary ice blocks it creates shield the player from both of her icicle attacks. This is only helpful, however, with the platform arena strategy listed above, as this strategy lowers the spawned amount of Everscreams and Santa-NK1s.
 - The silly spinning attack that causes her to fire icicles in random directions is the moment she is most vulnerable and also when she deals the least amount of damage. Capitalize on these opportunities to deal as much damage to her as possible. Minimizing damage taken during this attack can be done by positioning yourself away from her in one of the four cardinal directions.
- As listed above, drinking one Warmth Potion will last for the entire night, lowering the damage of her attacks significantly. If the player can get their hands on one, equipping a
 Hand Warmer(Desktop, Console, Old-gen console and Mobile versions) is also helpful in preventing the player from getting Chilled for long periods or from getting Frozen, which leaves the player highly vulnerable. The
  Ankh Shield also works for negating Chilled.
 - Ironically, the Blizzard Staff works wonders with taking her down if the player can manage to obtain one from her, and can be used in tandem with Spectre armor(Desktop, Console, Old-gen console and Mobile versions) (with the Mask equipped) to quickly decimate groups of Ice Queens.
3. Everscream
- Their ornament attack can be avoided easily by standing on a row of platforms above ground level. This strategy also works somewhat with the pine needle attack, though to a lesser degree as they can travel farther distances. Pine needles, however, only aim at the location the player was before the attack was initiated, so simply get out of the way of their line of fire to avoid taking unnecessary damage. Additionally, the Everscream's attacks cannot pass through walls, so use this to your advantage.
- Compared to the other two mini-bosses, they pose rather little risk to the player in later waves. However, due to their relatively low health and difficulty, it is recommended to focus on taking them down if they appear, as they easily drop enough hearts to heal the player and to tank heavy hits from stronger mini-bosses. In addition, they are much easier to spot than Present Mimics, which can have difficulty spawning in harder waves.
- ↑ Information taken from the Desktop 1.4.4.9 source code,
AI()inTerraria.NPC.cs. The relevant part is theaiStyle == 61block. - ↑ See Frost Moon § Loot for more details on the loot drop rates.
- ↑ Information taken from the Desktop 1.4.0.5 source code,
AI()inTerraria.NPC.cs. The relevant part is theaiStyle == 57block. There may be inaccuracies, as the current Desktop version is 1.4.4.9.
- ↑ See Frost Moon § Loot for more details on the loot drop rates.
- ↑ Information taken from the Desktop 1.4.0.5 source code,
AI()inTerraria.NPC.cs. The relevant part is theaiStyle == 60block. There may be inaccuracies, as the current Desktop version is 1.4.4.9.
- ↑ See Frost Moon § Loot for more details on the loot drop rates.