가이드:시작하기

Terraria에 오신걸 환영합니다!
이 가이드는 당신의 세계를 돌아보는 여정을 시작하는 데 도움이 될 것입니다. 캐릭터 만들기, 전투, 게임 초기 팁과 같은 게임 기본 사항을 다루고, 추가적인 조언을 위해 다른 가이드로 안내할 것이입니다. 테라리아를 시작하는 단계별 튜토리얼을 읽어보세요! This guide will help you get started on your journey through your world. It will cover gameplay basics like character creation, combat, and early-game tips, and direct you to other guides for further advice. Keep reading for a step-by-step tutorial on how to begin Terraria!
게임 모드
테라리아의 타이틀 화면에서 플레이하고 싶은 게임 모드를 선택할 수 있습니다. 이 예에서 우리는 "싱글 플레이어"를 선택할 것이지만, 친구들과 모험을 시작하고 싶다면 "멀티플레이어!"를 선택할 수 있습니다. 사용 가능한 옵션은 ![]()
![]()
![]() , and
, and ![]() 버전의 Single Player 또는 [Multiplayer]] 또는
버전의 Single Player 또는 [Multiplayer]] 또는 ![]()
![]() 틀:Old-gen console 아이콘, and
틀:Old-gen console 아이콘, and ![]() 버전의 Play Game입니다.
버전의 Play Game입니다.
틀:Console version, 틀:Old-gen console 아이콘![]() 틀:Old-gen console 아이콘, and
틀:Old-gen console 아이콘, and ![]() 버전에는 튜토리얼을 먼저 완료하는 것이 좋습니다.
버전에는 튜토리얼을 먼저 완료하는 것이 좋습니다.
이 가이드는 당신이 싱글 플레이어를 선택했다고 가정할 것입니다; 게임을 배우는 것이 더 쉽기 때문에, 친구들과 노는 것을 막지 마세요.
그러니 초기 게임에서 마스터가 되는 법을 배워봅시다!
캐릭터 생성

게임 모드를 선택한 후, 자신만의 캐릭터를 만들고 선택해야 합니다. 오른쪽 하단의 신규 버튼을 클릭하여 캐릭터 생성 화면을 엽니다. 여기서, 당신은 다음과 같은 캐릭터의 특성을 변경할 수 있습니다: 머리카락, 머리 색깔, 의류 스타일과 색상, 피부색, 눈 색깔!
이름 및 난이도
당신의 character's 이름은 world에 로그인할 때, chat에서 메시지를 보낼 때, 그리고 당신이 die를 보낼 때마다 표시됩니다. 스팀이나 콘솔 사용자 이름과 동일할 필요는 없습니다. ![]()
![]()
![]()
![]() , and
, and ![]() 에서 원하는 시간에 캐릭터 이름을 변경할 수 있습니다.틀:Verify
에서 원하는 시간에 캐릭터 이름을 변경할 수 있습니다.틀:Verify ![]()
![]() 틀:Old-gen console 아이콘
틀:Old-gen console 아이콘![]() , and
, and ![]() 에서는 나중에 캐릭터 이름을 변경할 수 없습니다.
에서는 나중에 캐릭터 이름을 변경할 수 없습니다.
다른 문자 어려움 옵션을 선택할 수 있습니다: Journey, Classic (소프트코어라고도 함), Mediumcore 및 Hardcore. 틀:Note
캐릭터 난이도 설정은 캐릭터가 죽으면 어떤 일이 일어나는지 결정합니다. enemies이 얼마나 어려울지 포함하여 게임플레이의 다른 측면에는 영향을 미치지 않습니다.
- 여행 모드는 플레이어에게 "연구" 항목과 제한된 크리에이티브 모드와 같은 다양한 치트 옵션에 액세스할 수 있는 기능을 제공합니다. 여행 캐릭터는 틀:Key를 눌러 치트 메뉴에 액세스하여 Godmode를 활성화하고, 항목을 복제하고, 시간과 날씨을 설정하고, 적의 산란을 비활성화할 수 있습니다. 그러나, 저니 캐릭터는 멀티플레이어 플레이를 포함하여 저니 모드 세계에서만 입장할 수 있습니다.
- 클래식 또는 소프트코어는 당신이 죽을 때 당신의 동전 중 일부를 떨어뜨린다는 것을 의미합니다. 세계의 난이도에 따라, 동전의 절반, 틀:Expert 또는 틀:Master을 떨어뜨릴 수 있습니다. 잃어버린 동전은 죽음의 위치로 돌아가면 픽업할 수 있지만, 그들을 되찾기 위해 적을 물리쳐야 할 수도 있습니다.
- 미디엄코어는 당신이 죽을 때 가지고 다니는 모든 물품을 떨어뜨린다는 것을 의미합니다. 용암에 빠지거나, 폭발물에 의해 죽거나, 세상을 떠나면 영구적으로 손실될 수 있습니다.
- 하드코어는 생명이 1개밖에 없다는 것을 의미합니다. 죽으면 캐릭터 파일은 영구적으로 삭제됩니다. 틀:Note
새로운 플레이어에게 더 쉬운 시간과 덜 실망스러운 경험을 제공하기 때문에 첫 번째 플레이스루를 위해 '클래식'/'소프트코어를 선택하는 것이 좋습니다.
외형 (선택사항)
캐릭터는 성별 외모, 헤어스타일, 눈 색깔, 피부색 및 옷을 변경하여 시각적으로 사용자 정의할 수 있습니다. 눈과 피부색(1.4 이전)을 제외한 모든 것은 특정 아이템을 사용하여 게임 내에서 변경할 수 있습니다.
외모 옵션 중 어느 것도 비주얼, 플레이어가 음향 효과를 다치게 하고, 가끔 NPC 따옴표를 제외하고는 게임플레이에 영향을 미치지 않습니다.


- 색상 선택 표시줄은 색조/채도/가치 시스템을 사용합니다. 상단 막대는 기본 색상을 변경합니다; 중간은 색상이 얼마나 희미해졌는지 변경합니다; 하단 막대는 색상을 흰색에서 검은색으로 밝게 하거나 어둡게 합니다. 더 기술적인 설명은 HSV (Wikipedia)를 참조하십시오.
- 옷은 당신의 갑옷과 허영용품에 의해 가려질 것입니다. 이것은 당신이 진행함에 따라 Familiar set를 착용함으로써 취소될 수 있습니다.
- 나중에 게임 내에서 옷을 바꾸려면, 드레서를 사용하세요. 헤어스타일을 바꾸려면, 스타일리스트 NPC를 찾으세요. 당신의 성별 외모를 바꾸려면, 성별 변화 물약을 마시세요.
완료되면, 만들기를 클릭하여 선택한 설정으로 캐릭터 생성을 확인하세요. 이제 캐릭터의 '재생을 클릭하여 세계 선택 화면으로 들어가세요.
세계 생성

Select World 화면에서 New 버튼을 클릭하여 첫 번째 세계를 생성하세요. 플레이어는 단일 세계에 잠겨 있지 않지만, 일을 단순하게 유지하기 위해 처음에는 단일 세계를 사용하여 게임을 완료하는 것이 좋습니다.
이름 및 시드 (선택사항)
이 두 옵션은 당신이 시작한다면 큰 영향을 미치지 않을 것입니다.
- 당신의 세계 이름은 선택 세계 화면에 표시되며, 멀티플레이어 세션을 주최한 경우 다른 플레이어에게 표시됩니다. 그것은 또한 몇 가지 죽음의 메시지에 나타난다.
- 세계 씨앗은 창조된 세계를 나타내는 무작위로 생성된 숫자이다. 그것은 동일한 세상을 만들기 위해 복사하고 붙여넣을 수 있다.
세계크기
세 가지 옵션이 있습니다:
- 작은 세계는 상대적으로 콤팩트하고 통과하기 쉽다; 바이오메스 사이를 여행하고 caves로 내려가는 데 시간이 덜 걸릴 것이다. 이것은 여행이 상대적으로 위험하기 때문에 처음에는 게임을 더 쉽게 만든다. 그러나, 작은 세계는 보물과 천연 자원을 덜 생성하므로, 나중에 어려움을 겪을 수 있습니다.
- '중간'의 세계는 작은 세계보다 50% 더 크다; 그들은 여행하는 데 조금 더 오래 걸리지만 보물과 여분의 생물군을 생성할 수 있는 더 많은 공간이 있다.
- '' 세계는 작은 세계의 두 배 크기이다. 생물군계 사이를 여행하는 데는 오랜 시간이 걸리지만, 크기는 몇 가지 매우 희귀한 구조물을 제외하고 거의 모든 가능한 지형, 보물 및 자원을 대량으로 생성할 수 있게 해준다. 이 세계들은 당신이 건설하고자 한다면 유용하다.
세계 크기는 게임플레이에서 대부분 비슷하지만 플레이스루의 길이에 특히 영향을 미칠 수 있습니다; 어떤 세계 크기가 가장 좋은지는 플레이어마다 다르며 종종 손에 든 시간에 따라 달라집니다. 또한 더 큰 세계 옵션을 선택할수록, 세계가 생성하기 위한 대기 시간이 길어진다는 점에 유의하십시오.
난이도
- 클래식/노멀 모드 세계는 표준 테라리아 경험을 제공합니다.
- Expert Mode 세계는 적과 보스, 위험, 그리고 귀중한 전문가 전용 보물을 강화했습니다. 많은 전문가 전용 항목은 당신에게 크게 도움이 될 수 있으며, 도전할 가치가 있을 수 있습니다.
- 마스터 모드 세계에는 훨씬 더 위험한 적과 보스가 있지만, 화장대 아이템, 자랑권, 그리고 하나의 추가 액세서리 슬롯 외에는 많은 전리품을 제공하지 않습니다. 모든 전문가 항목은 마스터 모드로 나타납니다.
- Journey Mode 세계는 여행 모드 캐릭터 전용이며, 치트 메뉴를 사용할 수 있는 유일한 세계입니다. 당신의 클래식/소프트코어 캐릭터는 여행 세계에 로그인할 수도 없습니다. 여행 모드에는 0.5배(가장 쉬운 것)에서 3.0배(동등한 마스터 모드)에 이르는 난이도 슬라이더가 있습니다. 2배로 슬라이딩하면 모든 전문가 모드 기능을 활성화할 수 있습니다.
첫 번째 플레이스루를 위해 Classic('Normal라고도 함)을 선택하는 것이 좋습니다.
세계 오염
모든 테라리아 세계에는 특정 전리품을 받고 싸우는 보스를 바꾸는 능력에 영향을 미치는 두 개의 [[악의 생물군계] 중 하나가 있습니다. ![]()
![]() , and
, and ![]() 에서, 세계 악은 적어도 하나의 세계에서 Hardmode에 도달한 후에만 선택될 수 있다; 그 전에는 항상 무작위일 것이다. 비원주민 세계의 악에 대한 씨앗은 나중에 살 수 있지만, 인공 생물군계 창조는 어려울 수 있다.
에서, 세계 악은 적어도 하나의 세계에서 Hardmode에 도달한 후에만 선택될 수 있다; 그 전에는 항상 무작위일 것이다. 비원주민 세계의 악에 대한 씨앗은 나중에 살 수 있지만, 인공 생물군계 창조는 어려울 수 있다.
- 부패는 일반적으로 더 낮은 위험과 보상을 모두 제공하는 보라색 생물군계이며, 새로운 플레이어에게 이상적입니다.
- 크림슨, 살과 고아를 주제로 한 붉은 색의 생물군계. 전반적으로, 그 물건은 약간 더 강력하지만, 적들은 더 위험하다. 이것은 경험 많은 선수들에게 매력적이다.

Create 또는 Accept를 클릭하여 세상을 생성하십시오. 게임이 완료될 때까지 진행률 표시줄이 표시됩니다. 그 후, 창조된 세계에서 Play를 눌러 모험을 시작하세요!
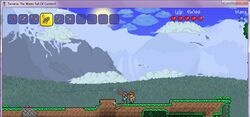
게임 시작

처음으로 세계에 들어가면, 당신의 캐릭터가 지도 중앙에 나타날 것이므로, 세계의 절반은 왼쪽으로, 반은 오른쪽으로 탐험할 수 있습니다. 이 위치는 Spawn Point로 알려져 있으며, 당신이 죽은 후 또는 세상에 들어올 때마다 당신의 캐릭터가 나타나는 곳이 될 것입니다. 또한 ![]()
![]()
![]()
![]() , and
, and ![]() 의 Map에 녹색 화살표로 표시됩니다. 틀:Note
의 Map에 녹색 화살표로 표시됩니다. 틀:Note
![]()
![]() , and
, and ![]() 에서 재생하는 경우
에서 재생하는 경우 ![]() Copper Shortsword(
Copper Shortsword(![]() Wooden Sword),
Wooden Sword), ![]() Copper Pickaxe 및
Copper Pickaxe 및 ![]() Copper Axe를 포함한 스타터 도구 세트가 있습니다.
Copper Axe를 포함한 스타터 도구 세트가 있습니다.
이동 및 도구 사용
- 틀:Desktop 버전에서는 마우스와 키보드를 사용하여 게임을 제어할 수 있습니다. 컨트롤러를 사용하는 경우, 아래의 콘솔 섹션을 참조하십시오.
- 화면의 커서는 마우스를 사용하여 이동합니다.
- 틀:Key (왼쪽 클릭)는 현재 핫바에서 선택되었거나 커서에 연결된 항목을 활성화합니다. 이것은 보통 무기로 공격하고, 블록을 놓거나 부수고, 물약을 마시는 등의 행동을 합니다.
- 틀:Key틀:Key틀:Key틀:Key 키는 문자를 이동합니다(틀:Key는 점프를 위한 not'입니다).
- 틀:Key (스페이스바)는 액세서리에 따라 캐릭터를 점프(또는 플라이/수영/등)합니다.
- 틀:Key (오른쪽 클릭)는 Chests 및 Doors와 같은 배치된 객체와 상호 작용합니다. 그것은 또한 NPC와 이야기하고 항목 스택을 나누기 위한 것입니다.
- 틀:Key는 캐릭터가 현재 선택된 항목을 삭제하게 합니다. 정상적인 게임 플레이에 필요하지 않기 때문에 이 기능을 바인드'하거나 사고로 누르지 않을 키에 재할당하는 것이 좋습니다. (아이템은 인벤토리에서 드래그하고 마우스 오른쪽 버튼을 클릭하여 던질 수도 있습니다.)
- 틀:모바일 버전에는 움직임을 위한 왼쪽 조이스틱, 아이템을 사용하기 위한 오른쪽 조이스틱(또는 화면의 아무 곳이나 탭하여 아이템을 사용하거나 블록을 배치하세요), 그리고 빠른 치유와 마운트와 같은 다양한 일을 할 수 있는 다른 버튼이 있습니다. 탭하면 켜고 끌 수 있는 각 버튼의 기능을 보여주는 전구 버튼도 있습니다.
- 콘솔 버전은 컨트롤러 틀:Icon/console / Joy-Cons 틀:Icon/switch를 사용하여 게임을 제어합니다. 틀:Switch version는 도킹되지 않을 때 터치 스크린 기능도 있으므로 일부 게임플레이 요소에는 모바일과 같은 컨트롤(예: 메인 메뉴, 인벤토리)이 있습니다.
- 왼쪽 조이스틱은 캐릭터를 움직이고, 오른쪽 조이스틱은 커서를 움직입니다.
- 하단 얼굴 버튼은 캐릭터를 점프하게 합니다.
- 범퍼는 핫 바 슬롯을 바꿉니다.
- 상단면 버튼은 재고를 엽니다.
- 오른쪽 트리거 공격/[Blocks|block]]을 배치합니다.
- 왼쪽 방아쇠는 세상과 상호 작용한다.
핫바와 인벤토리
재고
틀:Main
화면의 왼쪽 상단 모서리에 1부터 10까지 표시된 10개의 재고 슬롯이 표시됩니다. 이 슬롯들은 '핫바라고 불린다. 그것들은 일반적으로 사용되는 항목에 접근하는 빠른 방법입니다. 재고에서 모든 물품을 넣을 수 있습니다. 항목을 사용하려면 키보드의 숫자 행에 연결된 숫자를 눌러 핫바 슬롯을 선택하거나, 스크롤 휠을 사용하여 오른쪽 슬롯으로 스크롤하거나, 커서가 있는 슬롯을 클릭하세요. 슬롯을 선택하면 화면의 어느 곳에서나 틀:Key를 눌러 선택한 항목을 사용할 수 있습니다.
틀:Key 또는 틀:Key를 누르면 재고가 열립니다. 그것은 40개의 재고 슬롯, 10개의 핫바 슬롯, 동전과 탄약을 위한 4개의 슬롯, 쓰레기 슬롯, 그리고 다양한 armor/액세서리 슬롯으로 구성되어 있습니다. 그것은 또한 아이템을 만드는 데 사용되는 공예 메뉴를 포함합니다.
새로 생성된 모든 캐릭터(클래식/소프트코어 모드)는 인벤토리의 다음 항목으로 시작합니다:
 Copper Shortsword or
  Wooden Sword , 적을 죽이는 데 사용됩니다.
 Copper Pickaxe는 블록을 파고 가구과 같은 배치된 항목을 분리하는 데 사용됩니다.
 Copper Axe, 나무와 Cactus를 자르기 위해 나무를 얻는 데 사용됩니다.
틀:Note
재고 재배치
인벤토리의 항목은 커서를 사용하여 이동할 수 있습니다. 항목에서 틀:Key를 누르면 슬롯에서 제거하고 커서에 부착합니다. 다른 슬롯을 다시 클릭하면 항목이 다시 아래로 설정되며, 슬롯에 이미 항목이 포함되어 있는 경우 다른 슬롯으로 바꿉니다.
보관된 항목을 인벤토리 화면에서 이동하면 마치 핫바에 보관된 것처럼 틀:Key를 할 수 있습니다. 예를 들어 potion을 마시는 데 사용할 수 있습니다. 틀:Key을 누르면 아이템을 땅에 던집니다. 이것은 멀티플레이어에서 다른 플레이어에게 아이템을 전달하는 데 사용할 수 있습니다.
특정 재고 슬롯은 특별한 방식으로 작동합니다.
- 탄약 슬롯에는 거리 무기, 렌치 또는 낚시 기둥의 미끼에 대한 ammunition 항목만 포함할 수 있습니다. 탄약의 가장 높은 슬롯이 먼저 사용되고, 그 다음에 슬롯이 사용된다는 것을 명심하세요.
- 동전 슬롯은 당신이 죽을 때 떨어질 수 있는 동전만 보관할 수 있습니다. 동전을 수집하면 동전 슬롯에 입금되며, 적절한 경우 자동으로 다음으로 높은 교단으로 변환됩니다(예: 100 = 1, 100 = 1 등). 코인 슬롯 대신 일반 재고로 동전을 옮길 수 있습니다 (후자의 돈은 여전히 기본적으로 코인 슬롯에 입금됩니다). 이것은 사망 시 동전 손실을 막지 못합니다.
- 재고의 오른쪽 하단 섹션에 있는 휴지통 슬롯으로 항목을 드래그하여 제거할 수 있지만, 틀:Key을 누른 상태에서 인벤토리의 항목을 클릭하면 자동으로 처리됩니다. 휴지통 슬롯에 놓인 마지막 항목은 다른 항목을 버릴 때까지 남아 있으므로, 거기에 놓인 '마지막' 항목만 검색할 수 있으므로 항목을 빠르게 제거할 때 주의하십시오. 로그아웃할 때 쓰레기 항목도 제거됩니다.
- 또는 NPC로 쇼핑하는 동안 드래그/드롭하여 아이템을 판매하거나 틀:Key를 누르고 해당 항목을 클릭할 수 있습니다(쓰레기 아이콘 대신 판매를 나타내는 동전 아이콘이 표시됩니다). 실수로 물건을 팔면, 같은 가격으로 다시 살 수 있습니다 - NPC의 가게에서 여전히 볼 수 있지만, 아이템을 판매하고 대화상자를 떠나면, 판매된 상품은 사라집니다.
- 상품을 판매할 때 NPC의 재고가 가득 차면, 다시 구매할 수 없습니다. 이러한 이유로, 판매 품목이 거의 없는 NPC에게 상품을 판매하는 것이 최적일 수 있습니다(예: 전체 재고가 있는
 Tavernkeep가 아닙니다).
- 상품을 판매할 때 NPC의 재고가 가득 차면, 다시 구매할 수 없습니다. 이러한 이유로, 판매 품목이 거의 없는 NPC에게 상품을 판매하는 것이 최적일 수 있습니다(예: 전체 재고가 있는
- 오른쪽 하단/장비 메뉴/오른쪽의 장비 슬롯은 갑옷과 액세서리와 같은 캐릭터가 착용하는 품목을 위한 것입니다. 인벤토리는 캐릭터의 갑옷과 장비 슬롯을 보여줄 것입니다. 슬롯 상단의 아이콘을 클릭하면 Mounts, Pets, Hooks, Minecarts 및 Light Pets와 같은 "대체" 장비를 볼 수 있습니다.
다른 인터페이스 요소
목록 옆에 있는 이 빨간 심장은 캐릭터의 건강을 나타냅니다. 각 붉은 심장은 20개의 생명력을 가집니다. 모든 캐릭터는 100개의 체력으로 시작합니다. 이것은 지하에서 발견된 ![]() Life Crystal를 사용하여 400개의 생명으로 올릴 수 있으며, 나중에 Hardmode 동안 Jungle에서 발견된
Life Crystal를 사용하여 400개의 생명으로 올릴 수 있으며, 나중에 Hardmode 동안 Jungle에서 발견된 ![]() Life Fruit로 500개의 생명으로 올릴 수 있습니다.
Life Fruit로 500개의 생명으로 올릴 수 있습니다.
당신은 당신의 건강을 0 이상으로 유지해야 합니다, 그렇지 않으면 당신의 캐릭터가 죽어서 스폰 포인트에 다시 나타날 것입니다. 건강은 손상을 입지 않은 짧은 기간 후에 재생된다.
화면 오른쪽의 파란색 별은 캐릭터의 마나를 나타냅니다. 각 푸른 별은 20마나 입니다.
모든 캐릭터는 20 마나로 시작합니다. 이것은 ![]() Mana Crystal를 사용하여 200 마나로 올릴 수 있으며 일부 액세서리와 armor로 일시적으로 더 높일 수 있습니다.
Mana Crystal를 사용하여 200 마나로 올릴 수 있으며 일부 액세서리와 armor로 일시적으로 더 높일 수 있습니다.
마나는 마법의 무기에 전력을 공급하는 데 사용됩니다; 그것은 건강과 비슷하지만, 훨씬 더 빠른 속도로 재생됩니다.
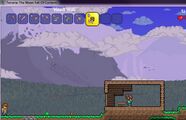
The First Day
After loading the world your character will be standing at the spawn point, with an NPC nearby, the ![]() Guide. You can talk to him by pressing 틀:Key with your mouse over him. He has some tips for new players, and will show you the available crafting recipes if you give him a material. This option can be used at any point in the game.
Guide. You can talk to him by pressing 틀:Key with your mouse over him. He has some tips for new players, and will show you the available crafting recipes if you give him a material. This option can be used at any point in the game.
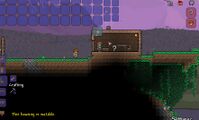
Digging and Placing
To dig, you first select your Copper Pickaxe. You are going to use this tool a lot, so you want to keep it on your hotbar. Now, if you move the cursor over a block near your character and press 틀:Key, you will swing your Copper Pickaxe. After a few swings at the block, it will disappear and turn into a collectible item. Standing close to an item will cause you to collect it, which will put it in your inventory.
To place blocks, select a block by either putting it on your hotbar and selecting the hotbar slot or attaching it to the cursor and moving the cursor out of the inventory screen. Now move the cursor adjacent to a nearby block and click 틀:Key. You will place the block. Holding down the button and moving the cursor to another empty space adjacent to a different block will place another block.
You can remove any previously placed blocks by digging them back out with your pickaxe, even the block originally connecting to the ground - blocks above it will not fall due to gravity.
Your axe must be used to destroy trees or blocks under trees, however.
틀:Note
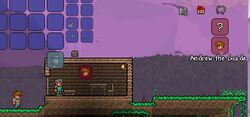
Safety and House building

틀:Main
Upon spawning your first goal should be to make yourself a ![]() Work Bench from 10
Work Bench from 10 ![]() Wood, as it allows for the crafting of furniture as well as weapons that are crucial to survival.
Wood, as it allows for the crafting of furniture as well as weapons that are crucial to survival.
- Making yourself aWooden Sword and
 Wooden Bow will help greatly with enemies, although arrows will be required to use a bow, which can be made with Wood and
  Stone Block later.
Once equipped, your goal should be to build a house. This will help you shelter from enemies which spawn during the night, helping you survive early on. A house designed for a player may consist of two walls and a roof; however, for a house to be habitable by an NPC, it must also be fully covered by background walls, have a ![]() Door and light source, and contain at least one
Door and light source, and contain at least one ![]() Chair and one adjacent Work Bench or
Chair and one adjacent Work Bench or ![]() Table .
Table .
 Torch can be crafted with 1
  Gel dropped from
  Slimes and 1 Wood in groups of 3, and can be used to make useful tools such as a
  Campfire(which will regenerate health) and
  Flaming Arrow.
- Despite producing light, Campfires will not count as a light source for NPC housing.
Every world spawns with you and the Guide at the spawn point. He is a valuable resource of information and help, so you want to protect him, although he can respawn later during the day with a valid house available.
Once you have collected about 200 wood, return to where you initially spawned and dig out 1 block underneath where you first appeared.
Time to get building!
- Steps of building a suitable House
1. Lay down the wood foundation;
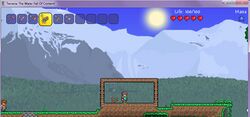
2. Make a box;

3. Craft a
 Work Bench;
4. Place the Work bench down;
5. Craft 1
 Door and replace a side wall with it; (tip: replace both walls if you want mobility)
6. Craft
 Wood Wall and cover the interior of the house with it;
7. Craft and place
Torch, and a  Chair;
8. Assign the house to an NPC, in this case the
 Guide.


- Tip:
 Work Benches are considered Tables for purposes of NPC Housing. You can replace Tables with them. For more info, consult Housing.
- Tip:
You likely won't want to build more than 3 NPC houses in close proximity to one another to prevent increased prices.
If you can't build a house before sunset, you can dig yourself 8 blocks into the ground and cover yourself up with ![]() Dirt.
Dirt.
When Night falls, all NPCs will return to their designated houses and stop moving. NPCs without a house will walk around aimlessly. You can temporarily surround them with blocks to prevent enemies from reaching them.
Continuing on
Weapons

During your adventures in Terraria you will encounter many enemies. To fight them you use weapons. There are 5 main types of weapons:
- Melee weapons: These weapons are the most straight-forward. They are weapons that physically hit the enemy like Swords, Boomerangs and Flails.
- Ranged weapons: These weapons use a form of ammo to fire projectiles at distant enemies, such as Bows.
- Magic weapons: Magic weapons have various different attacks, but generally they shoot a magical projectile that costs Mana. Examples include the different Staves.
- Summoning weapons: These weapons summon a minion that targets enemies and combats them itself. The Slime Staff is an example of a summoning weapon.
- Throwing weapons: This is a minor Pre 1.4 damage type that uses consumable, one use items to deal damage. For example, grenades inflict throwing damage.
Good weapons in the early-game include:
- While a Wooden Sword will provide some protection you may be able to quickly upgrade to a Boreal Wood or
 Cactus Sword if close by, although Deserts can be troubling for unequipped players.
- Wooden Bow: While basic the Wooden Bow is extremely easy to obtain for its power, costing only 10 Wood and can be easily replaced if the player can find Boreal or Palm Wood in a nearby Desert or Tundra.
- Its damage can be increased further with Flaming or
 Frostburn Arrow, the latter of which is crafted with 1
  Ice Torch (3 Torches + 1
  Ice Block) and 10
  Wooden Arrow.
- 10 Wooden Arrows + 1
 Fallen Star can also create
  Jester's Arrow, but spending your Fallen Stars on
  Mana Crystal is advised.
- 10 Wooden Arrows + 1
- Its damage can be increased further with Flaming or
 Snowball are a cheap and surprisingly effective way to deal damage, gaining 15 Snowballs per
  Snow Block and dealing 8 damage per hit.
- Mages and Summoners are lacking in early-game weapons, but
 Wand of Sparking and
  Finch Staff can be found in Surface
  Chest with enough luck.
Armor
 Wood armor is usually the first set of armor made, but swapping it with
  Boreal or
  Cactus armor can help if those resources are available.
- Wearing a matched set of armor is usually recommended, as the user will get a set bonus from wearing all pieces.
Healing
In Terraria, any damage done to the player will appear above their head as a red number. Damage done to enemies by players is shown with an orange number. When the player heals, the amount healed will be shown as a green number. To avoid dying, you can heal yourself using one of several healing items, with the H key or selecting the potion and pressing 틀:Key.
 Mushroom can be used to restore 15 health, but are rather ineffective and have better uses.
 Lesser Healing Potion can be obtained from Pots, Chests, and later crafted and restore 50 health on use.
틀:Note
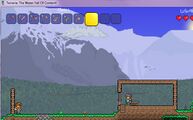
Mining and Exploration

Eventually, a ![]() Furnace will be needed. A Furnace can transform Ore into Bars, which are the materials of better Weapons, Tools, and Armor. Find deposits of Stone and mine up at least 20 blocks. Torches are also needed for creating a Furnace, so make sure to kill a few Slimes to get
Furnace will be needed. A Furnace can transform Ore into Bars, which are the materials of better Weapons, Tools, and Armor. Find deposits of Stone and mine up at least 20 blocks. Torches are also needed for creating a Furnace, so make sure to kill a few Slimes to get ![]() Gel. Get
Gel. Get ![]() Wood, head to the Work Bench, craft a Furnace and place it down.
Wood, head to the Work Bench, craft a Furnace and place it down.
While exploring the world keep an eye out for oddly colored blocks, as these will most likely be ore deposits.
You will need to make an ![]() Iron Anvil or
Iron Anvil or ![]() Lead Anvil (some worlds will have Lead instead of Iron). Anvils are used to create Items from Bars. Go find some
Lead Anvil (some worlds will have Lead instead of Iron). Anvils are used to create Items from Bars. Go find some ![]() Iron or
Iron or ![]() Lead Ore. In order to smelt one
Lead Ore. In order to smelt one ![]() Iron/
Iron/![]() Lead Bar, you need three ores. As you need five Bars to create the Anvil, 15 Iron/Lead Ore is needed. Once the ore is gathered and smelted at the Furnace, head to the work bench and create an Anvil. When placed down (preferably next to the Furnace) new Recipes become available.
Lead Bar, you need three ores. As you need five Bars to create the Anvil, 15 Iron/Lead Ore is needed. Once the ore is gathered and smelted at the Furnace, head to the work bench and create an Anvil. When placed down (preferably next to the Furnace) new Recipes become available.
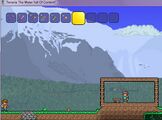
Cave exploration
There are a few options when choosing how to dig: Digging straight down or searching for an open cave to explore. At this early stage in the game use caution when digging holes. Using the blocks picked up while digging or creating ![]() Wood Platform, you can build a way back.
Wood Platform, you can build a way back.
To illuminate your area you can hold a torch in your hand by putting torches in your hotbar and selecting it. You can put a torch on a wall or the ground by left clicking to place it. This will not only let you see mobs so you can fight them, mark the way back, and show where and how far you've gone if you come back to the same cave to explore further. In addition to placing torches, you can drop one in item form, which is useful for seeing what's at the bottom of a pit, and how far down it goes.
When exploring caves, you may find Pots. You can smash these with a weapon or tool to get some loot. You can also find Chests or ![]() Gold Chest. When you are near a chest you can right-click, which will show your inventory and the contents of the chest. You can click on a chest item to grab it, then click again on an inventory square to put it in your inventory. Alternatively, you could click "Loot All" to the right of the chest contents to grab everything. Once the chest is empty you can use your pickaxe to pick it up, take it with you, and then place it elsewhere, like you'd place any other piece of furniture (you can't mine chests if it's not completely empty however). It's recommended that you take a few of the chests you find back to your house to store stuff with, since crafting your own chests will use Iron Bars, and you'll want to save your iron for other purposes.
Gold Chest. When you are near a chest you can right-click, which will show your inventory and the contents of the chest. You can click on a chest item to grab it, then click again on an inventory square to put it in your inventory. Alternatively, you could click "Loot All" to the right of the chest contents to grab everything. Once the chest is empty you can use your pickaxe to pick it up, take it with you, and then place it elsewhere, like you'd place any other piece of furniture (you can't mine chests if it's not completely empty however). It's recommended that you take a few of the chests you find back to your house to store stuff with, since crafting your own chests will use Iron Bars, and you'll want to save your iron for other purposes.
You'll find ![]() Cobweb and can cut them down with any weapon or tool and then pick them up. Cobweb can be turned into
Cobweb and can cut them down with any weapon or tool and then pick them up. Cobweb can be turned into ![]() Silk, to make a
Silk, to make a ![]() Bed at a loom, used to change your spawn point. The Green Arrow on the Map will not disappear when you do this. Silk can make decorative items and vanity clothing.
Bed at a loom, used to change your spawn point. The Green Arrow on the Map will not disappear when you do this. Silk can make decorative items and vanity clothing.
While underground it is possible to come across pools of water. Torches do not work underwater, so you must use ![]() Glowstick, but they cannot be crafted. You can throw them, but they will bounce and move around. You can craft
Glowstick, but they cannot be crafted. You can throw them, but they will bounce and move around. You can craft ![]() Sticky Glowstick by combining Gel with a Glowstick; these will stick to walls when thrown, making them easier to place. No matter which you use, however, glowsticks are not permanent when thrown, unlike placed torches.
Sticky Glowstick by combining Gel with a Glowstick; these will stick to walls when thrown, making them easier to place. No matter which you use, however, glowsticks are not permanent when thrown, unlike placed torches.

When stepping into a pool of water the character will sink as if weighted down. Don't fear diving down underwater to continue moving downwards, as the character has a rather large air meter. However, if close to running out of air there is a way to regain air quickly. First either find a wall or make a small shaft at the bottom of the water, and then dig a tunnel in the wall and then upward in the ceiling. The water will not fill the upper squares. As the air supply runs low, jump into the hole. This will refill the meter.
If you see an area that glows blue and has blue mushrooms, congrats - you have found a Glowing Mushroom biome. This place is useful as it grows glowing mushrooms, so take some while you're there. When you return home, craft a bottle, place it on a table, and craft healing potions out of lesser healing potions and those glowing mushrooms. They heal for twice as much as lesser healing potions do, and are some of the best healing items pre-Hardmode, after ![]() Honeyfin. A Gold Chest and a few
Honeyfin. A Gold Chest and a few ![]() Life Crystal may also appear, feel free to loot them.
Life Crystal may also appear, feel free to loot them.
You may also encounter Gems or Gem Trees underground, which can be destroyed with a Pickaxe or Axe for Gems and Gemcorns.
In the event one encounters a Fairy following them is recommended, as they can lead to valuable ores and treasures that would otherwise be missed.
Afterward
Now that you've learned how to play and survive, the best thing to do would be to simply continue playing, discovering new things on your own. If you do get stuck, find something you're unsure about, or simply want detailed information about one of your items, look up what you need on the wiki, or check out the wiki's Walkthrough. It may be handy to check the Armor or Weapons pages for info on what direction to head next. You might also want to look at the pages about the Bosses of the game so you know what your long term task will be. And remember, you can play the game your way, so don't feel bound by the information on this wiki.
Tips
- Exiting the game then re-entering the world will bring you to your spawn point.
- Despite not being their primary use, Gel and Fallen Stars can be stored as ammo in the inventory, saving space.
- If you want to take full advantage of Magic or Summon weapons, gathering fallen stars at night to craft Mana Crystal to increase your maximum mana is vital.
- If you want to take full advantage of Magic or Summon weapons, gathering fallen stars at night to craft
- If you find
 Sunflower, place some around your house. It gives some helpful bonuses that can make surviving easier.
- Campfire,
 Star in a Bottle, and
  Heart Lantern can also provide great help where placed, although it's recommended to increase your health and mana to maximum before crafting Bottles or Lanterns.
- It's best to build your base close to the original Spawn point so you have less trouble returning to it at Night or if you respawn.
- When digging deep, it's useful to leave a way back up. The easiest way would be to leave Platforms on a side of the passage as a makeshift ladder, or placing
 Rope while digging the shaft.
 - Torches last forever so bring plenty along and place them liberally when going mining and exploring.
- Having torches which correspond with the inhabited biome (
 Bone Torch in the Forest) at base can help greatly, as having torches which match the home biome increases luck, which helps greatly with Enemy drops and damage.
- Touching Ladybugs can also give a small luck bonus during the Windy Day event.
- Having torches which correspond with the inhabited biome (
- Avoid the Corruption / Crimson early on as they contain tough enemies that will kill you.
- If you want an Anvil but do not want to use Bars or coins, you can find them in ruined houses underground.
- Placing NPCs in their favored biome and other liked NPCs can be an effective way to get discounts on goods; see NPCs/preferences for more details.
- Finding a Living Tree is an easy way to get a free NPC house by placing torches. Only works in pre-1.4 versions. 1.4 players may also find deadly gnomes. Leading them to an area without background walls during the day will turn them into objects, and will increase luck to nearby players.
- It is highly advisable to begin gathering materials for a few Buffs. You can quickly gather
 Sand and
  Daybloom, as well as the
  Daybloom Seeds and
  Clay used to begin Gardening with
  Pots.
Pots.
- Placing a
 Bottle on a Work Bench will allow you to craft Potions while nearby, while Bottles for potion making can be filled when near water.
 - Two of the earliest buffs are the
 Regeneration Potion and the
  Ironskin Potion, and for the early game can significantly improve your survivability.
- Additionally,
 Shine and
  Night Owl Potion are easy to craft and help greatly with Underground exploration.
- Additionally,
- Placing a
- On

 틀:Old-gen console 아이콘, and
  versions, if you find your way into a Dungeon early there is a chance you can obtain a
  Water Bolt, a powerful early-game Magic Weapon.
- If you travel far enough past the Snow biome, you will eventually come across a dark brick-patterned structure known as the Dungeon. Entering before summoning and killing the Dungeon's boss Skeletron is highly advised against, as
 Dungeon Guardian will spawn and instantly kill you.
- If you travel far enough past the Snow biome, you will eventually come across a dark brick-patterned structure known as the Dungeon. Entering before summoning and killing the Dungeon's boss Skeletron is highly advised against, as
More information
For more advanced information, please check out the guides listed below.
- Crafting 101 - This is the introductory crafting guide. It contains a detailed explanation of how crafting works, and the ideal crafting station setup.
- NPCs - There are more NPCs than just the
 Guide that you'll want to make homes for.
 - Bases - How to create an effective home base.
- Mining techniques - This guide goes into detail on easy and efficient ways to mine ore, and what to expect when venturing deeper into Terraria.
- Gardening - How to grow gardens of Trees, Mushrooms, and other less savory things. This is a wonderful guide for learning how to properly organize and maintain a garden.
- List of weapons - All the weapons you might find on your travels will be explained here.
- PvP - A great place to start when looking for information on Player vs. Player combat. Not quite for beginners, however it's a great read for those who would like to study beforehand.
- Eye of Cthulhu Boss Fight - One of the Bosses a player might run up against early on in their worlds.
- King slime boss fight - Another boss the player can encounter early game.
- List of Bosses - A list of all the Bosses players will come in contact with in their worlds. Bosses are powerful monsters that have a lot of health and do devastating damage to the unprepared.
- Practical Tips - Some tips for all skill levels of players
All guides have the following list of Guide pages, such as below, that you can use to move between guides very quickly. Use those if you want to learn more things. 틀:Guides
- Pages using DynamicPageList3 dplvar parser function
- Pages setting LuaCache keys
- Pages using DynamicPageList3 dplreplace parser function
- 검수필요 가이드
- 깨진 파일 링크가 포함된 문서