Guide:Getting started/ja

テラリアへようこそ!
あなたのワールドでの旅の始まり方をこのガイドが教えます。キャラクター作成、戦闘、ゲーム序盤のアドバイス、他のガイドに向かわせるために更なるアドバイスなどゲームの基本を取り扱っています。テラリアをはじめ方に関するステップバイステップのチュートリアルを最後まで読み続けてください。
ゲームモード
テラリアのタイトル画面ではプレイしてみたいゲームモードを選択することができます。この例えのために、私たちは"シングルプレイヤー"を選択します。もしも、友人と一緒にはじめたい場合は"マルチプレイヤー"を選ぶことも可能です。
![]() Desktop,
Desktop, ![]() Console, and
Console, and ![]() Mobileバージョンに選べるモードはシングルプレイヤーかマルチプレイヤーまたは、
Mobileバージョンに選べるモードはシングルプレイヤーかマルチプレイヤーまたは、![]() Old-gen console and
Old-gen console and ![]() バージョンではゲームを開始を選択可能です。
バージョンではゲームを開始を選択可能です。
![]() Consoleや
Consoleや![]() Old-gen console and
Old-gen console and ![]() 版では私たちは先にチュートリアルをクリアした方が良いと思っているモードが存在します。
版では私たちは先にチュートリアルをクリアした方が良いと思っているモードが存在します。
ゲームの遊び方を簡単に覚えるためにこのガイドは皆さんがシングルプレイヤーを選択することを推定していますが、友人と始めることも大丈夫です。
それでは、序盤でマスターになるために学びましょう!
キャラクター作成

ゲームモードの選択後、自身のキャラクターを作成・選択する必要があります。キャラクター作成画面を開くためには画面右下にあるNew(新規)ボタンをクリックします。ここでは、自分のキャラクターの特徴である髪型、髪色、服装または色、肌色、目の色を変えることが出来ます!
名前と難易度
ワールドに入る時、チャットでメッセージを送信する時、死ぬ時に、自分のキャラクターの名前が表示されます。Steamまたは家庭版ゲーム機の名前と同じじゃなくても大丈夫です。![]() Desktop version,
Desktop version, ![]() Console version, and
Console version, and ![]() Mobile versionでは、いつでも自分のキャラクターの名前を変更することが可能です。Verify
Mobile versionでは、いつでも自分のキャラクターの名前を変更することが可能です。Verify![]() Old-gen console and
Old-gen console and ![]() では、あとからキャラクターの名前を変更することができません。
では、あとからキャラクターの名前を変更することができません。
キャラクターの難易度を選択することが可能で、それらはジャーニーモード、クラシック(ソフトコアとも知られている)、ミディアムコア、ハードモード。メモ:![]() では、全てのプレイヤーはクラシックモードになっているため、難易度設定は存在してません。
では、全てのプレイヤーはクラシックモードになっているため、難易度設定は存在してません。
キャラクターが死亡した際のペナルティがキャラクター難易度設定によって決まります。敵の難しさも含む、その他の要素に影響はありません。
- ジャーニーモードはプレイヤーに限定されたクリエイティブモードのようにアイテムを"研究"することや様々なチート要素にアクセスできる。ジャーニーモードのキャラクターはCキーを押すことでチートメニューを開くことができ、無敵モード、アイテムの複製、時間や天気の操作、敵のスポーンを無効化にするなどが可能。とはいえ、マルチプレイヤー含む、ジャーニーモードのキャラクターはジャーニーモードのワールドにしか入れません。
- クラシック(またはソフトコア)は死亡の際にコインをいくつかドロップします。ワールドの難易度によりますが半分、3/4、allをドロップします。落としたコインは死亡した場所に戻れば回収ができますが、敵を倒す必要があるかもしれません。
- ミディアムコアは死亡する際に全てのアイテムをドロップします。溶岩に落ちた時、爆弾によってキルされた時、ワールドから出た時にドロップしたアイテムを永久に無くなり、取り戻すことが不可能。
- ハードコアは1ライフしかありません。死亡した場合、そのキャラクターは永久に削除されます。メモ:ハードコアはハードモードと異なります。これは、ハードモードはワールドがウォール・オブ・フレッシュ討伐前の時に使う用語である。
新規のプレイヤーに楽できるのとストレスをあんまり与えないために初めてプレイする際はクラシック/ソフトコアを選択することをオススメします。
外見(任意)
性別、髪型、目の色、肌色、服装を変更することによってキャラクターの見た目をカスタマイズできる。ゲーム内の特定のアイテムを使用した時に目と肌色(1.4前)を変更することが可能です。
None of the Appearance options have any effect on gameplay aside from visuals, the player hurt sound effect, and occasional NPC quotes.


- The color selection bars use the Hue/Saturation/Value system. The top bar changes the base color; the middle changes how faded the color is; the bottom bar lightens or darkens the color from white to black. See HSV (Wikipedia) for a more technical explanation.
- Clothing will be obscured by your armor and vanity items. This can be undone by wearing the Familiar set as you progress.
- To change your clothing in-game later, use a Dresser. To change hairstyle, find the Stylist NPC. To change your gender appearance, drink a Gender Change Potion.
Once you are finished, click Create to confirm character creation with the settings chosen. Now, click Play on your character to enter the World Selection screen.
World Creation

Click the New button on the Select World screen to generate your first world. Players are not locked to a single world; however, we recommend completing the game using a single world at first to keep things simple.
Name and Seed (optional)
These two options won't have much effect if you're starting out.
- Your world's name is displayed on the Select World screen, and it will be shown to other players if you hosted a Multiplayer session. It also appears in a few death messages.
- The world seed is a randomly-generated number which represents the world that has been created. It can be copied and pasted to create an identical world.
World Size
There are three options:
- Small worlds are relatively compact and easy to traverse; it will take you less time to travel between biomes and descend into caves. This makes the game easier at first, since traveling is relatively risky. However, small worlds generate fewer treasure items and natural resources, so you may have a hard time later on.
- Medium worlds are 50% larger than small worlds; they take a bit longer to travel through but have more space to generate treasure and extra biomes.
- Large worlds are twice the size of small worlds. It takes a long time to travel between biomes, but the size allows for nearly all possible terrain, treasure, and resources to generate in large quantities, aside from a few very rare structures. These worlds are useful if you are looking to build.
While world sizes are mostly similar in gameplay they can notably affect the length of a playthrough; which world size is best will vary from player to player and often depends on the amount of time one has on hand. Also note that that the bigger world option you choose, the longer the wait time will be for the world to generate.
Difficulty
- Classic/Normal Mode worlds offer the standard Terraria experience.
- Expert Mode(Desktop, Console and Mobile versions) worlds have enhanced enemies and bosses, hazards, and valuable Expert-only treasure. Many of the Expert-only items can significantly help you, and can be worth the challenge.
- Master Mode(Desktop, Console and Mobile versions) worlds have even more dangerous enemies and bosses, but don't provide much loot in return other than vanity items, bragging rights, and one extra accessory slot. All Expert items appear in Master Mode.
- Journey Mode(Desktop, Console and Mobile versions) worlds are for Journey Mode characters only; they are the only worlds where the cheat menu can be used. Your Classic/Softcore character can't even log into a Journey world. Note that Journey mode has difficulty sliders ranging from 0.5x (the easiest) to 3.0x (equivalent Master mode). Sliding to 2x will enable all Expert mode features.
We recommend that you select Classic (also known as Normal) for your first playthrough.
World Evil
All Terraria worlds have one of two Evil biomes, that affect your ability to receive certain loot and changes a boss that you fight. On the ![]() Console version, world evil can only be selected once Hardmode has been reached in at least one world; it will always be random before then. While seeds for the non-native world evil can be bought later, artificial biome creation can be difficult.
Console version, world evil can only be selected once Hardmode has been reached in at least one world; it will always be random before then. While seeds for the non-native world evil can be bought later, artificial biome creation can be difficult.
- The Corruption, a purple-colored biome that generally offers both lower risk and reward, making it ideal for new players.
- The Crimson, a red-colored biome with themes of flesh and gore. Overall, its items are slightly more powerful, but the enemies are more dangerous. This makes it appealing to experienced players.

Click Create or Accept to generate your world; the game will display a progress bar until it is complete. Afterwards, press Play on the created world to start your adventure!
Beginning Gameplay

Upon entering a world for the first time, your character will appear at the center of the map, so you have half of the world to explore to the left, and half to the right. This location is known as the Spawn Point and will be where your character appears after you die, or whenever you enter the world. It's also marked with a Green Arrow on the Map in ![]() Desktop version,
Desktop version, ![]() Console version, and
Console version, and ![]() Mobile version. Note: Avoid building exactly on this spot, as you could potentially break blocks when spawning in.
Mobile version. Note: Avoid building exactly on this spot, as you could potentially break blocks when spawning in.
You will notice you have a set of starter tools in your inventory, including a ![]() Copper Shortsword (
Copper Shortsword (![]() Wooden Sword if playing on the Nintendo
Wooden Sword if playing on the Nintendo ![]() version),
version), ![]() Copper Pickaxe and
Copper Pickaxe and ![]() Copper Axe.
Copper Axe.
Movement and Tool Use
- On
 Desktop version, the game can be controlled using the Mouse and Keyboard. If you are using a controller, please see the console section further below.
- The cursor on the screen is moved using the mouse.
- ⚒ Use / Attack (left-click) will activate the item currently selected in the hotbar, or attached to the cursor. This usually results in attacking with a weapon, placing/breaking a block, drinking a potion, etc.
- The WASD keys move the character (note that W is not for jumping).
- ↷ Jump (spacebar) will make the character jump (or fly/swim/etc depending on your accessories).
- ⚷ Open / Activate (right-click) will interact with placed objects like Chests and Doors. It is also for talking to NPCs and splitting stacks of items.
- On the
 Mobile version, there will be a left joystick for movement, a right joystick for using items (alternatively tap anywhere on the screen to use an item or place a block), and other buttons to do various things, such as quick heal and Mounts. There is also a lightbulb button that will show each button's function once tapped that can be toggled on and off.
 - The console versions use controllers
 / Joy-Cons
  to control the game. The Nintendo Switch version also has touch screen capability when it isn’t docked, so some gameplay elements have mobile-like controls (e.g, main menu, inventory).
Hotbar and Inventory
The Inventory
In the upper-left corner of the screen, you will see ten inventory slots labeled 1 through 10. These slots are referred to as the hotbar. They are a quick way of accessing commonly-used items. You can place any item into them from the inventory. To use the item, select the hotbar slot by pressing the associated number on the number row on the keyboard, use the scroll wheel to scroll to the right slot, or click a slot with the cursor. When you have selected a slot, you can press ⚒ Use / Attack anywhere on the screen to use the selected item.
By pressing Esc or Inventory you open up the inventory. It consists of 40 inventory slots, 10 hotbar slots, 4 slots each for coins and ammo, a trash slot, and various armor/accessory slots. It also contains the crafting menu, which is used to craft items.
All newly created characters (in Classic/Softcore mode) begin with the following items in their inventory:
 Copper Shortsword (Desktop, Console, Old-gen console and Mobile versions) or
  Wooden Sword (3DS version), used for killing enemies.
 Copper Pickaxe, used to dig blocks, as well as detaching placed items like Furniture.
 Copper Axe, used for chopping down Trees and Cactus to obtain Wood.
Note: Items may have a word as their prefix, such as "Demonic Copper Pickaxe" or "Broken Copper Shortsword". These will increase or decrease the item's base stats; see the Modifiers page for more information.
Rearranging the Inventory
Items in the inventory can be moved using the cursor. Pressing ⚒ Use / Attack on an item will remove it from its slot and attach it to your cursor. Clicking again on another slot will set the item back down, swapping it for another if the slot already contains an item.
Moving a held item out of the inventory screen allows you to ⚒ Use / Attack as if it were held in the hotbar; this can be used, for example, to drink a potion. Pressing ⚷ Open / Activatewill throw the item onto the ground. this can be used to pass an item to another player in Multiplayer.
Certain inventory slots act in a special way.
- The ammo slots can only contain items that are either ammunition for Ranged weapons, wires for Wrenches or bait for Fishing poles. Keep in mind that the top-most Slot for ammo will be used first, followed by subsequent slots.
- The Coin slots can only hold coins, which may be dropped when you die. When you collect coins, they will be deposited into the Coin slots, automatically converting to the next highest denomination when appropriate (ex: 100 = 1, 100 = 1, etc). You can move coins to your normal inventory instead of the Coin slots (though subsequent money will still deposit to the Coin slots by default). This does not prevent Coin loss upon death.
- While you can drag items into the Trash slot (located in the lower-right section of your Inventory) to get rid of them, pressing Ctrlwhile clicking an item in your inventory will do so automatically. The last item placed in the Trash slot will remain until you trash another one, so be careful when quickly removing items, as you can only retrieve the last item placed there. Trashed items are also removed when logging out.
- Alternatively, while shopping with an NPC, you can drag/drop to sell items, or by pressing Ctrland clicking said item (instead of a trash icon, you'll see a coin icon, indicating a sale) . If you accidentally sell an item, you can buy it back for the same price - if it is still visible in the NPC's shop, but beware: once you sell an item and leave the dialogue, your sold items will disappear.
- If the NPC's inventory is full when you sell an item, it cannot be bought back. For this reason, it may be optimal to sell your items to an NPC who offers few items for sale (eg: not the
 Tavernkeep(Desktop, Console and Mobile versions), who may have a full inventory as-is).
- If the NPC's inventory is full when you sell an item, it cannot be bought back. For this reason, it may be optimal to sell your items to an NPC who offers few items for sale (eg: not the
- The equipment slots on the bottom-right/equipment menu/right are for items your character wears, such as armor and accessories. The Inventory will show you your character's Armor and Equipment slots. Upon clicking the icons at the top of those slots, you can see your "alternative" Equipment, such as Mounts, Pets, Hooks, Minecarts, and Light Pets.
Other interface elements
These red hearts beside the inventory indicate the character's Health. Each red heart equals 20 health. All characters begin with 100 health. This can be raised to 400 health using ![]() Life Crystal found underground, and later 500 health with
Life Crystal found underground, and later 500 health with ![]() Life Fruit found in the Jungle during Hardmode.
Life Fruit found in the Jungle during Hardmode.
You must keep your health above 0, or your character will die and re-appear at your Spawn Point. Health regenerates after a short period of not taking damage.
The blue star on the right side of the screen indicates the character's Mana. Each blue star is 20 mana.
All characters begin with 20 mana. This can be raised to 200 mana using ![]() Mana Crystal and temporarily boosted further with some accessories and armor.
Mana Crystal and temporarily boosted further with some accessories and armor.
Mana is used to power Magic weapons; it regenerates similar to health, but at a much faster rate.
The First Day
After loading the world your character will be standing at the spawn point, with an NPC nearby, the ![]() Guide. You can talk to him by pressing ⚷ Open / Activate with your mouse over him. He has some tips for new players, (Desktop, Console, Old-gen console and Mobile versions) and will show you the available crafting recipes if you give him a material. This option can be used at any point in the game.
Guide. You can talk to him by pressing ⚷ Open / Activate with your mouse over him. He has some tips for new players, (Desktop, Console, Old-gen console and Mobile versions) and will show you the available crafting recipes if you give him a material. This option can be used at any point in the game.
Digging and Placing
To dig, you first select your Copper Pickaxe. You are going to use this tool a lot, so you want to keep it on your hotbar. Now, if you move the cursor over a block near your character and press ⚒ Use / Attack, you will swing your Copper Pickaxe. After a few swings at the block, it will disappear and turn into a collectible item. Standing close to an item will cause you to collect it, which will put it in your inventory.
To place blocks, select a block by either putting it on your hotbar and selecting the hotbar slot or attaching it to the cursor and moving the cursor out of the inventory screen. Now move the cursor adjacent to a nearby block and click ⚒ Use / Attack. You will place the block. Holding down the button and moving the cursor to another empty space adjacent to a different block will place another block.
You can remove any previously placed blocks by digging them back out with your pickaxe, even the block originally connecting to the ground - blocks above it will not fall due to gravity.
Your axe must be used to destroy trees or blocks under trees, however.
There are some exceptions, such as ![]() Sand and
Sand and ![]() Silt, which fall when there are no supporting blocks below them.
Silt, which fall when there are no supporting blocks below them.
Safety and House building

Upon spawning your first goal should be to make yourself a ![]() Work Bench from 10
Work Bench from 10 ![]() Wood, as it allows for the crafting of furniture as well as weapons that are crucial to survival.
Wood, as it allows for the crafting of furniture as well as weapons that are crucial to survival.
- Making yourself aWooden Sword and
 Wooden Bow will help greatly with enemies, although arrows will be required to use a bow, which can be made with Wood and
  Stone Block later.
Once equipped, your goal should be to build a house. This will help you shelter from enemies which spawn during the night, helping you survive early on. A house designed for a player may consist of two walls and a roof; however, for a house to be habitable by an NPC, it must also be fully covered by background walls, have a ![]() Door and light source, and contain at least one
Door and light source, and contain at least one ![]() Chair and one adjacent Work Bench or
Chair and one adjacent Work Bench or ![]() Table .
Table .
 Torch can be crafted with 1
  Gel dropped from
  Slimes and 1 Wood in groups of 3, and can be used to make useful tools such as a
  Campfire(which will regenerate health) and
  Flaming Arrow.
- Despite producing light, Campfires will not count as a light source for NPC housing.
Every world spawns with you and the Guide at the spawn point. He is a valuable resource of information and help, so you want to protect him, although he can respawn later during the day with a valid house available.
Once you have collected about 200 wood, return to where you initially spawned and dig out 1 block underneath where you first appeared.
Time to get building!
- Steps of building a suitable House
1. Lay down the wood foundation;
2. Make a box;

3. Craft a
 Work Bench;
4. Place the Work bench down;
5. Craft 1
 Door and replace a side wall with it; (tip: replace both walls if you want mobility)
6. Craft
 Wood Wall and cover the interior of the house with it;
7. Craft and place
Torch, and a  Chair;
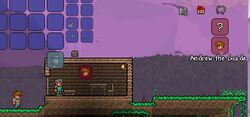
8. Assign the house to an NPC, in this case the
 Guide.


- Tip:
 Work Benches are considered Tables for purposes of NPC Housing. You can replace Tables with them. For more info, consult Housing.
- Tip:
You likely won't want to build more than 3 NPC houses in close proximity to one another to prevent increased prices.
If you can't build a house before sunset, you can dig yourself 8 blocks into the ground and cover yourself up with ![]() Dirt.
Dirt.
When Night falls, all NPCs will return to their designated houses and stop moving. NPCs without a house will walk around aimlessly. You can temporarily surround them with blocks to prevent enemies from reaching them.
Continuing on
Weapons

During your adventures in Terraria you will encounter many enemies. To fight them you use weapons. There are 5 main types of weapons:
- Melee weapons: These weapons are the most straight-forward. They are weapons that physically hit the enemy like Swords, Boomerangs and Flails.
- Ranged weapons: These weapons use a form of ammo to fire projectiles at distant enemies, such as Bows.
- Magic weapons: Magic weapons have various different attacks, but generally they shoot a magical projectile that costs Mana. Examples include the different Staves.
- Summoning weapons: These weapons summon a minion that targets enemies and combats them itself. The Slime Staff is an example of a summoning weapon.
- Throwing weapons: This is a minor Pre 1.4 damage type that uses consumable, one use items to deal damage. For example, grenades inflict throwing damage.
Good weapons in the early-game include:
- While a Wooden Sword will provide some protection you may be able to quickly upgrade to a Boreal Wood or
 Cactus Sword if close by, although Deserts can be troubling for unequipped players.
- Wooden Bow: While basic the Wooden Bow is extremely easy to obtain for its power, costing only 10 Wood and can be easily replaced if the player can find Boreal or Palm Wood in a nearby Desert or Tundra.
- Its damage can be increased further with Flaming or
 Frostburn Arrow, the latter of which is crafted with 1
  Ice Torch (3 Torches + 1
  Ice Block) and 10
  Wooden Arrow.
- 10 Wooden Arrows + 1
 Fallen Star can also create
  Jester's Arrow, but spending your Fallen Stars on
  Mana Crystal is advised.
- 10 Wooden Arrows + 1
- Its damage can be increased further with Flaming or
 Snowball are a cheap and surprisingly effective way to deal damage, gaining 15 Snowballs per
  Snow Block and dealing 8 damage per hit.
- Mages and Summoners are lacking in early-game weapons, but
 Wand of Sparking(Desktop, Console and Mobile versions) and
  Finch Staff(Desktop, Console and Mobile versions) can be found in Surface
  Chest with enough luck.
Armor
 Wood armor is usually the first set of armor made, but swapping it with
  Boreal(Desktop, Console, Old-gen console and Mobile versions) or
  Cactus armor can help if those resources are available.
- Wearing a matched set of armor is usually recommended, as the user will get a set bonus from wearing all pieces.
Healing
In Terraria, any damage done to the player will appear above their head as a red number. Damage done to enemies by players is shown with an orange number. When the player heals, the amount healed will be shown as a green number. To avoid dying, you can heal yourself using one of several healing items, with the H key or selecting the potion and pressing ⚒ Use / Attack.
 Mushroom can be used to restore 15 health, but are rather ineffective and have better uses.
 Lesser Healing Potion can be obtained from Pots, Chests, and later crafted and restore 50 health on use.
Note: Consumables like these give the ![]() Potion Sickness between uses. It prevents you to use any healing items for 60 seconds, so it's a good idea to avoid taking damage as much as you can.
Potion Sickness between uses. It prevents you to use any healing items for 60 seconds, so it's a good idea to avoid taking damage as much as you can.
Mining and Exploration

Eventually, a ![]() Furnace will be needed. A Furnace can transform Ore into Bars, which are the materials of better Weapons, Tools, and Armor. Find deposits of Stone and mine up at least 20 blocks. Torches are also needed for creating a Furnace, so make sure to kill a few Slimes to get
Furnace will be needed. A Furnace can transform Ore into Bars, which are the materials of better Weapons, Tools, and Armor. Find deposits of Stone and mine up at least 20 blocks. Torches are also needed for creating a Furnace, so make sure to kill a few Slimes to get ![]() Gel. Get
Gel. Get ![]() Wood, head to the Work Bench, craft a Furnace and place it down.
Wood, head to the Work Bench, craft a Furnace and place it down.
While exploring the world keep an eye out for oddly colored blocks, as these will most likely be ore deposits.
You will need to make an ![]() Iron Anvil or
Iron Anvil or ![]() Lead Anvil (some worlds will have Lead instead of Iron). Anvils are used to create Items from Bars. Go find some
Lead Anvil (some worlds will have Lead instead of Iron). Anvils are used to create Items from Bars. Go find some ![]() Iron or
Iron or ![]() Lead Ore. In order to smelt one
Lead Ore. In order to smelt one ![]() Iron/
Iron/![]() Lead Bar, you need three ores. As you need five Bars to create the Anvil, 15 Iron/Lead Ore is needed. Once the ore is gathered and smelted at the Furnace, head to the work bench and create an Anvil. When placed down (preferably next to the Furnace) new Recipes become available.
Lead Bar, you need three ores. As you need five Bars to create the Anvil, 15 Iron/Lead Ore is needed. Once the ore is gathered and smelted at the Furnace, head to the work bench and create an Anvil. When placed down (preferably next to the Furnace) new Recipes become available.
Cave exploration
There are a few options when choosing how to dig: Digging straight down or searching for an open cave to explore. At this early stage in the game use caution when digging holes. Using the blocks picked up while digging or creating ![]() Wood Platform, you can build a way back.
Wood Platform, you can build a way back.
To illuminate your area you can hold a torch in your hand by putting torches in your hotbar and selecting it. You can put a torch on a wall or the ground by left clicking to place it. This will not only let you see mobs so you can fight them, mark the way back, and show where and how far you've gone if you come back to the same cave to explore further. In addition to placing torches, you can drop one in item form, which is useful for seeing what's at the bottom of a pit, and how far down it goes.
When exploring caves, you may find Pots. You can smash these with a weapon or tool to get some loot. You can also find Chests or ![]() Gold Chest. When you are near a chest you can right-click, which will show your inventory and the contents of the chest. You can click on a chest item to grab it, then click again on an inventory square to put it in your inventory. Alternatively, you could click "Loot All" to the right of the chest contents to grab everything. Once the chest is empty you can use your pickaxe to pick it up, take it with you, and then place it elsewhere, like you'd place any other piece of furniture (you can't mine chests if it's not completely empty however). It's recommended that you take a few of the chests you find back to your house to store stuff with, since crafting your own chests will use Iron Bars, and you'll want to save your iron for other purposes.
Gold Chest. When you are near a chest you can right-click, which will show your inventory and the contents of the chest. You can click on a chest item to grab it, then click again on an inventory square to put it in your inventory. Alternatively, you could click "Loot All" to the right of the chest contents to grab everything. Once the chest is empty you can use your pickaxe to pick it up, take it with you, and then place it elsewhere, like you'd place any other piece of furniture (you can't mine chests if it's not completely empty however). It's recommended that you take a few of the chests you find back to your house to store stuff with, since crafting your own chests will use Iron Bars, and you'll want to save your iron for other purposes.
You'll find ![]() Cobweb and can cut them down with any weapon or tool and then pick them up. Cobweb can be turned into
Cobweb and can cut them down with any weapon or tool and then pick them up. Cobweb can be turned into ![]() Silk, to make a
Silk, to make a ![]() Bed at a loom, used to change your spawn point. The Green Arrow on the Map will not disappear when you do this. Silk can make decorative items and vanity clothing.
Bed at a loom, used to change your spawn point. The Green Arrow on the Map will not disappear when you do this. Silk can make decorative items and vanity clothing.
While underground it is possible to come across pools of water. Torches do not work underwater, so you must use ![]() Glowstick, but they cannot be crafted. You can throw them, but they will bounce and move around. You can craft
Glowstick, but they cannot be crafted. You can throw them, but they will bounce and move around. You can craft ![]() Sticky Glowstick by combining Gel with a Glowstick; these will stick to walls when thrown, making them easier to place. No matter which you use, however, glowsticks are not permanent when thrown, unlike placed torches.
Sticky Glowstick by combining Gel with a Glowstick; these will stick to walls when thrown, making them easier to place. No matter which you use, however, glowsticks are not permanent when thrown, unlike placed torches.

When stepping into a pool of water the character will sink as if weighted down. Don't fear diving down underwater to continue moving downwards, as the character has a rather large air meter. However, if close to running out of air there is a way to regain air quickly. First either find a wall or make a small shaft at the bottom of the water, and then dig a tunnel in the wall and then upward in the ceiling. The water will not fill the upper squares. As the air supply runs low, jump into the hole. This will refill the meter.
If you see an area that glows blue and has blue mushrooms, congrats - you have found a Glowing Mushroom biome. This place is useful as it grows glowing mushrooms, so take some while you're there. When you return home, craft a bottle, place it on a table, and craft healing potions out of lesser healing potions and those glowing mushrooms. They heal for twice as much as lesser healing potions do, and are some of the best healing items pre-Hardmode, after ![]() Honeyfin. A Gold Chest and a few
Honeyfin. A Gold Chest and a few ![]() Life Crystal may also appear, feel free to loot them.
Life Crystal may also appear, feel free to loot them.
You may also encounter Gems or Gem Trees underground, which can be destroyed with a Pickaxe or Axe for Gems and Gemcorns.
In the event one encounters a Fairy following them is recommended, as they can lead to valuable ores and treasures that would otherwise be missed.
Afterward
Now that you've learned how to play and survive, the best thing to do would be to simply continue playing, discovering new things on your own. If you do get stuck, find something you're unsure about, or simply want detailed information about one of your items, look up what you need on the wiki, or check out the wiki's Walkthrough. It may be handy to check the Armor or Weapons pages for info on what direction to head next. You might also want to look at the pages about the Bosses of the game so you know what your long term task will be. And remember, you can play the game your way, so don't feel bound by the information on this wiki.
Tips
- Exiting the game then re-entering the world will bring you to your spawn point.
- Despite not being their primary use, Gel and Fallen Stars can be stored as ammo in the inventory, saving space.
- If you want to take full advantage of Magic or Summon weapons, gathering fallen stars at night to craft Mana Crystal to increase your maximum mana is vital.
- If you want to take full advantage of Magic or Summon weapons, gathering fallen stars at night to craft
- If you find
 Sunflower, place some around your house. It gives some helpful bonuses that can make surviving easier.
- Campfire,
 Star in a Bottle, and
  Heart Lantern can also provide great help where placed, although it's recommended to increase your health and mana to maximum before crafting Bottles or Lanterns.
- It's best to build your base close to the original Spawn point so you have less trouble returning to it at Night or if you respawn.
- When digging deep, it's useful to leave a way back up. The easiest way would be to leave Platforms on a side of the passage as a makeshift ladder, or placing
 Rope while digging the shaft.
 - Torches last forever so bring plenty along and place them liberally when going mining and exploring.
- Having torches which correspond with the inhabited biome (
 Bone Torch(Desktop, Console and Mobile versions) in the Forest) at base can help greatly, as having torches which match the home biome increases luck, which helps greatly with Enemy drops and damage.
- Having torches which correspond with the inhabited biome (
- Avoid the Corruption / Crimson early on as they contain tough enemies that will kill you.
- If you want an Anvil but do not want to use Bars or coins, you can find them in ruined houses underground.
- Placing NPCs in their favored biome and other liked NPCs can be an effective way to get discounts on goods; see NPCs/preferences for more details.
- Finding a Living Tree is an easy way to get a free NPC house by placing torches. Only works in pre-1.4 versions. 1.4 players may also find deadly gnomes. Leading them to an area without background walls during the day will turn them into objects, and will increase luck to nearby players.
- It is highly advisable to begin gathering materials for a few Buffs. You can quickly gather
 Sand and
  Daybloom, as well as the
  Daybloom Seeds and
  Clay used to begin Gardening with
  Pots.
Pots.
- Placing a
 Bottle on a Work Bench will allow you to craft Potions while nearby, while Bottles for potion making can be filled when near water.
 - Two of the earliest buffs are the
 Regeneration Potion and the
  Ironskin Potion, and for the early game can significantly improve your survivability.
- Additionally,
 Shine and
  Night Owl Potion are easy to craft and help greatly with Underground exploration.
- Additionally,
- Placing a
- On
 Old-gen console and
  versions, if you find your way into a Dungeon early there is a chance you can obtain a
  Water Bolt, a powerful early-game Magic Weapon.
More information
For more advanced information, please check out the guides listed below.
- Crafting 101 - This is the introductory crafting guide. It contains a detailed explanation of how crafting works, and the ideal crafting station setup.
- NPCs - There are more NPCs than just the
 Guide that you'll want to make homes for.
 - Bases - How to create an effective home base.
- Mining techniques - This guide goes into detail on easy and efficient ways to mine ore, and what to expect when venturing deeper into Terraria.
- Gardening - How to grow gardens of Trees, Mushrooms, and other less savory things. This is a wonderful guide for learning how to properly organize and maintain a garden.
- List of weapons - All the weapons you might find on your travels will be explained here.
- PvP - A great place to start when looking for information on Player vs. Player combat. Not quite for beginners, however it's a great read for those who would like to study beforehand.
- Eye of Cthulhu Boss Fight - One of the Bosses a player might run up against early on in their worlds.
- King slime boss fight - Another boss the player can encounter early game.
- List of Bosses - A list of all the Bosses players will come in contact with in their worlds. Bosses are powerful monsters that have a lot of health and do devastating damage to the unprepared.
- Practical Tips - Some tips for all skill levels of players
All guides have the following list of Guide pages, such as below, that you can use to move between guides very quickly. Use those if you want to learn more things.
 Getting started
 Practical tips
- Walkthrough (
 Game progression
 Progression graph
 Mining techniques
 Class setups (
 Weapon playthroughs
 Armor progression
 Inventory management
 Money
Money Enemies
 Biome Keys or Key Molds
 Resources
 Crafting 101 (Quick reference)
 Night's Edge
 Frostspark Boots
 Terraspark Boots
 Shellphone
 Ankh Shield
 Terra Blade
 Zenith
 Arena
Arena Artificial biomes
 Bases
Bases Travel
 Wiring
 Corruption
 Crimson
 Desert
 Dungeon
 Jungle
 Ocean
Ocean Underworld
 キングスライム
 Eye of Cthulhu
 Eater of Worlds
 Brain of Cthulhu
 Deerclops
 Queen Bee
 Lepus
Lepus Skeletron
 Turkor the Ungrateful
 Wall of Flesh
 Getting started (Walkthrough)
 Maintaining purity
 Hallow
 Jungle Temple
 クイーンスライム
 The Twins
 The Destroyer
 Skeletron Prime
 Mechdusa
 Plantera
 光の女帝
光の女帝 Golem
Golem Ocram
Ocram Duke Fishron
 Lunatic Cultist
 Moon Lord
 Blood Moon
 Goblin Army
 Old One's Army
 The Torch God
 Pirate Invasion
 Pumpkin Moon
 Frost Moon
 Martian Madness
 Lunar Events
 The Constant
 Don't dig up
 Get fixed boi
 Not the bees
 Setting up a Terraria server
 Setting up Steam Multiplayer
 Capture the Gem
 PvP
PvP
 "Beating" the Tutorial
 Completing the Bestiary
- Dungeon Guardian
 Expert Mode
 Hardcore
 NPC Happiness
 Obtaining a Terraprisma
 Skipping ahead
 Teleporter network
 Ideas
Ideas Vanity