Guide:Teleporter network
A pair of Teleporters are handy and simple to use. A small network with a few locations is also not a problem. But there are a few issues:
- When the number of locations reaches 20-30, it usually becomes difficult to build, modify, and use at all.
- When you have more than 8 destinations, you need multiple source teleporters. While it is possible to use teleports to secondary teleportation hubs, for sufficiently advanced networks this can still be tricky to remember.
(Desktop, Console and Mobile versions) While less useful in 1.4 and later due to the existence of Pylons (which don't need wire, can be accessed via the map, and can each form the source of a miniature, localized teleport network to points of interest in each biome or near them), here is a possible though highly complex solution and its explanation.
Overview
This system has the following usage.
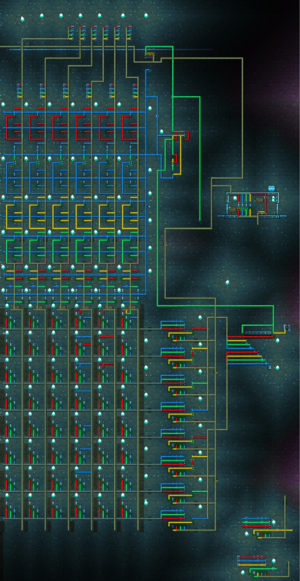
The player gets into a large room with one teleporter inside and a set of switches on the wall (such as the room at the very top of the image on the right). Each switch represents a teleporter cabin on the map. The player turns on one of them and steps on the teleporter. Then, 0.17 seconds later, they arrive in the chosen cabin, having possibly stopped at seven other cabins along the way. Teleporting preserves position relative to the teleporter (so if you start on the left side you end up on the left side, etc.), so slower teleporter networks have the problem that if you move around while teleporting you might fall off the teleporter But this network's total transit time of 0.17 seconds is fast enough that you can run directly across the teleporter pad and make all 8 jumps before getting out of range, even with the best movement speed increase gear (some mounts can probably outpace it).
To return, a single switch on the uplink (i.e. incoming) wire of the teleporter can be flipped to move towards the root, or original, teleporter. If you keep all the switches in the same position relative to the teleporter pad, you can just rapidly click through to get to the root without having to move your mouse between jumps. Building the root teleporter directly under the world spawn makes for an excellent transport hub.
So we have the following requirements:
- One root room (relatively complex) and a network of dumb remote cabins. Here, a "dumb" cabin is one that the player never ends up in, and is only used for transit).
- Cabins are connected to each other in a chain, so there is no need to drag each wire from the final teleporter to the root.
- Cabins don't store any information through switches or other means (besides the switch to return home), so we can fix any logical problems in the wiring at the root.
- The system should be easily expandable, so that adding a new cabin must not cause a complex renovation in the root room.
- In fact, wiring a new cabin should be as simple as dragging a bundle of wires with The Grand Design.
- Sudden server reboot must not mess up the logical state of the network, so the network needs a way to fix itself if it only got part of a signal.
- Player can use colored background walls to draw a map in the root, where switches are placed.
- Flipping multiple switches doesn't disturb the encoding.
- The system will reset itself after a jump (including putting all switches back to their original state), so there is no complex decoding required.
- If the activation trigger is triggered multiple times in quick succession, it won't affect the jump.
Topology
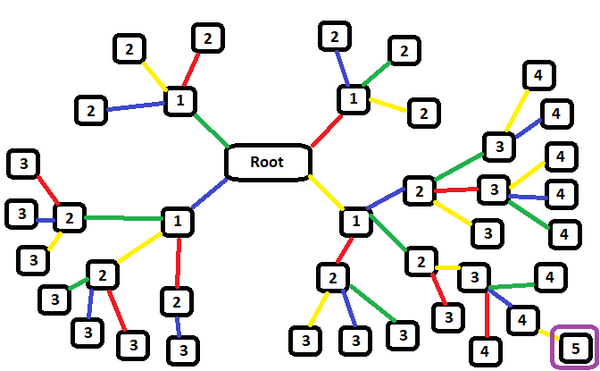
The network topology (i.e. the overall shape of the teleporters and their connections) is a tree. The root can have up to 4 direct connections to teleporter cabins, and those cabins and all subsequent cabins reached by jumps can connect to 3 more cabins (using any color wire except the incoming color). The maximum depth (by this design) is 8 jumps, though it can be expanded.
Each cabin has an address in the network, given by a pattern of colors. For example, bottom-right tier 5 node has the address "yellow-green-yellow-blue-yellow". To get the player there, the computer turns on the wires in that order, one after another. While it may seem like each pair of cabins would only need one color to connect, every link between cabins consists of bundles of all 4 wires of different colors. All 4 wires are needed because they contain activation signals to subsequent cabins, and one wire is both a signal carrier and the wire that actually teleports into the given cabin. The teleporters at the very end of the network could be connected with only one wire, since no signal would need to be passed on, but that would make future additions to that line harder, since the other signal wires would have to be added in.
While you can connect up to 8 different wires to a teleporter, it is highly impractical to encode 8 different signals, and run two bundles of wires from every cabin to every other cabin, and the cabins would need some sort of smart handling, making them no longer stateless, so this guide limits it to 4.
Warnings
- It is important to note that "AND" gates send a pulse both when becoming true, and when becoming false. This is important to note because it is really easy to accidentally wreck all of your encoding by wiring a gate in first, and then putting lamps on it, triggering random pulses downward that will change states unexpectedly.
Cabin scheme
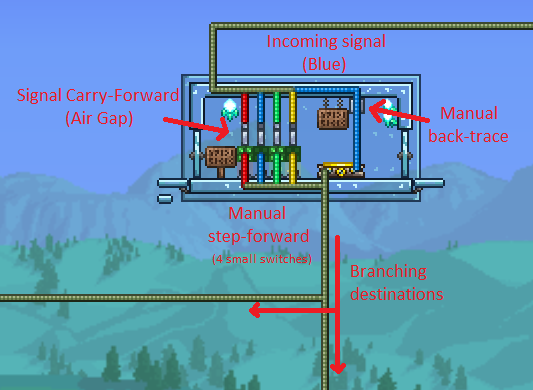
Each cabin must have a teleporter (for the actual movement) and a set of "diodes", which are described below, for passing along the signal. Switches are optional, but provide manual transportation through the network as desired (useful for debugging, or returning to home).
In electronics, the term diode refers to a device that only lets current move one way. In this game, a diode is made of an "AND" gate, one unwired activated lamp (just so there is a space between incoming and outgoing wires), and a wired lamp on top. The signal comes to the top lamp, the outgoing wire is connected to the "AND" gate at the bottom.
For this teleporter network, the bundle of wires going into each cabin is separated into its four components, each of which goes through a diode and comes out the same color, while one of the wires splits before the diode and connects directly to the teleporter. Here, the diodes are needed not so much to keep current from flowing backward but to keep the player from getting sent too far "down the wire". If the wires were directly connected, they would carry the player to the furthest destination of the same color, skipping all the other teleporters along the way and removing the ability to 'branch' at each cabin. So the diodes here function more like an "air-gap" in real-life networks, which is a physical separation between sets of wires. By having the signal air gapped at every step, it can only carry between two connected links in the tree.
"AND" gates will send a signal as they become true or false, so an incoming signal on any color will propagate through the entire network, meaning that it activates every pair of teleporters of the color for the current step.
Root scheme
As for the teleport and switches, the root or home base must have:
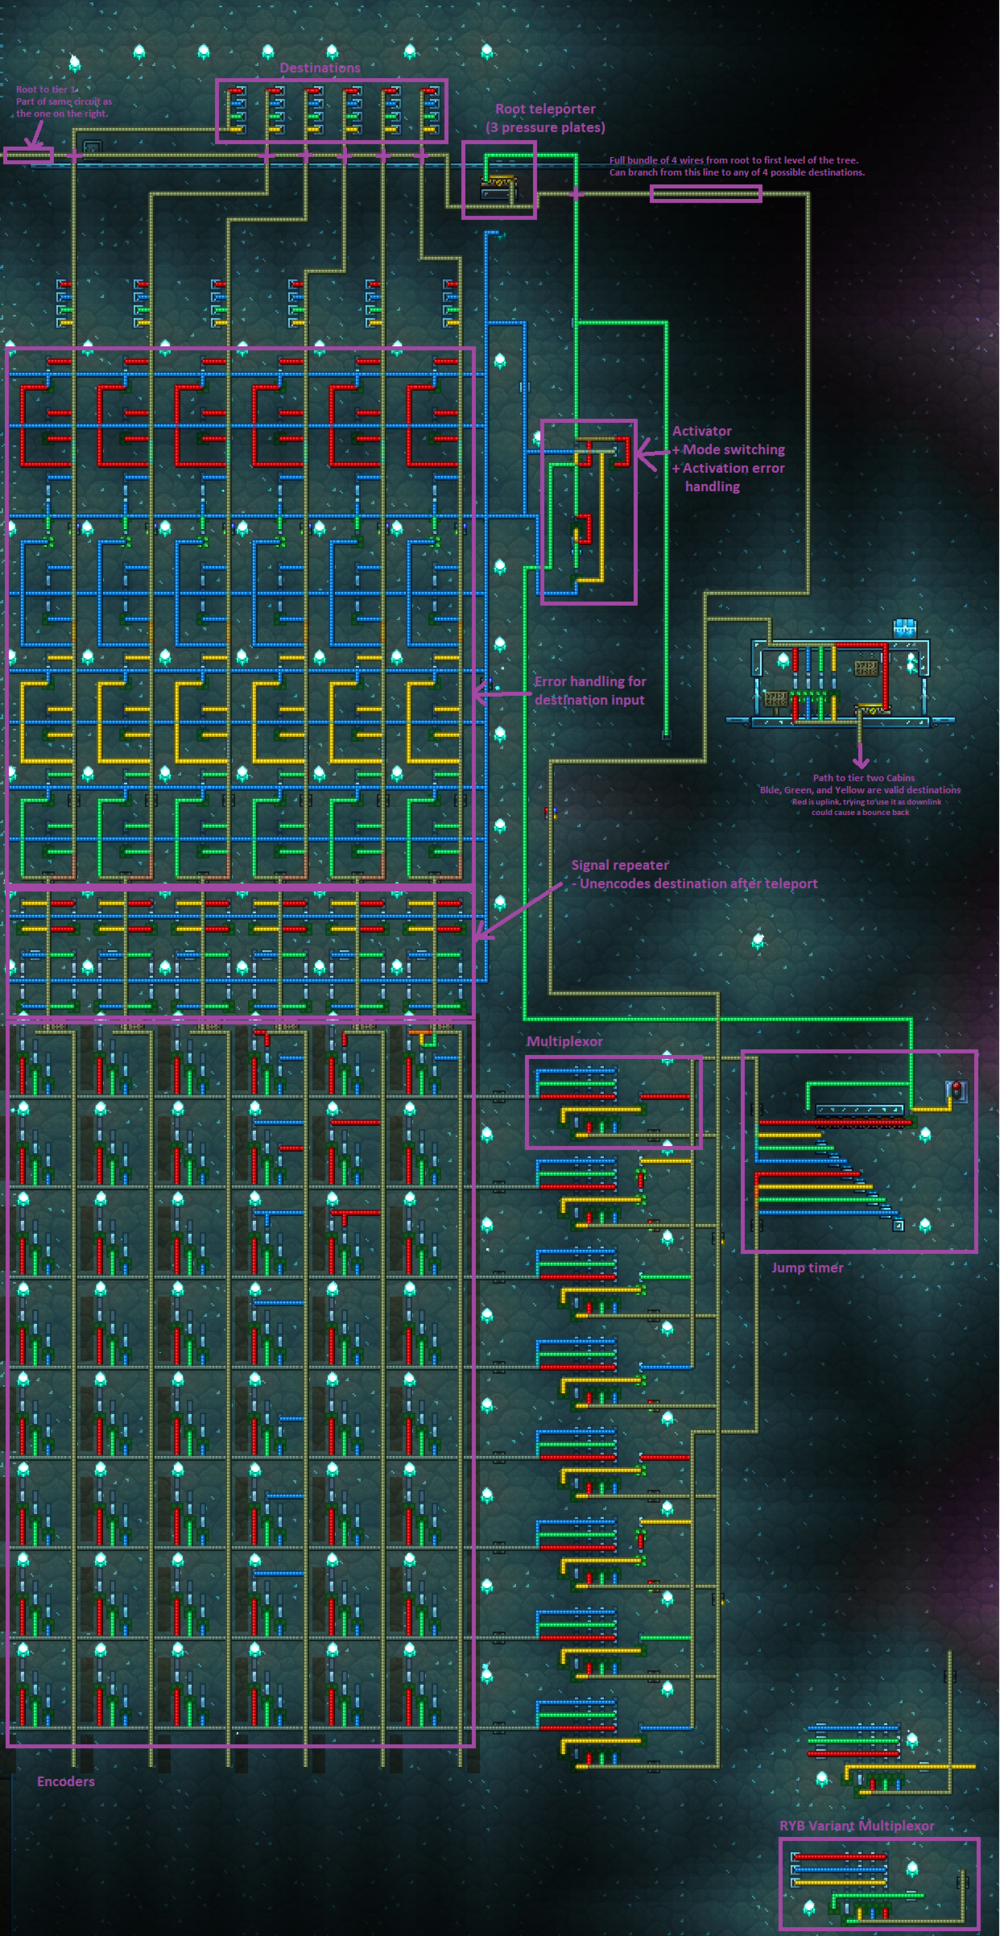
- Address encoders, which turn the signal from the switches into the sequence of colors of wire that will turn on to get the player to the destination. The address encoders shown in the main diagram on this page are incomplete; in a finished teleporter network, there would be additional wiring in every part of the encoder, as described below.
- multiplexors, a device which in traditional electronics allows multiple signals to travel through a single wire or channel. In this guide, the multiplexor merely serves as a way to take the single from each row of encoders and turn it into a time sequence of pulses.
- a timing system, to allow for the multiple jumps and to run the multiplexors..
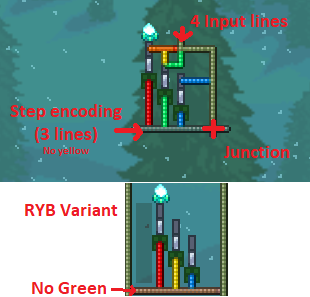
Here is the picture of root, allowing up to 8 jumps over links, with 6 sets of address encoders, enough to program 24 possible destinations.
Step encoding
The step encoding is done by a large group of similar elements, arranged in a grid. In this example, there are 8 rows of them (maximum number of jumps), and 6 columns.
Each column can be wired up to 4 of the switches in the root base. While there are 6 columns in this image (corresponding to 24 possible destinations), you can have anywhere from 1-2187 columns, for a total possible of 8,748 destinations from the root; though this would probably not fit within the width of a large map.
Each element (i.e. each of the squares depicted in the image), is made of input wires, output wires to the next part of the encoder (which just keeps the same signal that came in), output wires to the multiplexor, 3 diodes (similar to what is used in the cabins), and a junction box, to allow the two outputs to cross over each over.
The step encoders in the main image are incomplete. Additional wires are added to create the right sequence of jumps according to the network map shown in the Topology section above. The possible connections are shown in a detailed view, in the image below.
Each layer of the step encoder column is connected to all four switches in the corresponding column of switches in the main room. Each switch corresponds to a different color of input wire in the bundle of wires coming down from above. For each color of input wire, the 'element' can be wired for 5 possible outputs: Red, Green, Blue, Yellow, and "stop". The different outputs are caused by different layouts of the input wire.
For example, if we wanted the red switch in the upper-left of the switches in the image to correspond to a journey of 'blue-red-red-red-yellow-green-yellow-green' in the map of teleporters, we would wire the top element of the column with red wire in the layout that gives a 'blue' output signal; the second element of the column with a red wire in the layout that gives a red signal; and so on. The red wire would go to all eight of the elements in the column. The blue switch would correspond to a different journey, such as 'red-red-red-red-blue-yellow-blue-yellow', and so blue input wire would be added to each element in the column, with the first element having blue wire in the layout that gives a 'red' output signal. So the four different wires in each column sometimes overlap, and sometimes not, and each input wire (each coming from a different switch) gives a different pattern of outputs.
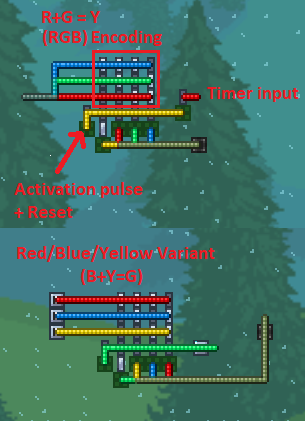
In a perfect world, a 'blue' output would be a blue wire, but the timing mechanism use one color up, so we have to communicate four colors through three wires. This is what the multiplexors are for: they can take in a combination of three wires and figure out how to separate it into four possible signals. You can set it up as either RGB (where Red and Green gives a Yellow jump) or RYB (where Yellow and Blue give you a green jump)
RGB Setup: Connect the input wire:
- To the Red lamp to give an output corresponding to 'red' (jump red link)
- To the Green lamp to give an output corresponding to 'green' (jump green link)
- To both Red and Green lamps to give an output corresponding to 'yellow' (jump yellow link)
- To the Blue lamp to give an output corresponding to 'blue' (jump blue link)
- To none of them (no more jumps)
The timing system activates those codes from top to bottom (using the missing wire color, yellow if you use RGB, or green if you use RYB, see the Multiplexor for how this works).
Turning on the switch sends signals through these encoders and then flips a corresponding set of lamps in the Multiplexor. If several switches are turned on, the destination address may be unexpected. The error handling section of the computer prevents this issue from occurring, but if you prefer a simpler to build, but more error prone approach, you can equip switches with torches on the same wire, to see which of them are activated, and manually deactivate them before activating the next.
Multiplexor
Each multiplexor takes in the signal from the step encoder on the left side, and a signal from the timing mechanism in from the right, outputting a pulse of the right color into the 4-wire bundle. Each multiplexor is timed a little before the one below it, so all eight fire in order, giving the total sequence in that 4-wire bundle. The bundle is the main transport wire; it goes directly to root or home teleporter and to all the tier 1 cabins. Each of those cabins splits it and uses the 'air gap' before merging the wires again and going on to the tier 2 destination, and so on. This makes the connections between cabins trivial (just drag the 4 wires) with all the complexity being left in the home base and a bit in the cabins.
Finally, AND gates are used to separate the signal from 3 wires into 4 and send out a single pulse. This is done with "AND" logic from 4 inputs. These inputs are the three diode inputs from the Step Encoder, and the last is the pulse from the timing mechanism.
The state of the lamps in the picture above is initial (e.g. Not ready to teleport, awaiting input). Each input wire that is turned on will flip the status of each lamp it passes through, and the wire at the bottom will only output if all lamps above it are turned on. To get the pulse effect, we also need an unwired lamp under one of the gates, to keep th wires spaced apart (specifically to separate the pulse timing wire from the output wire of same color).
The way AND gates work, only one gate in this module will change its state when it receives a jump pulse from the timing mechanism, determined by the states of the lamps that were changed by the step encoder wires. This gate will trigger a pulse into an output wire of corresponding color, at the correct time.
Output from the pulse generator must be wired to root's teleporter for the initial jump and conducted away to sub-cabins for the destination teleporters and subsequent jumps.
Timing Mechanism
This is where the speed comes from:
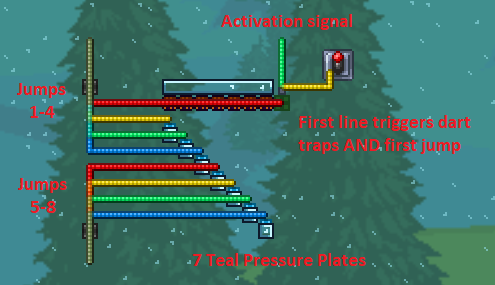
The first jump is triggered immediately by the pressure plate (though it does go through a diode and wire color change first). This wire also activate 7 hammered dart traps that are pointing downward, towards a stair case of teal pressure plates. These pressure plates activate on impact, and as they are only one square further from the darts than their predecessor, each step happens 1/45 of a second after the last, for a total transit time for 8 jumps of 0.17 seconds.
Error Checking/Auto Resetting
Error checking and auto resetting makes up the bulk of the system, but it is also what makes the system very usable and helps avoid issues that require debugging later. The error checking system makes sure, for instance, that only one switch can be in effect at a time, while the auto-reset means that once a switch has been pushed and the teleporter used, it automatically clears and resets itself to be ready for a new teleport.
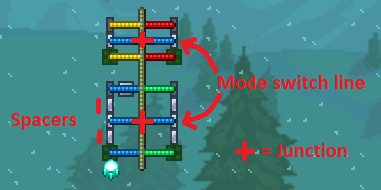
These systems are highly intertwined, because there's a primary "Mode Switch" line that is shared between the two systems, so doing one without the other would require some major redesign. The Mode Switch line changes which part of the wiring is functional.
Auto-Reset
When an input signal encodes a step in the multiplexor, the way to decode it so that a new step can be encoded is to send the exact same signal again. So this part of wiring displayed below is just a repeater; that is, it sends the same signal again a short time after the first signal.
This repeater will take the input signal, and turn a lamp on at the same time as the "Mode switch" line flips the corresponding lamp off, so the "AND" gate doesn't pulse right away, but when the mode switch line flips back, the "AND" gate activates, and sends a pulse along the corresponding wire, which turns off the gate again instantly, resulting in only one pulse that resets the Multiplexor, and the repeater itself.
Destination Input Error Handling
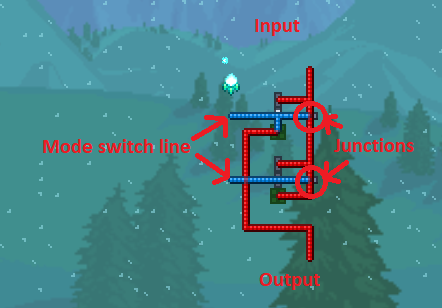
On the path between the input switch and the step encoder (also before the repeater) this system will catch and reject any input until the system is prepared to take more input. In other words, while one destination is encoded, this system blocks the wires from any further signals.
The sample below is for the red input. There are two AND gates, one to accept input (and passes it further down the line), and one to reject it (by not sending it further down the line). The Mode Switch line running between both will swap which one will be activated when the switch is flipped. Both AND gates reset the input lamps, but only the accepting gate (the top one) actually propagates the input signal down.
Important Note: The blue section will require always-on-lamps to separate the blue input from the mode-switch line, making it slightly taller than the others. Look at the larger image for guidance.
Activation Input Error Handling
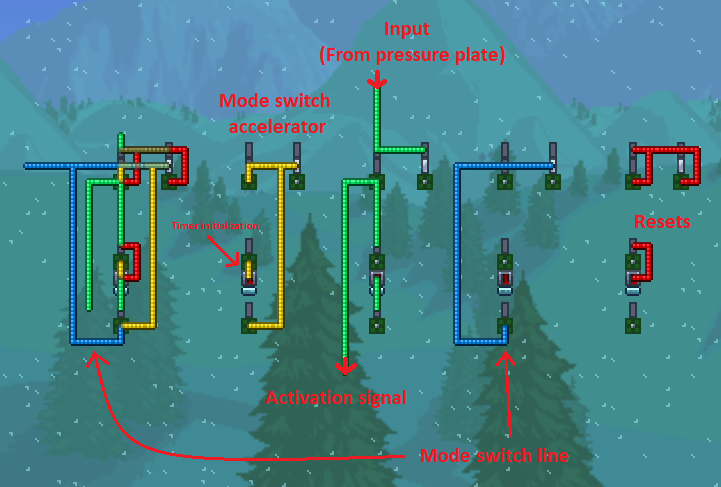
This is the most complex part of the system. It is the part that switches between 'accepting input' and 'not accepting input' modes, and is the part that actually gets signal from the main teleporter's pressure plates and starts up the timing system.
Similar to the Destination Error Handling, there are four AND gates, one for accepting input (left), one for rejecting (right), and two for working the timer signals.
The green wire comes in from the pressure plates.
If the accepting AND gate is active it does 3 things:
- Sends a pulse to the dart timing mechanism to kick it off
- Teleports begin
- Flips the mode switch lamps to start rejecting input immediately
- Leaves all systems temporarily in a state where all input is rejected
- Starts a 1 second timer. The timer will:
- Trigger a mode switch across the main Blue line to set the Destination input to accept
- also triggers the repeaters to un-encode the multiplexor
- Trigger a mode switch along the smaller yellow line (cancels out the blue line from above in this local subsystem, because it was already disabled in the above step)
- Trigger a mode switch across the main Blue line to set the Destination input to accept
Regardless of which AND gate gets triggered, the red wire at the top will turn the lamps that the green line just activated back off again, so those lamps will always be in an off state. This is also the only thing that the reject gate does.

