Guide:The Twins strategies
The Twins are the Hardmode version of the Eye of Cthulhu. They are part of the trio of the mechanical bosses, alongside with The Destroyer and Skeletron Prime.

| Type | |
|---|---|
| Environment | |
| Max Life | 430006450082237 (total) |
| Defense | 10 |
| KB Resist | 100% |
| Immune to |
| Coins | 12 GC30 GC |
|---|
- Item (Quantity)Rate
 Soul of Sight (25-40)100%
 Hallowed Bar (15–30)100%
 Horned God Boots(Old-gen console version)14.29%
 Greater Healing Potion (5–15)100%
- 14.29%
 Treasure Bag(Desktop, Console and Mobile versions)(The Twins)
 Mechanical Wheel Piece(Desktop, Console and Mobile versions)100%
- 14.29%
- Soul of Sight (25–40)100%
- Hallowed Bar (20–35)100%
- 100%
 Pair of Eyeballs(Desktop, Console and Mobile versions)
 Twins Relic(Desktop, Console and Mobile versions)
| Hurt | |
|---|---|
| Killed | |
| Hurt (mechanical) |
Spawn Condition
The Twins can be spawned by fulfilling any of these conditions:
- Smash a
 Demon /
  Crimson Altar. They will then have a 10% chance of appearing when night falls. Note that this condition is shared with the rest of the trio, which increases as more mechanical bosses are defeated, and thus it's not guaranteed if they have yet to be defeated, and will only work if The Twins have yet to be defeated;
 - Use a
 Mechanical Eye at night.
They must then be defeated before the night ends.
The Fight
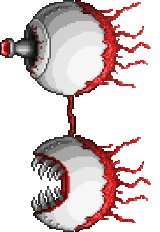
The Twins, as the name suggests, are two separate monsters, both of which must be defeated. They have a combined health of 43,000 / 64,500, shared between them. Retinazer is distinguished by its red iris and that it fires lasers. Spazmatism is distinguished by its green iris and that it fires cursed flames.
When reduced to 2/5 health, they will transform, gaining a slight boost in offense and defense. Each Eye transforms independently once reduced to 8,000 / 12,000 HP (Retinazer) / 9,200 / 13,800 HP (Spazmatism); the other eye remains in its original form until it is reduced to the appropriate amount. When one is destroyed, the other will continue attacking in the same pattern.
It is a good idea to focus on one eye, since the fight becomes easier if a single eye has been defeated. Also, the fight becomes considerably harder if both eyes are on their second form.
Retinazer
In its first form, Retinazer will fire lasers at the player at a steady but somewhat slow rate. This is occasionally interrupted by charging attacks, which mirror that of its partner. Retinazer does slightly less damage than Spazmatism, but this is offset by its higher accuracy thanks to the speed of the lasers. When not charging, Retinazer will always be aligned diagonally with the player, positioned above them.
When it changes into its second form, it will no longer engage in charge attacks. Instead, its lasers will progressively fire at a faster rate as it loses health. This is occasionally supplemented by a weaker but much more rapid laser attack that tracks extremely well. To avoid this, try to fall as fast as you can, and you can be left unscathed. With wings it is possible to "zig-zag" up and down to dodge the lasers. This is made trickier as the fight goes on, with Retinazer using more rapid and fast lasers that are much harder to dodge.
Spazmatism
Spazmatism, like Retinazer, varies between firing Cursed Flames from a distance and engaging in charging attacks. The flames do more damage than the lasers, but are not as fast and thus easier to dodge. However, the Cursed Inferno debuff can be very dangerous for its high damage over time and its ability to stop health regeneration. Its charge attacks are faster and more agressive than Retinazer.
Spazmatism's second form changes his attack pattern dramatically compared to Retinazer. Its cursed flame attack becomes a constant stream of flame, which will last for several seconds (and deal large amounts of damage). However, it does not chase the player quite as quickly as it does in its first form, making avoiding the attack somewhat easier. Once it stops spewing flame, it will charge with greatly increased speed, which also does a lot more damage. Dodging these charges is quite difficult. Much like Retinazer, fall as fast as you can while he is charging, and you should be okay. Misdirecting Spazmatism's charges is easier than it sounds; if you jump as he slows down, he will charge over you. This causes Spazmatism to charge at you from either above or below, making him easier to dodge if you just run.
General Strategies
General Tips
This content is transcluded from Guide:Practical tips § Combat.
- For nocturnal bosses, starting the battle just after the sun sets (7:30 PM) will provide the maximum amount of time to defeat the boss. In Hardmode, the
 Moon Charm and/or
  Moon Stone and their upgrades are also useful at night.
 - Boss battles can be won or lost before the battle ever starts. Choose your equipment and have it ready; find and/or make potions and placed buffs; use the highest-tier food you have available; set up an arena appropriate to the boss; learn the strategies for the boss you're facing.
- Prepare your Boss-fighting arena with adequate lighting,
 Campfires and
  Heart Lanterns for health regeneration, and
  Stars in Bottles for mana regeneration if you use magic.
  Bast Statues(Desktop, Console and Mobile versions) will provide a significant defensive boost.
  Garden Gnomes(Desktop, Console and Mobile versions) and (Desktop, Console and Mobile versions) (if underground) proper torch placement will reduce damage taken and increase damage dealt due to the luck. The Torch God's Favor(Desktop, Console and Mobile versions) helps with this.
  Honey pools can also be used for extra health regeneration.
 - (Desktop, Console and Mobile versions)
 Sunflowers provide the
  Happy!(Desktop, Console and Mobile versions) buff to nearby players, which grants a +10% movement speed bonus and 17% reduction in enemy spawn rate.
 - Always carry around a stack of the highest-tier healing potion available, as relying only on natural Health Regeneration is not a good idea. Depending on the game stage, this can include items such as
 Lesser Healing Potions or
  Honeyfins. On the
  Desktop,
  Console, and
  Mobile versions,
  Restoration Potions are healing potions with a shorter cooldown.
- Likewise carry mana potions, if you use Magic.
- The
 Strange Brew(Desktop, Console and Mobile versions) is also an option, which yields very similar healing abilities to Healing Potion with added chances to trigger periods of invulnerability upon consumption.
 - On the
 Old-gen console version and Nintendo
  version, Restoration Potions can save a slot, but will likewise trigger both cooldowns.
- It is suggested to build houses for the
 Dryad and the
  Nurse NPCs in your arena. The former casts the
  Dryad's Blessing(Desktop, Console and Mobile versions) buff, which increases your defense and provides you with a thorns-like effect, while the latter can heal and remove debuffs instantly, at the cost of some
  coins.
 - Bosses are displayed on the Minimap: Follow the boss's icon to track it when you're struggling to find it. You can identify the boss icons by checking their respective wiki pages.
- Once you have freed the
 Mechanic in the Dungeon, you can use
  Wire to enhance your arena with
  Traps and helpful
  Heart and
  Star Statues. The former helps to damage the enemies, though be careful to set them up correctly in order not to hurt yourself during the battle. The latter will spawn heart and star pickups, respectively. Connect these devices to
  timers to activate them infinitely.
 - In Hardmode, the
 Brand of the Inferno(Desktop, Console and Mobile versions) and
  Sergeant United Shield(Desktop, Console and Mobile versions) can be used to parry incoming contact damage.
 - It may be useful to summon and kill the Eye of Cthulhu or King Slime before summoning any harder boss in order to spawn an extra one-use pool of Hearts. Note that this will take up a big chunk of the spawnable healing Hearts, which will cause Heart Statues to not spawn as many/any Hearts.
- Remember to use the
 Sharpening Station(Desktop, Console and Mobile versions),
  Ammo Box(Desktop, Console, Old-gen console and Mobile versions),
  Crystal Ball,
  Bewitching Table(Desktop, Console and Mobile versions),
  War Table(Desktop, Console and Mobile versions), and
  Slice of Cake(Desktop, Console and Mobile versions) before you go to explore or battle bosses/invasions. These will give boosts that are useful to have, with the first five being class-specific. They give
  Sharpened(Desktop, Console and Mobile versions),
  Ammo Box(Desktop, Console, Old-gen console and Mobile versions),
  Clairvoyance,
  Bewitched(Desktop, Console and Mobile versions),
  Strategist(Desktop, Console and Mobile versions), and
  Sugar Rush(Desktop, Console and Mobile versions), respectively.
Terrain preparation
The Sky above the surface is highly recommended for the Twins arena, as vertical movement is required to dodge most of the attacks.
- A very long Sky Bridge (if possible made out of
 Asphalt or
  Frozen Slime Blocks) is optimal. Continuously running with
  Spectre /
  Lightning /
  Frostspark /
  Terraspark Boots(Desktop, Console and Mobile versions) causes both to miss you with their projectiles very often, and keeps each Twin at a stationary horizontal position most of the time, allowing you to fire continuously at it without switching your aim. Wings will help dodge each of the Twins' second phases. Using Asphalt can negate the need for Boots, while using them can allow you to avoid taking damage completely. However, try not to run too fast if you use Boots and Asphalt, as Retinazer may fall behind and despawn. Spazmatism, however, is fast enough to keep up. Regular stone blocks can be used too if you have obtained the
  Blessed Apple(Desktop, Console and Mobile versions).
- This is only possible if another mechanical boss has been defeated as the steampunker will have to sell the blend-o-matic to make the asphalt blocks.
- The standard Boss arena of several layers of Platforms with furniture buffs makes maneuvering around easier.
- Also, a wall on both sides of a small area can block Spazmatism's cursed fire, but be careful not to run out of time from covering behind the wall. It is helpful to have a one block hole one block up to shoot through. This is more useful if you want to try tanking the boss with the above tip of heart statues. If you can tank the hits with the help of heart statues, you can gun down Retinazer while Spazmatism is only able to charge at you.
- The player can use a
 Minecart Track when building a sky arena to avoid The Twins' attacks whilst using a ranged weapon.
Gearing up
If a mechanical boss has been defeated, ![]() Life Fruits will begin to grow in the Underground Jungle, increasing life by 5 per Life Fruit until the player reaches 500 health. It is recommended to get as much Life Fruit as possible.
Life Fruits will begin to grow in the Underground Jungle, increasing life by 5 per Life Fruit until the player reaches 500 health. It is recommended to get as much Life Fruit as possible.


 Adamantite armor provides the greatest overall increase to all stats. Melee and ranged users should substitute in a
  Frost Breastplate to increase damage output and defense without sacrificing anything important. If more offense is desired,
  Mythril Greaves or
  Spider Greaves(Desktop, Console, Old-gen console and Mobile versions) should be substituted into the leg slot.

 Titanium armor is a defensive alternative for Adamantite Armor, the
  Titanium Barrier(Desktop, Console and Mobile versions) /
  Shadow Dodge(Old-gen console and 3DS versions)buff increases survivability.
 Crystal Assassin armor(Desktop, Console and Mobile versions) has respectable defense and stat boosts, which makes this set a viable alternative to Hardmode ore sets. On Desktop version, Console version, and Mobile version, it provides a dash as part of its set bonus, allowing players to replace
  Shield of Cthulhu(Desktop, Console and Mobile versions) with another accesory.

 Orichalcum armor provides very high critical strike chance and its set bonus can hit both eyes.

 Palladium armor provides lower stat bonuses, but the
  Rapid Healing buff greatly increases natural regeneration.


 Hallowed armor becomes a great choice if a mechanical boss has been defeated. The
  Holy Protection(Desktop, Console and Mobile versions) buff allows the player to dodge an attack.
 Spider armor(Desktop, Console, Old-gen console and Mobile versions) is the best choice for summoners who do not use whips frequently.
 Obsidian Armor(Desktop, Console and Mobile versions) provides strong bonuses and high minion damage to summoners. The increased whip range and speed can potentially outperform Spider Armor.


 The armor sets available from the
  Tavernkeep(Desktop, Console and Mobile versions) combine summoning with one of the other classes. This is only available if you've defeated another mechanical boss.
 Forbidden armor(Desktop, Console and Mobile versions)and
  Frost armor((Old-gen console and 3DS versions)) provide weak stat bonuses, but allow you to mix different damage types. On Desktop version, the Frost armor provides excellent stat increases as a set bonus, making it a strong alternative to Adamantite or Titanium armors.
Weapons
- For Melee users
- The
 Shadowflame Knife(Desktop, Console and Mobile versions) shoots very fast and deals a lot of damage per dagger. It also inflicts
  Shadowflame(Desktop, Console and Mobile versions), which deals 15 damage per second, more than any other debuff available. If aimed right, it can manage to hit both eyes at the same time.
  Yoyos(Desktop, Console and Mobile versions) with the Yoyo Bag can be useful.
- The
 Bananarang is difficult to obtain but performs excellently.
- Alternatively,
 Light Discs can work, if you already defeated The Destroyer.
- Alternatively,
 Ice Sickle could also be used, as Spazmatism will spend most of the time behind the player, so shooting constantly backwards with the piercing projectile will hit him multiple times and deal quite reasonable damage.
- If Duke Fishron has been defeated, the
 Flairon makes the fight trivial.
- For Ranged users
- The
 Adamantite or
  Titanium Repeater with
  Holy Arrows or
  Ichor Arrows are great for players who have yet to beat a mechanical boss.
  Hallowed Repeater or
  Phantom Phoenix(Desktop, Console and Mobile versions) are good options if a mechanical boss has been defeated.
 Guns such as the Megashark, Uzi, Gatligator, and Clockwork Assault Rifle can be quite effective when paired with
  Ichor,
  Crystal, or
  Cursed Bullets.
- Keeping an
 Endless Musket Pouch(Desktop, Console and Mobile versions) and
  Endless Quiver(Desktop, Console and Mobile versions) allows the user to have backup ammo in case the player runs out of special bullets or arrows.
 - The
 Daedalus Stormbow(Desktop, Console and Mobile versions) is a great bow, especially if combined with Ichor Arrows or
  Cursed Arrows, even better with a
  Magic Quiver and its upgrades, as these three together can take down any of The Twins in seconds.
 - The
 Sharanga(Old-gen console and 3DS versions) with Wooden Arrows will be very useful as well, as it turns into
  Spectral Arrow(Old-gen console and 3DS versions).
 - The
 Dart Rifle(Desktop, Console and Mobile versions) /
 Dart Pistol(Desktop, Console and Mobile versions) with
  Crystal Darts(Desktop, Console and Mobile versions) or
  Ichor Darts(Desktop, Console and Mobile versions) is an effective weapon, especially the former, which can hit both Twins at the same time.
 - The
 Onyx Blaster(Desktop, Console and Mobile versions) with
  Exploding Bullet is a great combination, and will deal over 250 damage per hit.
 - If Duke Fishron has already been defeated, the
 Tsunami makes the fight trivial.
- For Magic users
 Crystal Serpent(Desktop, Console and Mobile versions) is one of the strongest weapons mages can use in early Hardmode.
- The
 Crystal Storm and the
  Sky Fracture(Desktop, Console and Mobile versions) are also very powerful choices.
 - If one other mechanical boss has been defeated, the left-click attack of the
 Tome of Infinite Wisdom(Desktop, Console and Mobile versions) deals high damage[1].
 - The
 Spirit Flame(Desktop, Console and Mobile versions) 's homing abilities and high damage allows the user to deal consistent damage.
 - The
 Shadowflame Hex Doll(Desktop, Console and Mobile versions) can also be very strong, despite its short range.
  Golden Shower inflicts the
  Ichor debuff, decreasing the defense of The Twins.
- It can be used as a substitute for Ichor Bullets, Ichor Arrows, and Flask of Ichor for other classes, allowing other classes to use more potent ammo or flasks. However, this requires the player to constantly reapply the debuff.
- The
 Nimbus Rod's rainclouds last for 1 minute, adding DPS.
 - If a mechanical boss has already been defeated, the
 Unholy Trident is a powerful choice if aimed correctly.
 - If Duke Fishron has been defeated, the
 Razorblade Typhoon makes the fight trivial.
- The
 Bubble Gun, another Duke Fishron drop, can easily defeat Spazmatism, but struggles against Retinazer.
- The
- For Summoners (Desktop, Console, Old-gen console and Mobile versions)
- The
 Sanguine Staff has perfect tracking and high base damage, which make it a decent choice.
 - The
 Blade Staff can greatly outperform the Sanguine Staff with whips that deal summon tag damage.
 - The
 Spider Staff is a poor choice for this fight if not using an arena, as it can be difficult for the spiders to reach the Twins or stay attached. However, if one creates an arena full of walls, the spiders will latch on while they change forms, dealing hundreds of damage.
 - Although being a Pre-Boss weapon, the
 Abigail's Flower can do well with its buffs gained after entering Hardmode.
 - The
 Firecracker increases damage output for minions, especially with ones that have high base damage such as Sanguine Staff. The (Desktop, Console and Mobile versions)
  Cool Whip works better for the Blade Staff due to its tag damage.
  Snapthorn's Jungle Fury buff increases the speed of whips, adding more DPS.
 Durendal is a powerful choice if a mechanical boss has already been defeated, and if combined with other whips, makes it a potent weapon.
- The
 Queen Spider Staff sentry adds extra DPS, while not counting towards minion count.
 - If a mechanical boss has already been defeated, the
 Ballista Cane is a powerful choice when facing the Twins.
Accessories
Accessories that improve mobility are a must, since the Twins use quick attacks.
- The
 Amphibian Boots(Desktop, Console and Mobile versions),
  Frostspark Boots, or
  Terraspark Boots(Desktop, Console and Mobile versions) and
  Wings are a must, especially for the Sky Bridge method. They allow the player to dodge, and also allow the player to retreat temporarily if health is running low.
- The Gelatinous Pillion can replace both the boots and the wings, as its quick vertical movement makes it excellent for dodging the flames from Spazmatism in the first stage and flying out of range in the second stage.
- Even though it doesn't prevent Cursed Inferno, the
 Ankh Shield can still be used to prevent Knockback and for some useful extra defense.
- The same is true for the
 Obsidian Shield and the
  Cobalt Shield.
- The same is true for the
- An


 Emblem of the player's respective class greatly increases damage output.
  Shield of Cthulhu(Desktop, Console and Mobile versions)'s dash is essential throughout the fight.
 Worm Scarf(Desktop, Console and Mobile versions) greatly decreases damage, but is exclusive to Corruption worlds.
- The
 Brain of Confusion(Desktop, Console and Mobile versions) is very useful for players with Crimson, as it provides a chance to dodge an attack. It doesn't prevent getting inflicted with the
  Cursed Inferno debuff, however.
 - The
 Charm of Myths reduces the cooldown of Potion Sickness as well as increasing passive health regeneration.
- It can be quickswapped in the accessory slot if using it on a vanity slot, taking advantage of its reduced Potion Sickness cooldown.
- The
 Cross Necklace or the
  Star Veil increases invulnerability frames for a brief period upon taking damage, which can greatly mitigate damage, especially from Spazmatism's charges.
 - The Moon Charm gives an increase to various stats, increasing survivability and damage.
- The
 Magic Cuffs (or
  Celestial Cuffs(Desktop, Console, Old-gen console and Mobile versions)) are helpful if using Magic Weapons, but requires the user to take damage.
 Magnet Flower(Desktop, Console and Mobile versions),
  Arcane Flower(Desktop, Console and Mobile versions),
  Mana Cloak(Desktop, Console and Mobile versions), or
  Mana Flower allows the user to automatically consume mana potions.
- Magic Quiver and its upgrades greatly increases arrow damage.
 Pygmy Necklace adds an extra minion slot.
- (Desktop, Console and Mobile versions) The
 Feral Claws accessory and its upgrades enable autoswing and increase melee and whip knockback and size, making them useful for both Melee and Summoners.
 Berserker's Glove(Desktop, Console and Mobile versions), an upgrade to the
 Power Glove, also increases defense, but melee users might prefer to use the Power Glove instead so it can later be crafted into the Mechanical Glove.
If possible, reforge all Accessories for damage, crit chance or defense bonuses. If money is no object (see Guide:Making Money), having all Accessories reforged to Warding, Lucky or Menacing provides an extra 20 defense, 20% crit chance or 20% damage (24%, since the ![]() Demon Heart(Desktop, Console and Mobile versions) allows you to have 6 accessories, up to 28% in Master Mode with 7 accessory slots).
Demon Heart(Desktop, Console and Mobile versions) allows you to have 6 accessories, up to 28% in Master Mode with 7 accessory slots).
Potions
 Regeneration Potion,
  Endurance Potion and
  Ironskin Potion will help prevent fatal damage. Two of each will likely cover the entire night.
 Lifeforce Potion is harder to craft, requiring
  Prismite, but it can boost maximum health to 480 (600 if on 500 HP using
  Life Fruit).
- Any food item providing the
 Well Fed buff is very useful.
  Gravitation Potion can be especially useful, as it eliminates the need for any arena and may free up an accessory slot.
 Swiftness Potion greatly increases mobility.
- If you have access to a world with Corruption, a
 Wrath Potion is a good bonus, but not necessary.
 - For magic users, a
 Magic Power Potion and a
  Mana Regeneration Potion is a must.
  Archery Potion will greatly boost the damage and speed of Arrows.
- Melee users greatly benefit from the effects of an
 Ale or
  Sake(Desktop, Console, Old-gen console and Mobile versions)
  Summoning Potion adds an extra minion slot to the fight.
Miscellaneous
- Because the Twins are vulnerable to many debuffs, melee and summoners can use Flasks. The
 Flask of Ichor for Crimson worlds greatly increases the damage output of all weapons, and the
  Flask of Cursed Flames for Corruption worlds can give a very slight increase to DPS.
 - Crystal Bullets and Ichor Bullets are a must have if using guns, and Holy Arrows and Ichor Arrows for bows.
- The
 Ice Rod is useful against Retinazer because the spawned ice blocks can block his lasers.
Specific Strategies
Retinazer Cheese
This strategy requires you take out Spazmatism first. Once you defeat Spazmatism you need to get Retinazer into its second form. Then go inside a small box of solid blocks and use Summons (preferably with summon armor), the Meteor Staff or the Daedalus Stormbow (preferrably with Holy Arrows and the Magic Quiver/its upgrades) to take down Retinazer. Because Retinazer does not charge in its second form and its lasers do not pierce blocks, you will be completely safe.
Close-ranged Unicorn Strategy
A helpful strategy is a Skybridge using a ![]() Blessed Apple(Desktop, Console and Mobile versions) and any kind of yoyo (A
Blessed Apple(Desktop, Console and Mobile versions) and any kind of yoyo (A ![]() Yoyo Bag(Desktop, Console and Mobile versions) is recommended) or a long range weapon. Running with the Unicorn and shooting the yoyo behind you will deal a lot of damage, and you won't get hit very much as the unicorn is slightly faster. Warning: Using this strategy may lead to the The Twins despawning if you go too fast.
Yoyo Bag(Desktop, Console and Mobile versions) is recommended) or a long range weapon. Running with the Unicorn and shooting the yoyo behind you will deal a lot of damage, and you won't get hit very much as the unicorn is slightly faster. Warning: Using this strategy may lead to the The Twins despawning if you go too fast.
Minecart Strategy
A strategy that is helpful for all classes is to use a minecart track extending as far as possible. For shorter minecart tracks, both ends can be hammered to allow the minecart to go in both directions without losing speed. As the minecart can go faster than The Twins, the player can use a long range weapon, such as a Repeater or a Yoyo (with ![]() Yoyo Bag(Desktop, Console and Mobile versions)) to deal damage from a relatively safe distance. Warning: Using this strategy may cause The Twins to despawn if the player travels too fast.
Yoyo Bag(Desktop, Console and Mobile versions)) to deal damage from a relatively safe distance. Warning: Using this strategy may cause The Twins to despawn if the player travels too fast.
Sentry Farming
After gaining access to the Tier 2 equipment sold by the Tavernkeep, the Twins become much easier to defeat. Wearing the Squire armor and using the Ballista Cane will give the best results because of the high defense and health regeneration provided by the armor, as well as the Ballista Panic! buff doubling the firing rate. Acquiring one of the accessories dropped by the Ogre is recommended for this method. When building your arena, be sure to use platforms whenever possible to maximize the opportunities your Ballistas have to fire. Make sure that you have Heart Lanterns and Campfires set up to give yourself the most health regeneration. Having a good pair of Wings, the ![]() Cobalt Shield or its upgrades, and the
Cobalt Shield or its upgrades, and the ![]() Lightning Boots,
Lightning Boots, ![]() Frostspark Boots or
Frostspark Boots or ![]() Terraspark Boots(Desktop, Console and Mobile versions) are recommended for maximum mobility. The
Terraspark Boots(Desktop, Console and Mobile versions) are recommended for maximum mobility. The ![]() Summoner Emblem(Desktop, Console and Mobile versions) will make the fight go much faster, rounding out your accessories. A few
Summoner Emblem(Desktop, Console and Mobile versions) will make the fight go much faster, rounding out your accessories. A few ![]() Greater Healing Potion are all the healing you'll need in case you get backed into a tight spot. Once the Twins have been summoned in, simply kite them around your Ballistas, taking damage periodically, preferably from Retinazer's laser for minimal damage. With the best Modifiers on your gear and all the relevant buffs, the Twins will go down in two to three minutes. If you find yourself taking too much damage and needing to heal more, consider swapping out the Summoner Emblem with a
Greater Healing Potion are all the healing you'll need in case you get backed into a tight spot. Once the Twins have been summoned in, simply kite them around your Ballistas, taking damage periodically, preferably from Retinazer's laser for minimal damage. With the best Modifiers on your gear and all the relevant buffs, the Twins will go down in two to three minutes. If you find yourself taking too much damage and needing to heal more, consider swapping out the Summoner Emblem with a ![]() Charm of Myths so you can heal more often.
Charm of Myths so you can heal more often.
The Black Spot
It is very easy to defeat The Twins with The Black Spot. The only thing you need is high, consistent damage until dawn. Keep in mind that circling around in the skies may summon a Wyvern, so it's nice to have a weapon against segmented enemies (such as the Medusa Head).
Note: The Black Spot was nerfed to be slightly slower in 1.4.1, which may result in taking more damage than intended.
Bouncing Strategy (Desktop, Console and Mobile versions)
It is very effective if you are able to keep The Twins low to the ground to bounce on them repeatedly using a ![]() Slimy Saddle(Desktop, Console, Old-gen console and Mobile versions). It works especially well to pair this with the
Slimy Saddle(Desktop, Console, Old-gen console and Mobile versions). It works especially well to pair this with the ![]() Meteor Staff(Desktop, Console and Mobile versions), raining meteors down on whichever eye you happen to be bouncing on.
Meteor Staff(Desktop, Console and Mobile versions), raining meteors down on whichever eye you happen to be bouncing on.