Guide:Pirate Invasion strategies
The Event
| Type | |
|---|---|
| Environment | |
| AI Type | Flying Dutchman AI |
| Damage | 0 |
| Max Life | 50/100/150 (core) + 80001600024000 (4 cannons) |
| Defense | 100 |
| KB Resist | 100% |
| Immune to | All debuffs |
- Item (Quantity)Rate
- 2%
- 6.67%
- 6.67%
 Pirate Staff(Desktop, Console, Old-gen console and Mobile versions)6.67%
 Gold Ring(Desktop, Console and Mobile versions)6.67%
 The Dutchman(Desktop, Console and Mobile versions)5%
- 10%
 Golden furniture (1 piece)100%
 Flying Dutchman Trophy(Desktop, Console and Mobile versions)10%
 Flying Dutchman Relic(Desktop, Console and Mobile versions)
 The Black Spot(Desktop, Console and Mobile versions)
| Hurt | |
|---|---|
| Killed |
- Internal NPC ID: 491
| Type | |
|---|---|
| Environment | |
| AI Type | Rider AI |
| Damage | 30/60/90 (contact) 60120180 (Cannonball) |
| Max Life | 2000/4000/6000 |
| Defense | 20 |
| KB Resist | 100% |
| Immune to | All debuffs except Whip debuffs |
- Cannonball (hostile)
")
| Hurt | |
|---|---|
| Killed | |
| Cannonball |
- Internal NPC ID: 492
- Internal Projectile ID: 240
The Pirate Invasion is an event where numerous pirates invade the spawn point. It can occur in Hardmode randomly or by using a ![]() Pirate Map after an altar has been destroyed and the player has 200 or more max health. If those requirements have been fulfilled, there is a 3.27% chance if one has yet to be defeated, and a 1.96% chance if one has been defeated.
Pirate Map after an altar has been destroyed and the player has 200 or more max health. If those requirements have been fulfilled, there is a 3.27% chance if one has yet to be defeated, and a 1.96% chance if one has been defeated.
Enemies
- The
 Parrot will fly about, trying to deal contact damage. It does not drop much and killing one will not help complete the event.
 - The
 Pirate Captain uses a gun and a cannon. The gun rapid-fires bullets, and the cannon will fire projectiles that explode on contact with a solid object, dealing very high damage. The captain drops a vast amount of loot. Only one can exist at a time.
  Pirate Corsairs are the sword-wielding scalawags. They deal melee damage and move fairly rapidly. They drop even more loot than the Captain.
 Pirate Crossbowers are one of the ranged pillagers of the event. They use their crossbows to fire flaming arrows from a distance. They drop the same amount of loot as their low-class cousins (all but the captain, his parrots, his ghost, and his ship). With their debuff and considerable damage, they are one of the larger threats if in the open.
 Pirate Deadeyes carry bullet-firing guns. They are very inaccurate and are likely to miss. Nevertheless, one should take care to avoid their bullets if in the open.
- Unarmed
 Pirate Deckhands can only attack via contact damage.
  Pirate's Curses(Desktop, Console and Mobile versions) are the skeletal remains of the captain. They appear after the captain dies. They act like wraiths, flying through blocks, and are immune to traps. Specifically designed to thwart exploitation of the grounded enemies, these are a large threat to those in enclosed shelters.
- The mini-boss of the event, the
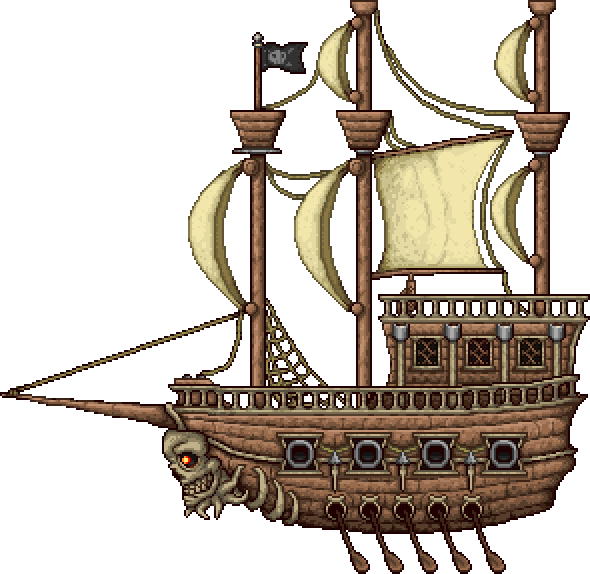
 Flying Dutchman(Desktop, Console and Mobile versions) has four cannons that fire towards the player, and goes down once all four are destroyed. The Dutchman has the highest chance of loot drops.
General Strategies
General Tips
This content is transcluded from Guide:Practical tips § Combat.
- For nocturnal bosses, starting the battle just after the sun sets (7:30 PM) will provide the maximum amount of time to defeat the boss. In Hardmode, the
 Moon Charm and/or
  Moon Stone and their upgrades are also useful at night.
 - Boss battles can be won or lost before the battle ever starts. Choose your equipment and have it ready; find and/or make potions and placed buffs; use the highest-tier food you have available; set up an arena appropriate to the boss; learn the strategies for the boss you're facing.
- Prepare your Boss-fighting arena with adequate lighting,
 Campfires and
  Heart Lanterns for health regeneration, and
  Stars in Bottles for mana regeneration if you use magic.
  Bast Statues(Desktop, Console and Mobile versions) will provide a significant defensive boost.
  Garden Gnomes(Desktop, Console and Mobile versions) and (Desktop, Console and Mobile versions) (if underground) proper torch placement will reduce damage taken and increase damage dealt due to the luck. The Torch God's Favor(Desktop, Console and Mobile versions) helps with this.
  Honey pools can also be used for extra health regeneration.
 - (Desktop, Console and Mobile versions)
 Sunflowers provide the
  Happy!(Desktop, Console and Mobile versions) buff to nearby players, which grants a +10% movement speed bonus and 17% reduction in enemy spawn rate.
 - Always carry around a stack of the highest-tier healing potion available, as relying only on natural Health Regeneration is not a good idea. Depending on the game stage, this can include items such as
 Lesser Healing Potions or
  Honeyfins. On the
  Desktop,
  Console, and
  Mobile versions,
  Restoration Potions are healing potions with a shorter cooldown.
- Likewise carry mana potions, if you use Magic.
- The
 Strange Brew(Desktop, Console and Mobile versions) is also an option, which yields very similar healing abilities to Healing Potion with added chances to trigger periods of invulnerability upon consumption.
 - On the
 Old-gen console version and Nintendo
  version, Restoration Potions can save a slot, but will likewise trigger both cooldowns.
- It is suggested to build houses for the
 Dryad and the
  Nurse NPCs in your arena. The former casts the
  Dryad's Blessing(Desktop, Console and Mobile versions) buff, which increases your defense and provides you with a thorns-like effect, while the latter can heal and remove debuffs instantly, at the cost of some
  coins.
 - Bosses are displayed on the Minimap: Follow the boss's icon to track it when you're struggling to find it. You can identify the boss icons by checking their respective wiki pages.
- Once you have freed the
 Mechanic in the Dungeon, you can use
  Wire to enhance your arena with
  Traps and helpful
  Heart and
  Star Statues. The former helps to damage the enemies, though be careful to set them up correctly in order not to hurt yourself during the battle. The latter will spawn heart and star pickups, respectively. Connect these devices to
  timers to activate them infinitely.
 - In Hardmode, the
 Brand of the Inferno(Desktop, Console and Mobile versions) and
  Sergeant United Shield(Desktop, Console and Mobile versions) can be used to parry incoming contact damage.
 - It may be useful to summon and kill the Eye of Cthulhu or King Slime before summoning any harder boss in order to spawn an extra one-use pool of Hearts. Note that this will take up a big chunk of the spawnable healing Hearts, which will cause Heart Statues to not spawn as many/any Hearts.
- Remember to use the
 Sharpening Station(Desktop, Console and Mobile versions),
  Ammo Box(Desktop, Console, Old-gen console and Mobile versions),
  Crystal Ball,
  Bewitching Table(Desktop, Console and Mobile versions),
  War Table(Desktop, Console and Mobile versions), and
  Slice of Cake(Desktop, Console and Mobile versions) before you go to explore or battle bosses/invasions. These will give boosts that are useful to have, with the first five being class-specific. They give
  Sharpened(Desktop, Console and Mobile versions),
  Ammo Box(Desktop, Console, Old-gen console and Mobile versions),
  Clairvoyance,
  Bewitched(Desktop, Console and Mobile versions),
  Strategist(Desktop, Console and Mobile versions), and
  Sugar Rush(Desktop, Console and Mobile versions), respectively.
Terrain Preparation
Do not attempt to fight the Pirate Invasion in an open space during early Hardmode. The amount of enemies coupled with their abundant projectiles will quickly overwhelm an inexperienced or underequipped player. Instead, consider some simple preparation. With a secure, enclosed space, the event can be made easy. Simply construct a box-shaped building on or off the ground. When inside the box, no enemies will be able to reach the player. Attacking enemies will require weapons that can attack around or through blocks. If the player does not possess such weapons, their only option will be to place holes in the walls and fire projectiles through them, taking care not to be hit by enemy projectiles. It is best to place these holes in ceilings or floors to make it harder for ground enemies to fire into them. The Flying Dutchman cannot pass through blocks, so it will remain stuck against the walls of the box where the player can easily destroy its cannons. Do note that the Pirate's Curses, with trap immunity and the ability to fly through blocks, will be a large threat to those in shelter. It can help to make the shelter larger for space to dodge and fight the Curse.
Gearing Up
Armor
 Palladium Armor can be used with the corresponding head piece for regeneration.
 Orichalcum Armor can be used with the corresponding head piece for crowd control.
 Titanium Armor gives the most defense and should be used with the corresponding head piece.
- If one does not mind hybrid sets, warriors and rangers should use the
 Frost Breastplate,
  Spider Greaves(Desktop, Console, Old-gen console and Mobile versions), and their corresponding
  Adamantite Head piece.
 - A mage can use the
 Adamantite Headgear,
  Mystic Robe(Desktop, Console, Old-gen console and Mobile versions), and
  Forbidden Treads(Desktop, Console and Mobile versions), however, this is very frail. Otherwise, a wizard should use Adamantite armor if the other sets are unavailable.
 - A summoner should use
 Spider Armor(Desktop, Console, Old-gen console and Mobile versions).
Weapons
For Melee Users
- The
 Titanium Sword is useful as it has high damage. If it is unavailable, the
  Adamantite Sword can be used. The
  Ice Sickle is also useful.
 - The
 Amarok(Desktop, Console and Mobile versions) is useful due to the
  Frostburn Debuff. Yoyos as a whole are useful for attacking from within shelter, though they have limited range.
 - The
 Adamantite Glaive and the
  Titanium Trident are good piercing weapons.
 - The
 Flying Knife(Desktop, Console and Mobile versions) is useful for attacking from within a safe box.
 - The
 Dao of Pow can be used to disrupt enemy lines due to the
  Confused Debuff.
 - The
 Shadowflame Knife(Desktop, Console and Mobile versions) can be used at range against both crowds and single targets, but requires the defeat of a Goblin Warlock during the Hardmode Goblin Army.
For Ranged Users
- The
 Marrow and the
  Ice Bow (with
  Cursed Arrows or
  Venom Arrows) are all good bows. Even the
  Hellwing Bow(Desktop, Console and Mobile versions) (with the
  Endless Quiver(Desktop, Console and Mobile versions)) is still useful due to its infinite pierce.
- The
 Daedalus Stormbow(Desktop, Console and Mobile versions) (with
  Holy Arrows) is especially useful because it can attack from shelter.
 - The
 Adamantite Repeater and
  Titanium Repeater (with the Endless Quiver(Desktop, Console and Mobile versions)) can be used if the stronger bows are unavailable.
- The
- The
 Clockwork Assault Rifle (with
  Crystal Bullets or
  Ichor Bullets), the
  Onyx Blaster(Desktop, Console and Mobile versions) (with Ichor Bullets), the
  Phoenix Blaster, the
  Star Cannon, and the
  Uzi (with the
  Endless Musket Pouch(Desktop, Console and Mobile versions)) are excellent choices. The
  Megashark (with the Endless Musket Pouch(Desktop, Console and Mobile versions)) is even better if The Destroyer has been defeated.
 - The
 Dart Rifle(Desktop, Console and Mobile versions) /
  Dart Pistol(Desktop, Console and Mobile versions) and the
  Toxikarp(Desktop, Console and Mobile versions) are great for debuffs. Use
  Ichor Darts(Desktop, Console and Mobile versions) for single targets,
  Cursed Darts(Desktop, Console and Mobile versions) for singular enemies, and
  Crystal Darts(Desktop, Console and Mobile versions) for crowds. The
  Flamethrower is also good if one has beaten Skeletron Prime.
For Magic Users
- The
 Flower of Frost is useful for debuffs. The
  Flower of Fire is a weaker version.
 - The
 Life Drain(Desktop, Console and Mobile versions) is great against crowds, while the
  Clinger Staff(Desktop, Console and Mobile versions) is useful for barriers. The
  Nimbus Rod can be used for damaging passersby. The
  Frost Staff is also good.
 - The
 Golden Shower, the
  Cursed Flames, and the
  Crystal Storm are all good weapons for debuffs and rapid damage respectively. The
  Demon Scythe can be used for close combat.
 - The
 Sky Fracture(Desktop, Console and Mobile versions) is a very powerful weapon and can deal high damage to both crowds and single targets. However, it requires a
  Magic Missile, necessitating exploration of the Dungeon.
 - The
 Medusa Head(Desktop, Console and Mobile versions) can attack multiple enemies at once if obtained.
 - The
 Spirit Flame(Desktop, Console and Mobile versions) has homing and powerful damage.
 - The
 Crystal Serpent(Desktop, Console and Mobile versions) is good against crowds.
 - The
 Unholy Trident is a good weapon, but it is dropped by deadly
  Red Devils.
 - The
 Crystal Vile Shard(Desktop, Console and Mobile versions) is weak and possesses limited range, but attacks directly through blocks and is useful for attacking enemies stuck outside the player's shelter.
For Summoners
- The
 Spider Staff(Desktop, Console, Old-gen console and Mobile versions) is available early, and a solid improvement over the Pre-Hardmode options, especially with the spiders' ability to latch onto enemies (putting walls behind the arena can make the spiders more mobile). If the Dreadnautilus has been defeated, the Sanguine Staff is a very powerful option.
 - For sentries, one should use the
 Queen Spider Staff(Desktop, Console, Old-gen console and Mobile versions) as it is the best one available.
Potions
- Any food that gives the
 Well Fed buff gives minor stat buffs to everything. Good ones are the
  Bowl of Soup,
  Christmas Pudding(Desktop, Console, Old-gen console and Mobile versions), and
  Pumpkin Pie.
  Ironskin Potions,
  Endurance Potions and
  Regeneration Potions will help tremendously with survivability.
 Swiftness Potions will aid in dodging.
 Ammo Reservation Potions and
  Archery Potions are good for rangers.
 Magic Power Potions and
  Mana Regeneration Potions are must have for mages.
- If the player possesses a minion, a
 Summoning Potion will increase capacity by 1.
  Rage Potions or
  Wrath Potions are useful for almost all classes.
Accessories
 Wings are extremely useful for mobility.
- The
 Frog Leg and its upgrades will dramatically increase the vertical mobility of wings.
- The
- Mobility accessories such as the
 Shield of Cthulhu(Desktop, Console and Mobile versions) are very useful as well.
 - Damage increasing accessories such as any Emblem, the
 Mechanical or
  Fire Gauntlet and
  Magic Quiver are always a good choice.
 - Variants of the
 Cobalt Shield and
  Cross Necklace can prevent hits.
  Magic Cuffs are good for regaining Mana.