Guide:Golem strategies
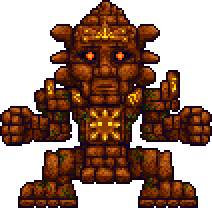
Golem is a Hardmode boss, found at the end of the Lihzahrd Temple. It has high HP, high defense, and multiple limbs and phases, however it is easy to defeat as it is not very mobile and its attacks are easy to dodge.

| Type | |
|---|---|
| Environment | |
| AI Type | Golem Body AI |
| Max Life | 60000 (Desktop, Console and Mobile versions) / 39000 (Old-gen console and 3DS versions)90000114749 (total) 25000 (Desktop, Console and Mobile versions) / 16000 (Old-gen console and 3DS versions)3750047812 (head) 15000 (Desktop, Console and Mobile versions) / 9000 (Old-gen console and 3DS versions)2250028687 (body) 10000 (Desktop, Console and Mobile versions) / 7000 (Old-gen console and 3DS versions)1500019125 (each fist) |
| Immune to |
| Debuff | |
|---|---|
| Debuff tooltip | Slowly losing life |
| Chance | 50% (Fireball) |
| Duration | 5–7 seconds10–14 seconds15–21 seconds |
| Coins | 15 GC37 GC50 SC |
|---|
- Item (Quantity)Rate
- 25% (Desktop, Console and Mobile versions)
 Beetle Husk (4–8)100%
- One of the following 7 (Desktop, Console and Mobile versions) / 8 (Old-gen console and 3DS versions) items will always be dropped[1]
 Stynger
- +
 Stynger Bolt (60–99)
14.29% (Desktop, Console and Mobile versions)
12.5% (Old-gen console and 3DS versions)- +
- 14.29% (Desktop, Console and Mobile versions)
12.5% (Old-gen console and 3DS versions) - 14.29% (Desktop, Console and Mobile versions)
12.5% (Old-gen console and 3DS versions) - 14.29% (Desktop, Console and Mobile versions)
12.5% (Old-gen console and 3DS versions) - 12.5% (Old-gen console and 3DS versions)
- 14.29% (Desktop, Console and Mobile versions)
12.5% (Old-gen console and 3DS versions) - 14.29% (Desktop, Console and Mobile versions)
12.5% (Old-gen console and 3DS versions) - 14.29% (Desktop, Console and Mobile versions)
12.5% (Old-gen console and 3DS versions)  Greater Healing Potion (5-15)100%
- 14.29%
- 10%
 Treasure Bag(Desktop, Console and Mobile versions)(Golem)
 Shiny Stone(Desktop, Console and Mobile versions)100%
- 14.29%
- 33.33%
- One of the following 7 items will be dropped
- Stynger
- +
Stynger Bolt (60–99)14.29% - +
- 14.29%
- 14.29%
- 14.29%
- 14.29%
- 14.29%
- 14.29%
- Beetle Husk (18–23)100%
- 100%
 Guardian Golem(Desktop, Console and Mobile versions)
 Golem Relic(Desktop, Console and Mobile versions)
- Internal Buff ID: 24
Spawn Condition
Golem can be summoned by using the ![]() Lihzahrd Power Cell at the
Lihzahrd Power Cell at the ![]() Lihzahrd Altar.
Lihzahrd Altar.
The Fight
Golem has a total of four attackable targets, but only two are necessary to defeat:
- Golem Head - This is the main target during the first form. It will frequently spew two fireballs that bounce. At half health, it will begin to fire lasers that increase in frequency when its HP lowers.
- Golem Body - This is the main target during the second form. Its main attack is a jump attack.
- Right Arm - This is an optional target. It uses a punch attack with a reach that can extend across the arena. It is recommended that you take these out first because they will become brutal if you leave them on for the third and fourth phases.
- Left Arm - This is an optional target with the same move-set as the Right Arm. It uses a punch attack with a reach that can extend across the arena.
First Form
Once summoned, Golem will move around while slowly attacking with its fists. The head will continuously spit two fireballs that will bounce around the arena. Dodging the fireballs is your priority, as they will inflict On Fire! and prevent health regeneration. The head (25000/37500/47812 HP) and arms are the targets during this phase, with the head being the main target. Destroying the arms is not strictly necessary, but recommended to make the next phase much easier. Note that Lihzahrd enemies can still spawn in the arena.
When Golem's head HP reaches 50% (12500 / 18750 HP), it will begin using Eye lasers. They start at an average interval, but as the head's HP is reduced, the frequency of the lasers will increase. When the head's hit points reach zero the second form begins. The lasers signal a DPS race and all focus should be concentrated on getting through each laser phase. These eye lasers can pass through blocks.
Second Form
Destroying the head stops the laser assault and reveals Golem's true form. The body (15000/22500/28687 HP) is the main target and destroying it will end the fight. The body will jump around and if the arms still exist, they will punch devastatingly faster compared to phase one. The head will be attacking while flying around. Note that the Head can pass through blocks.
The head will continue firing lasers at a reset frequency, which, similar in the first form, will increase as the body's hit points decrease.
General Strategies
General Tips
This content is transcluded from Guide:Practical tips § Combat.
- For nocturnal bosses, starting the battle just after the sun sets (7:30 PM) will provide the maximum amount of time to defeat the boss. In Hardmode, the
 Moon Charm and/or
  Moon Stone and their upgrades are also useful at night.
 - Boss battles can be won or lost before the battle ever starts. Choose your equipment and have it ready; find and/or make potions and placed buffs; use the highest-tier food you have available; set up an arena appropriate to the boss; learn the strategies for the boss you're facing.
- Prepare your Boss-fighting arena with adequate lighting,
 Campfires and
  Heart Lanterns for health regeneration, and
  Stars in Bottles for mana regeneration if you use magic.
  Bast Statues(Desktop, Console and Mobile versions) will provide a significant defensive boost.
  Garden Gnomes(Desktop, Console and Mobile versions) and (Desktop, Console and Mobile versions) (if underground) proper torch placement will reduce damage taken and increase damage dealt due to the luck. The Torch God's Favor(Desktop, Console and Mobile versions) helps with this.
  Honey pools can also be used for extra health regeneration.
 - (Desktop, Console and Mobile versions)
 Sunflowers provide the
  Happy!(Desktop, Console and Mobile versions) buff to nearby players, which grants a +10% movement speed bonus and 17% reduction in enemy spawn rate.
 - Always carry around a stack of the highest-tier healing potion available, as relying only on natural Health Regeneration is not a good idea. Depending on the game stage, this can include items such as
 Lesser Healing Potions or
  Honeyfins. On the
  Desktop,
  Console, and
  Mobile versions,
  Restoration Potions are healing potions with a shorter cooldown.
- Likewise carry mana potions, if you use Magic.
- The
 Strange Brew(Desktop, Console and Mobile versions) is also an option, which yields very similar healing abilities to Healing Potion with added chances to trigger periods of invulnerability upon consumption.
 - On the
 Old-gen console version and Nintendo
  version, Restoration Potions can save a slot, but will likewise trigger both cooldowns.
- It is suggested to build houses for the
 Dryad and the
  Nurse NPCs in your arena. The former casts the
  Dryad's Blessing(Desktop, Console and Mobile versions) buff, which increases your defense and provides you with a thorns-like effect, while the latter can heal and remove debuffs instantly, at the cost of some
  coins.
 - Bosses are displayed on the Minimap: Follow the boss's icon to track it when you're struggling to find it. You can identify the boss icons by checking their respective wiki pages.
- Once you have freed the
 Mechanic in the Dungeon, you can use
  Wire to enhance your arena with
  Traps and helpful
  Heart and
  Star Statues. The former helps to damage the enemies, though be careful to set them up correctly in order not to hurt yourself during the battle. The latter will spawn heart and star pickups, respectively. Connect these devices to
  timers to activate them infinitely.
 - In Hardmode, the
 Brand of the Inferno(Desktop, Console and Mobile versions) and
  Sergeant United Shield(Desktop, Console and Mobile versions) can be used to parry incoming contact damage.
 - It may be useful to summon and kill the Eye of Cthulhu or King Slime before summoning any harder boss in order to spawn an extra one-use pool of Hearts. Note that this will take up a big chunk of the spawnable healing Hearts, which will cause Heart Statues to not spawn as many/any Hearts.
- Remember to use the
 Sharpening Station(Desktop, Console and Mobile versions),
  Ammo Box(Desktop, Console, Old-gen console and Mobile versions),
  Crystal Ball,
  Bewitching Table(Desktop, Console and Mobile versions),
  War Table(Desktop, Console and Mobile versions), and
  Slice of Cake(Desktop, Console and Mobile versions) before you go to explore or battle bosses/invasions. These will give boosts that are useful to have, with the first five being class-specific. They give
  Sharpened(Desktop, Console and Mobile versions),
  Ammo Box(Desktop, Console, Old-gen console and Mobile versions),
  Clairvoyance,
  Bewitched(Desktop, Console and Mobile versions),
  Strategist(Desktop, Console and Mobile versions), and
  Sugar Rush(Desktop, Console and Mobile versions), respectively.
Terrain Preparation
If this is your first encounter with Golem, then you will not possess the ![]() Picksaw capable of shaping the
Picksaw capable of shaping the ![]() Lihzahrd Temple's blocks, so your customization is limited, unless you use
Lihzahrd Temple's blocks, so your customization is limited, unless you use ![]() actuators to disable the blocks under the altar. The arena that the fight occurs in is also varied in width/height. There are a few ways you can customize the default arena to make the fight much easier. *Note* (Desktop, Console and Mobile versions) Actuators will not disable the blocks under the altar in 1.4.
actuators to disable the blocks under the altar. The arena that the fight occurs in is also varied in width/height. There are a few ways you can customize the default arena to make the fight much easier. *Note* (Desktop, Console and Mobile versions) Actuators will not disable the blocks under the altar in 1.4.
- Create a small wall dividing the entrance and the arena, leaving an opening for your projectiles to get through. This becomes difficult to build if your default layout has the entrance in the ceiling.
- Create a much larger wall that divides the arena on either side of the altar leaving an opening at the top for you to leap through post-spawn and a spot for your weapons.
- An assortment of small walls scattered throughout the arena.
- A small pit that you can leap into while Golem stomps and punches. This will allow you to deal heavy damage, but you have to be cautious about his eye lasers and fireballs. A heart statue in the pit with you can be useful in keeping you alive.
 Teleporters can be used for dodging the attacks and move safely and instantly from side to side when fighting outside the temple.
- If you decided to fight Golem in the temple, then
 Lihzahrd and
  Flying Snake Banners would be useful because they will still keep spawning during the fight. It'll be much easier to get rid of them.
 - (Desktop, Console and Mobile versions) In 1.4 Golem can pass through walls, so dividing the arena vertically is much less useful. Also, it can follow you downwards, even into very small openings. The best way to avoid contact with the body is to place a row of platforms about 25-30 blocks from the ground, as Golem is still unable to jump that high.
- (Old-gen console and 3DS versions) actuators can be used to make tiles inactive, allowing more room to move around in the arena.
For safety reasons, you should remove all the pressure plates in the temple or on ![]() Old-gen console version and Nintendo
Old-gen console version and Nintendo ![]() version remove all of wires, as these can be hazardous in the fight.
version remove all of wires, as these can be hazardous in the fight.
Gearing up
Armor
- At minimum, players should use at least


 Hallowed armor or

 Chlorophyte armor, with the helmet to suit your class.
 - The best set for a melee user consists of a Chlorophyte Mask,
 Monk's Shirt(Desktop, Console and Mobile versions), and
  Squire's Greaves(Desktop, Console and Mobile versions), which together provide the best offensive bonuses available, and also provide higher defense than Chlorophyte armor.
- Hallowed Mask and
 Turtle Scale Mail or
  Squire's Plating(Desktop, Console and Mobile versions) are defensive substitutes.
 - The
 Turtle armor is the best set available if the player does not want to fight the Old One's Army
- Ranged characters can use


 Shroomite armor, which is the strongest armor available. Ranged characters who are willing to use minions may want to substitute the Shroomite Leggings for
  Tiki Pants, since there is no way to safely activate stealth during a boss fight.
  Frost armor provides good stat bonuses to both melee and ranged players along with the Frostburn debuff, however you will need to be good at dodging as it provides lower defence than other armour.
- A magic user should use Hallowed Headgear,
 Spectre Robe, and
  Apprentice's Trousers(Desktop, Console and Mobile versions), switching to the
  Spectre Hood and
  Spectre Pants only when at low health to maximize damage output. The
  Spectre Mask(Desktop, Console, Old-gen console and Mobile versions) is a slightly weaker offensive option.
 - Due to Golem's stationary nature, the
 Forbidden Mask(Desktop, Console and Mobile versions) set bonus can be effective against it.
  Squire armor(Desktop, Console and Mobile versions) provides high health regeneration and the ability to use 2 extra sentries, ideally
  Queen Spider Staff(Desktop, Console, Old-gen console and Mobile versions).
 Tiki armor is the standard choice for summoners. For those who have challenged the Pumpkin Moon,
  Spooky armor is a stronger choice.
- Full Turtle armor will be very useful for players who prefer defense.
Weapons
All classes can fare well against Golem.
For Melee users:
 Death Sickle can easily defeat Golem, especially when hiding behind walls (as detailed above). The
  Chlorophyte Partisan and
  Mushroom Spear are weaker alternatives.
 Starlight(Desktop, Console and Mobile versions) has extremely high DPS and immobilises the fists.
 Vampire Knives are another recommended melee item that deals middling damage, but makes it nearly impossible to die.
 Scourge of the Corruptor is extremely useful as it does good damage, splits into three and is homing.
 Seedler(Desktop, Console and Mobile versions) deals consistent damage rapidly at mid-range.
 Paladin's Hammer is a very powerful choice if you manage to obtain it as it has high damage and its piercing is useful
 The Eye of Cthulhu(Desktop, Console and Mobile versions) can be obtained by the first encounter (obtained during the Solar Eclipse, which can be easily summoned from items in the Jungle Temple), and with the Yoyo Bag, it can kill the Golem within a minute. The
  Kraken(Desktop, Console and Mobile versions) is a viable alternative.
 Terra Blade works well, especially when using the blade itself to damage the fists.
 The Horseman's Blade can clear the fight with no dodging required if used with a Cross Necklace, Frozen Shield, and the best melee bonuses you have access to.
For Ranged users:
 Megashark or
  Venus Magnum coupled with
  Crystal Bullets is recommended.
 Candy Corn Rifle will also work.
 Chlorophyte Shotbow is the best single-target arrow based weapon, dealing massive damage with
  Holy Arrows or
  Ichor Arrows.
 Pulse Bow(Desktop, Console, Old-gen console and Mobile versions) with
  Cursed Arrows,
  Chlorophyte Arrows or
  Venom Arrows is very effective in such an enclosed space, with arrows often hitting Golem many times.
 Stake Launcher is extremely effective in the first part of the battle as its projectiles can deal high damage to all three attackable parts.
 Eventide(Desktop, Console and Mobile versions) and
  Tsunami both deal out heavy amounts of damage if you can obtain them.
- (Old-gen console and 3DS versions)
 Piranha Gun will entirely prevent Golem's fists from attacking, making the fight much easier. After destroying the fists, you may have to redirect the piranha to Golem's head while dodging his lasers and fireballs. As long as you can dodge the lasers, this weapon will do a lot of damage to Golem.
  Tactical Shotgun is a powerful weapon when used with Chlorophyte or Crystal Bullets.
 Onyx Blaster(Desktop, Console and Mobile versions) is effective with Ichor Bullets.
 Rocket Launcher or
  Grenade Launcher with
  Rocket III or
  Mini Nuke I(Desktop, Console and Mobile versions) will tear through Golem's health and kill him very quickly. Both can deal dangerous splash damage to yourself, so
  Rocket I can be used if you prefer a longer but safer battle.
 Snowman Cannon is a stronger alternative that deals no splash damage and homes in on Golem.
 Nail Gun(Desktop, Console and Mobile versions) is expensive to use, but more powerful and much safer than using the Rocket Launcher in an enclosed space.
 Sniper Rifle is a fairly consistent and good damaging weapon with Chlorophyte, or Ichor Bullets if you have access to them.
- If you have the fallen stars for it,
 Super Star Shooter(Desktop, Console and Mobile versions) will shred the Golem asunder, even in expert mode.
For Magic users:

 Nimbus Rod will provide constant damage if the clouds are summoned above Golem's head.
- The
 Spectre Staff,
  Venom Staff(Desktop, Console, Old-gen console and Mobile versions) and
  Unholy Trident are all high-damaging weapons that can finish Golem quickly.
 - The
 Nightglow(Desktop, Console and Mobile versions) and
  Razorblade Typhoon are both high damage homing weapons that make quick work of Golem if you can obtain them.
  Magnet Sphere,
  Bat Scepter, and
  Rainbow Gun will allow for great sustained healing when using the Spectre Hood.
- (Old-gen console and 3DS versions)
 Inferno Fork is useful for attacking Golem's head as the explosion radius will stop the fists from attacking you while damaging Golem heavily.
  Rainbow Rod does great damage to every part of Golem due to the projectile homing and piercing.
 Leaf Blower can be used as an accurate, high-DPS weapon.
 Toxic Flask(Desktop, Console and Mobile versions) is a good alternative for the beginning of the fight, as it does a good amount of splash damage. Be mindful of its high mana cost.
For Summoners:
- The Queen Spider Staff(Desktop, Console, Old-gen console and Mobile versions) is the best sentry available due to its extreme synergy with whip tag damage.
 Ravens or
  Deadly Spheres(Desktop, Console and Mobile versions) will work well.
- The
 Desert Tiger Staff(Desktop, Console and Mobile versions) does excellent damage against Golem.
 - The
 Dark Harvest(Desktop, Console and Mobile versions) is an excellent choice for this fight due to its dark energy effect flaring out to attack Golem's other pieces.
Accessories
Mobility is important due to the multiple ways damage is being dealt in the fight. ![]() Wings are extremely important and can be supported by accessories like the
Wings are extremely important and can be supported by accessories like the ![]() Shiny Red Balloon and its equivalents. Wings may be dropped if one can jump multiple times, one would, however, need to equip more accessories. With equipping wings, players can also omit the
Shiny Red Balloon and its equivalents. Wings may be dropped if one can jump multiple times, one would, however, need to equip more accessories. With equipping wings, players can also omit the ![]() Rocket Boots and its advancements, since running would mean hitting Golem and to fly over is a much safer alternative. If using wings, the
Rocket Boots and its advancements, since running would mean hitting Golem and to fly over is a much safer alternative. If using wings, the ![]() Hoverboard is an excellent choice due to its ability to speed under Golem during its jumps and over its head during the first phases. Alternatively, the
Hoverboard is an excellent choice due to its ability to speed under Golem during its jumps and over its head during the first phases. Alternatively, the ![]() Shield of Cthulhu(Desktop, Console and Mobile versions),
Shield of Cthulhu(Desktop, Console and Mobile versions), ![]() Tabi or
Tabi or ![]() Master Ninja Gear would suffice. However, players may get into trouble if they dashed into Golem with Shield of Cthulhu.
Master Ninja Gear would suffice. However, players may get into trouble if they dashed into Golem with Shield of Cthulhu.
The ![]() Charm of Myths is recommended since there is a lot of damage being passed around without a wall, so multiple potions may be necessary. The natural regeneration will also allow you to take advantage of easier phases of the fights. Alternatively, you can switch to Charm of Myths only when drinking health potions, and use another accessory for the rest of the battle. The
Charm of Myths is recommended since there is a lot of damage being passed around without a wall, so multiple potions may be necessary. The natural regeneration will also allow you to take advantage of easier phases of the fights. Alternatively, you can switch to Charm of Myths only when drinking health potions, and use another accessory for the rest of the battle. The ![]() Star Veil and/or
Star Veil and/or ![]() Obsidian Shield may also be useful to negate the chance of being clipped by multiple projectiles.
Obsidian Shield may also be useful to negate the chance of being clipped by multiple projectiles.
The ![]() Avenger Emblem and other damage increasing emblems/accessories are very useful for quickly ending the 'hard' phases of the fight given the longer they last the bigger room for error.
Avenger Emblem and other damage increasing emblems/accessories are very useful for quickly ending the 'hard' phases of the fight given the longer they last the bigger room for error.
![]() Magic Cuffs and
Magic Cuffs and ![]() Mana Flower can be useful for magic characters.
Mana Flower can be useful for magic characters.
Potions
- The
 Summoning Potion,
  Flask of Ichor,
  Ale,
Ale,  Archery Potion,
  Mana Regeneration Potion, and
  Magic Power Potion potions are very helpful for their respective classes.
  Mana Regeneration in particular is by far the most important buff for magic users.
  Lifeforce Potion,
  Ironskin Potion,
  Regeneration Potion, and
  Endurance Potion will assist in survivability.
- Any item that provides
 Well Fed or better, such as
  Pumpkin Pie and
  Bowl of Soup, can be used.
 - Summoning Potion,
 Rage Potion, and
  Wrath Potion are very useful for all classes.
  Obsidian Skin Potion will prevent Golem’s fireballs from setting you on fire.
Specific Strategies
Spiky Balls Strategy (Not Desktop Compatible)
Grab all of the spike ball traps and wire from the temple as you pass through it, then when you get to the chamber at the end follow these instructions. Feel free to build a short wall in the entryway to the Golem's summoning chamber to block off the temple's monster spawns from interrupting your fight. Build a vertical wall halfway through the room with three holes in it big enough for you to pass through (3 blocks high). Then build a horizontal walking path on the half of the room opposite from the half Golem's altar is on (as in, not on that side of the room) (One of your vertical wall holes should be level with your walking path, the other should be where your wall meets the ceiling, and the last should be where your wall meets the floor). Make sure there is one hole in it big enough for you to pass through (2 blocks wide) and also make sure you have a small pool space for honey (1 block high, 2 blocks wide). On the side of the room with the altar, build a ceiling using any block type straight across (make sure that your ceiling only covers the open space and not any nooks or crannies). Below the ceiling install as many spike ball traps as will fit, and then hook them up to a pressure plate which you will locate anywhere on your walkway for your convenience. Place a campfire and a heart lantern anywhere that makes sense, and be sure you've got the best armor you can get your hands on, plus as many speed increasing modifiers and at least the Lightning boots. Summon the Golem, then spend the first few minutes of the fight standing in the lower corner (away from the Golem) slashing/shooting/casting magic at the fist that can cross the room to punch you until it breaks. Then hop/fly onto your walkway and proceed to rain deadly spike balls upon the Golem. Focus on hitting your pressure plate as often as you can, while dodging the Golem's laser eyes (Phase 2) as best as you can by flying around your little corner of the room and dunking yourself in your honey pool as often as you can. When Golem's head detaches (Phase 3) be sure to hop over your ceiling hole to make it follow you there, then when you jump back to your walkway it should just hover overhead (instead of right next to you). Continue dodging, dunking, and stomping on your pressure plate until Golem is defeated. This works very effectively when trying to farm for the Picksaw or for money with above tier armor.
Small Space Strategy
Make a vertical wall, but put a 3 block gap at the bottom and top so you can get in and out. Also build a horizontal line (with blocks, not platforms) with a 3 block gap somewhere along with it. The horizontal line should stop at the vertical line. When Golem spawns, he should jump up on the horizontal platform, but not go back down. This allows you to hit him continuously (Death Sickle highly approved), without taking too many potions (max 2-3). This also allows you to kill him fast. Also, someone on top of the vertical line shooting on Golem is very helpful. This strategy does not seem to work on console.
Static Hook
With a static hook, the player can grapple onto a wall of the arena and move side to side to dodge most of Golem's projectiles. Firing an Onyx Blaster with Chlorophyte bullets can rip through the boss and keep the fists at bay.
Bunny Cannon
The Bunny Cannon works well against Golem: set it up in an area Golem cannot reach (if the blocks are set just right, Golem will not be able to chase you), and fire away. Calculate Golem’s health and divide it by the bunny cannon’s damage (350), and that should give an approximate number of explosive bunnies to use.
!!Error: Invalid EICONS input! Slime Mount + Target Dummies
Place two target dummies next to one another, and then placing some blocks 5 tiles above the top tile of the dummy. Next get the slime mount and activate it in front of the dummies, then just jump. You’ll notice that your character is going to bounce rapidly up and down, and will also have immunity due to the slime mount. If this is paired with summons it can result in the player taking no damage at all during the fight. It is not recommended to use any actual weapons if you are building this above golem as weapons could interrupt the dummies and break the immunity. This can lead to the golem taking priority damage over the dummies and result in you taking damage.
Teleporter Method
For this method, place 2 Teleporters on opposite ends of Golem's chamber and wire them together. Make sure to have some sort of device such as levers or Pressure Plates to activate them. Summon Golem and teleport rapidly, Golem will have trouble hitting you if you teleport fast enough. This is an effective manner of beating Golem quickly as it nullifies the damage that he can deal, however this method becomes less effective as Golem takes more damage since he fires his lasers more frequently.
Heart Arrow & Frost Armor Method(3DS version)
You Will Need:
- Chlorophyte Shotbow/ Tsunami
- (3DS version) Heart Arrow x ~250
- Frost Armor
- High DPS Weapon (eg: Terra Blade, Paladin's Hammer)
Preparation
Excavate an area that allows running and jumping around, and add 3 to 5 layers of platforms. If needed, also add Honey pools, Heart Lanterns, Heart Statues and Campfires.
The Battle
Spawn Golem while standing on the platforms. Aim and stun his head, but when he punches you, you can stun his arms. In the second form, his head can shoot lasers rapidly and cannot be stunned, so just use a high damage weapon, like a Terra Blade or a Paladin's Hammer to destroy his body. The Frost armor will make the fight a lot faster, allowing Golem to be defeated in less than 2 minutes. For a video tutorial, see Merrick's Terraria Mobile: Heart Arrows VS Golem Video.