Guide:Obtaining a Terraprisma
Jump to navigation
Jump to search

 Classic
 Expert
 Master
The ![]() Terraprisma is a powerful summon weapon that is dropped from the Empress of Light only when all damage dealt to the Empress occurs during the day. The Empress enrages during the daytime, causing all of her attacks to instantly kill the player, which vastly increases the difficulty of the boss fight.
Terraprisma is a powerful summon weapon that is dropped from the Empress of Light only when all damage dealt to the Empress occurs during the day. The Empress enrages during the daytime, causing all of her attacks to instantly kill the player, which vastly increases the difficulty of the boss fight.
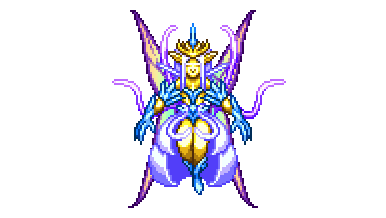
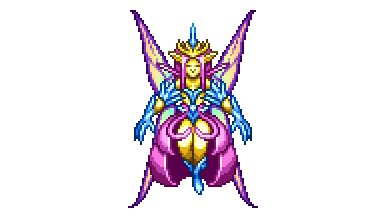
Empress of LightFirst FormHardmode exclusive
Map Icon
Statistics
| Type | |
|---|---|
| Environment | |
| AI Type | Empress of Light AI |
| Damage | 80110248 (contact)[1] 120165372 (dash)[2] 90120180 (Prismatic Bolt 1)[3] 100140210 (Sun Dance)[4] 90120180 (Everlasting Rainbow)[5] 100120180 (Ethereal Lance 1[6]) |
| Max Life | 70000/98000/124950 |
| Defense | 50 |
| KB Resist | 100% |
| Immune to |
Drops
| Coins | 25 GC62 GC50 SC |
|---|
Projectiles created
Projectiles created
Projectiles created
- Death Aurora(Spawning light effect)

- Prismatic Bolt

- Sun Dance

- Everlasting Rainbow

- Ethereal Lance

Sounds
| Hurt | |
|---|---|
| Killed | |
| Summoned | |
| Prismatic Bolt 1 | |
| Prismatic Bolt 2 | |
| Sun Dance | |
| Everlasting Rainbow | |
| Ethereal Lance 1/2/3 | |
| Dash |
- Internal NPC ID: 636
- Internal Projectile ID: 874, 873, 923, 872, 919
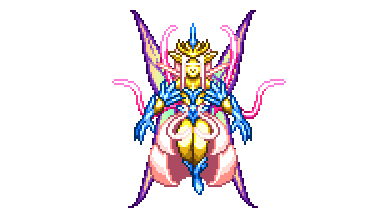
Empress of LightSecond FormHardmode exclusive
Map Icon
Statistics
| Type | |
|---|---|
| Environment | |
| AI Type | Empress of Light AI |
| Damage | 80110248 (contact)[1] 120165372 (dash)[2] 100140210 (Prismatic Bolt 1/2)[3] 120160240 (Sun Dance)[4] 100140210 (Everlasting Rainbow)[5] 120140210 (Ethereal Lance 1/3)[6] 130120180 (Ethereal Lance 2)[6] |
| Max Life | 35000/7000049000/9800062475/124950 |
| Defense | 60 |
| KB Resist | 100% |
| Immune to |
Drops
| Coins | 25 GC62 GC50 SC |
|---|
- Item (Quantity)Rate
- One of the following 4 items will always be dropped [7]
 Nightglow(Desktop, Console and Mobile versions)25%
 Starlight(Desktop, Console and Mobile versions)25%
 Kaleidoscope(Desktop, Console and Mobile versions)25%
 Eventide(Desktop, Console and Mobile versions)25%
 Empress Wings(Desktop, Console and Mobile versions)6.67%
 Prismatic Dye(Desktop, Console and Mobile versions)25%
 Stellar Tune(Desktop, Console and Mobile versions)2%
 Rainbow Cursor(Desktop, Console and Mobile versions)5%
 Terraprisma(Desktop, Console and Mobile versions)(if 100% of damage is dealt at daytime)100%
 Greater Healing Potion (5–15)100%
 Empress of Light Mask(Desktop, Console and Mobile versions)14.29%
 Empress of Light Trophy(Desktop, Console and Mobile versions)10%
 Treasure Bag(Desktop, Console and Mobile versions)(Empress of Light)
- One of the following 4 items will always be dropped
- Nightglow(Desktop, Console and Mobile versions)25%
- Starlight(Desktop, Console and Mobile versions)25%
- Kaleidoscope(Desktop, Console and Mobile versions)25%
- Eventide(Desktop, Console and Mobile versions)25%
 Soaring Insignia(Desktop, Console and Mobile versions)100%
- Empress of Light Mask(Desktop, Console and Mobile versions)14.29%
- Empress Wings(Desktop, Console and Mobile versions)10%
- Stellar Tune(Desktop, Console and Mobile versions)5%
- Rainbow Cursor(Desktop, Console and Mobile versions)5%
- Prismatic Dye(Desktop, Console and Mobile versions)25%
- 100%
 Jewel of Light(Desktop, Console and Mobile versions)
 Empress of Light Relic(Desktop, Console and Mobile versions)
Projectiles created
Projectiles created
Projectiles created
- Prismatic Bolt
- Sun Dance
- Everlasting Rainbow
- Ethereal Lance
Sounds
| Hurt | |
|---|---|
| Killed | |
| Summoned | |
| Prismatic Bolt 1 | |
| Prismatic Bolt 2 | |
| Sun Dance | |
| Everlasting Rainbow | |
| Ethereal Lance 1/2/3 | |
| Dash |
- Internal NPC ID: 636
- Internal Projectile ID: 873, 923, 872, 919
Spawning
In order to spawn the Empress of Light, you need to kill a ![]() Prismatic Lacewing. They spawn in the Hallow after Plantera has been killed and only spawn between dusk and midnight (7:30 PM and 12:00 AM). An easy way to ensure that all damage is dealt during the day is to use a
Prismatic Lacewing. They spawn in the Hallow after Plantera has been killed and only spawn between dusk and midnight (7:30 PM and 12:00 AM). An easy way to ensure that all damage is dealt during the day is to use a ![]() Bug Net to catch a Prismatic Lacewing during the night and then release and kill it during the day.
Bug Net to catch a Prismatic Lacewing during the night and then release and kill it during the day.
The Fight
Differences between Night and Day
The Empress of Light will enrage if still alive or if summoned during the daytime, causing her attacks to do tens of thousands of damage, similar to the Dungeon Guardian, instantly killing players who are hit by her attacks. This enraged state is indicated by her attacks turning from rainbow to bright yellow.
Attacks
Prismatic Bolts – Summons a cloud of prismatic bolts that home in on the player after a short time. These bolts do not have perfect tracking, and will miss if the player makes a sharp turn as they approach. Because she is enraged, extra bolts are created, and they will spread out more before homing onto the player.
- Dash Attack – Positions herself to the left or right of the player before charging horizontally in the player’s direction.
- Sun Dance – Hovers above and slightly to the left of the player and emits 8 rays of light that slowly rotate clockwise. 3 sets of rays are created per sun dance, each positioned slightly more clockwise from the last.
- Everlasting Rainbow – Releases a ring of 13 stars that spiral out clockwise, then spiral back in the same direction. These stars leave behind a trail of light that will damage the player.
- Ethereal Lance – Summons a swarm of swords that launch in the direction the player was headed when they were summoned, telegraphed by colored beams. These swords are summoned behind where the player was moving, or all around the player if they were stationary. The swords do no damage until launched. Because she is enraged, extra swords are summoned, and they will launch faster.
Attack Pattern
The Empress has set attack patterns for both of her phases.
First phase
When spawned, the Empress will hover in place for a few seconds before executing the following attacks in order:
- Prismatic Bolts
- Dash Attack
- Sun Dance
- Dash Attack
- Everlasting Rainbow
- Prismatic Bolts
- Dash Attack
- Ethereal Lance
- Dash Attack
- Everlasting Rainbow
This sequence of attacks will repeat indefinitely until the second phase starts.
Second phase
When the Empress is below half health, she will disappear for a second, then reappear above the next estimated location of the player before executing a new set of attacks, with slightly shorter attack intervals than before:
- Ethereal Lance Ver. 2: Summons 6 evenly spaced waves of swords that target specific points around the player instead of traveling from one side of the screen to the other. The first wave travels from the left side of the screen to the right of the player, the second wave from the right side to the left of the player, the third wave from top side to the bottom-right of the player, the fourth wave from top side to bottom-left of the player, the fifth wave from the bottom side to top-right of the player, and the sixth wave from the bottom side to top left of the player.
- Prismatic Bolts
- Dash Attack
- Ethereal Lance
- Everlasting Rainbow
- Prismatic Bolts
- Sun Dance
- Ethereal Lance
- Dash Attack
- Prismatic Bolts (Cast in a circle around the Empress instead of a cloud directly above her)
This sequence of attacks will repeat indefinitely until she is defeated.
General Strategies
General Tips
This content is transcluded from Guide:Practical tips § Combat.
- For nocturnal bosses, starting the battle just after the sun sets (7:30 PM) will provide the maximum amount of time to defeat the boss. In Hardmode, the
 Moon Charm and/or
  Moon Stone and their upgrades are also useful at night.
 - Boss battles can be won or lost before the battle ever starts. Choose your equipment and have it ready; find and/or make potions and placed buffs; use the highest-tier food you have available; set up an arena appropriate to the boss; learn the strategies for the boss you're facing.
- Prepare your Boss-fighting arena with adequate lighting,
 Campfires and
  Heart Lanterns for health regeneration, and
  Stars in Bottles for mana regeneration if you use magic.
  Bast Statues(Desktop, Console and Mobile versions) will provide a significant defensive boost.
  Garden Gnomes(Desktop, Console and Mobile versions) and (Desktop, Console and Mobile versions) (if underground) proper torch placement will reduce damage taken and increase damage dealt due to the luck. The Torch God's Favor(Desktop, Console and Mobile versions) helps with this.
  Honey pools can also be used for extra health regeneration.
 - (Desktop, Console and Mobile versions)
 Sunflowers provide the
  Happy!(Desktop, Console and Mobile versions) buff to nearby players, which grants a +10% movement speed bonus and 17% reduction in enemy spawn rate.
 - Always carry around a stack of the highest-tier healing potion available, as relying only on natural Health Regeneration is not a good idea. Depending on the game stage, this can include items such as
 Lesser Healing Potions or
  Honeyfins. On the
  Desktop,
  Console, and
  Mobile versions,
  Restoration Potions are healing potions with a shorter cooldown.
- Likewise carry mana potions, if you use Magic.
- The
 Strange Brew(Desktop, Console and Mobile versions) is also an option, which yields very similar healing abilities to Healing Potion with added chances to trigger periods of invulnerability upon consumption.
 - On the
 Old-gen console version and Nintendo
  version, Restoration Potions can save a slot, but will likewise trigger both cooldowns.
- It is suggested to build houses for the
 Dryad and the
  Nurse NPCs in your arena. The former casts the
  Dryad's Blessing(Desktop, Console and Mobile versions) buff, which increases your defense and provides you with a thorns-like effect, while the latter can heal and remove debuffs instantly, at the cost of some
  coins.
 - Bosses are displayed on the Minimap: Follow the boss's icon to track it when you're struggling to find it. You can identify the boss icons by checking their respective wiki pages.
- Once you have freed the
 Mechanic in the Dungeon, you can use
  Wire to enhance your arena with
  Traps and helpful
  Heart and
  Star Statues. The former helps to damage the enemies, though be careful to set them up correctly in order not to hurt yourself during the battle. The latter will spawn heart and star pickups, respectively. Connect these devices to
  timers to activate them infinitely.
 - In Hardmode, the
 Brand of the Inferno(Desktop, Console and Mobile versions) and
  Sergeant United Shield(Desktop, Console and Mobile versions) can be used to parry incoming contact damage.
 - It may be useful to summon and kill the Eye of Cthulhu or King Slime before summoning any harder boss in order to spawn an extra one-use pool of Hearts. Note that this will take up a big chunk of the spawnable healing Hearts, which will cause Heart Statues to not spawn as many/any Hearts.
- Remember to use the
 Sharpening Station(Desktop, Console and Mobile versions),
  Ammo Box(Desktop, Console, Old-gen console and Mobile versions),
  Crystal Ball,
  Bewitching Table(Desktop, Console and Mobile versions),
  War Table(Desktop, Console and Mobile versions), and
  Slice of Cake(Desktop, Console and Mobile versions) before you go to explore or battle bosses/invasions. These will give boosts that are useful to have, with the first five being class-specific. They give
  Sharpened(Desktop, Console and Mobile versions),
  Ammo Box(Desktop, Console, Old-gen console and Mobile versions),
  Clairvoyance,
  Bewitched(Desktop, Console and Mobile versions),
  Strategist(Desktop, Console and Mobile versions), and
  Sugar Rush(Desktop, Console and Mobile versions), respectively.
Terrain Preparation
A long straight section of terrain made of platforms, with a great amount of vertical space above is recommended. A few layers of platforms spaced vertically widely apart is also useful. It is up to the player how much horizontal space is required, but vertical space is key for this fight, as many of the attack patterns involve dodging by flying up or falling down. It's also generally better to fight her in Medium or Large worlds, as Small worlds do not provide enough space to dodge her attacks effectively, and can cause the player to get stuck in low gravity and get hit, or spawn Wyverns in, which if left unchecked, can easily snipe a player.
Gearing Up
Armor
This section assumes that melee, ranged, and magic players will use a hybrid summoning approach with minions, since the Terraprisma is useless in a non-summoning pure class playthrough.
- Warriors should use a hybrid combo of the
 Shinobi Infiltrator's Helmet,
  Monk's Shirt or
  Spooky Breastplate, and
  Valhalla Knight's Greaves.
 - Rangers should use a hybrid combo of a
 Shroomite Headpiece,
  Red Riding Dress, and
  Red Riding Leggings or
  Spooky Leggings.
 - Mages should use a hybrid combo of the
 Hallowed Headgear,
  Dark Artist's Robes or Spooky Breastplate, and
  Dark Artist's Leggings.
 - Summoners should use the
 Spooky set, or
  Tiki set if more whip range is needed.
Weapons
Melee
- The
 Terra Blade is a great option due to it's broad range and high damage output.
 - The
 Flying Dragon's large projectiles and high base damage make it useful for the fight.
 - The
 Flairon is a very useful weapon due to its homing capabilities.
- It is recommended to prioritize increasing damage and critical strike chance over melee speed when using Flairon and Flying Dragon, as their projectiles do not scale with melee speed like Terrablade.
Ranged
- The
 Tsunami can decimate the Empress and should be used with
  Venom Arrows or
  Ichor Arrows.
- Ichor Arrows can only be made in a Crimson world, unless the player has made a artificial Crimson via the
 Dryad or transporting Seeds. The
  Clentaminator can also be used with
  Red Solution.
- Ichor Arrows can only be made in a Crimson world, unless the player has made a artificial Crimson via the
- The
 Aerial Bane can take out the Empress pretty quickly. Use with the Venom Arrow.
 - If the Martian Madness event has been defeated, the
 Xenopopper should be used with
  Crystal Bullets.
  Chlorophyte Bullets are also good.
Magic
 Betsy's Wrath is a great secondary weapon due to its powerful defense-lowering Debuff.
- The
 Blizzard Staff is a very good choice due to its consistently high DPS. The
  Razorpine is a less potent but more accessible alternative.
 - The
 Bat Scepter may be utilized due to its homing capabilities and long range, however it has worse DPS, making it a weaker choice as a main weapon. However, it has the significant advantage of not requiring the player to focus on aiming at all, letting the player dodge attacks more effectively.
Summoner
- For Summoners intending to get the Terraprisma, there are a variety of options available depending on the player's progress -
- The
 Desert Tiger Staff can be used, but using it with the Firecracker is dangerous due to the low whip range.
 - The
 Raven Staff can be used for good DPS. However, its tracking is subpar, which can drag out the fight unnecessarily.
 - If
 Golem and the
  Martian Madness have been defeated, the
  Xeno Staff is a very powerful choice.
 - If the
 Lunatic Cultist and
  Stardust Pillar have been defeated, then it is recommended to use the
  Stardust Dragon Staff for its very high DPS.
 - It is recommended to fight the Empress of Light in the nighttime before hand, in order to gain the
 Kaleidoscope, which is a great option for most summons. It enables minions to deal critical hits, and has a large range, allowing you to greatly increase the DPS of your minions. This whip pairs well with the
  Blade Staff.
 - The
 Firecracker is the best whip for the Stardust Dragon Staff and the Desert Tiger Staff. It can be paired with the Dark Harvest or/and Durendal to boost the damage further.
Accessories
- Wings are highly recommended if not using a flying mount. The
 Fishron Wings or
  Betsy's Wings are the best wings available for the fight.
  Empress Wings are also useful if the player has beaten her during the night due to their high upward acceleration. Endgame players can use the Lunar Wings (
 Solar Wings,
  Stardust Wings,
  Nebula Mantle, and
  Vortex Booster) or the
  Celestial Starboard instead.
- It's also recommended to use the
 Soaring Insignia along with the wings for greatly increased mobility and infinite flight. Due to the nature of infinite flight, Wing choice can be made based on special abilities alone, making the
  Hoverboard a viable choice.
- It's also recommended to use the
- It is highly recommended to use the
 Destroyer Emblem as a hybrid character because it offers significant boosts to both your primary weapon and minions.
- If the player is a pure summoner, it is recommended to use the
 avenger Emblem instead because minions cannot benefit from critical strike chance bonuses.
- If the player is a pure summoner, it is recommended to use the
- The
 Mechanical Glove and its tinker
  Fire Gauntlet are useful accessories for pure summoners and melee characters who wield terrablade.
- However, the melee bonuses do not apply to Whips, and one may prefer using the
 Berserker's Glove instead, which remains useful for other boss fights as well.
- However, the melee bonuses do not apply to Whips, and one may prefer using the
- As a ranger, equipping both the
 Recon Scope and the
  Sniper Scope will greatly increase DPS.
 - The
 Celestial Shell is a very good choice for all classes due to its large boosts to offensive stats.
- If Golem has not been defeated the
 Squire's Shield,
  Apprentice's Scarf,
  Huntress's Buckler or
  Monk's Belt can be used instead to increase summon damage.
- If Golem has not been defeated the
- The
 Papyrus Scarab,
  Necromantic Scroll and
  Pygmy Necklace are good offensive combat accessories for pure summoners and hybrids alike, giving a total of 2 extra minion slots along with increased damage.
 - The
 Amphibian Boots give a very noticeable ascent speed boost to Wings and some utility on the ground with its extra running speed.
 - Shields are not recommended for this fight at all, and should be forgone in favor of a mobility or damage-boosting accessory.
Others
- The ability to teleport using the
 Hook of Dissonance and
  Rod of Discord can be useful for dodging hits.
 - In master mode worlds, the Hexxed Branch mount is useful to move quickly, as it very quickly reaches its max speed even while in the air. Because it cannot fly or double jump, using it without wings is not a good idea.
- The
 Gelatinous Pillion allows the player to quickly descend during the fight, making it the best mount to use alongside Wings.
 - The
 Witch's Broom(Desktop, Console and Mobile versions),
  Cosmic Car Key(Desktop, Console and Mobile versions) and the
  Shrimpy Truffle(Desktop, Console and Mobile versions) are viable substitutes for wings and other forms of mobility accessories, which should be abandoned if used.
- The latter is most useful if it is raining, or if there are water/honey bubbles set up within the arena.
- Equipping an
 Aether Monolith or
  Void Monolith in a social slot can help the Empress’s attacks stand out more.
- ↑ 1.0 1.1 Information taken from the Desktop 1.4.4.9 source code,
AI_120_HallowBoss()inTerraria.NPC.cs,ScaleStats_ApplyMultiplayerStats()inTerraria.NPC.cs, andGetAttackDamage_ScaledByStrength()inTerraria.NPC.cs. - ↑ 2.0 2.1 Information taken from the Desktop 1.4.4.9 source code,
AI_120_HallowBoss()inTerraria.NPC.cs. The relevant part is theswitch(this.ai[0]){ case 9: }code block. - ↑ 3.0 3.1 Information taken from the Desktop 1.4.4.9 source code,
AI_120_HallowBoss()inTerraria.NPC.cs. Relevant code blocks for attacks: Prismatic Bolt 1:switch(this.ai[0]){ case 2: }; Prismatic Bolt 2:switch(this.ai[0]){ case 16: } - ↑ 4.0 4.1 Information taken from the Desktop 1.4.4.9 source code,
AI_120_HallowBoss()inTerraria.NPC.cs. Relevant part for attack is theswitch(this.ai[0]){ case 6: }code block. - ↑ 5.0 5.1 Information taken from the Desktop 1.4.4.9 source code,
AI_120_HallowBoss()inTerraria.NPC.cs. Relevant part for attack is theswitch(this.ai[0]){ case 5: }code block. - ↑ 6.0 6.1 6.2 Information taken from the Desktop 1.4.4.9 source code,
AI_120_HallowBoss()inTerraria.NPC.cs. Relevant code blocks for attacks: Ethereal Lance 1:switch(this.ai[0]){ case 4: }; Ethereal Lance 2:switch(this.ai[0]){ case 7: }; Ethereal Lance 3:switch(this.ai[0]){ case 11: } - ↑ Information taken from the Desktop 1.4.4.9 source code,
RegisterBoss_HallowBoss()inTerraria.GameContent.ItemDropRules.ItemDropDatabase.cs.