Guide:Enemy farming
This guide will focus on killing enemies and Town NPCs and farming critter spawns quickly and efficiently for their unique resources. For farming money, see here, and for farming other resources, see here.
Natural NPC Spawn Mechanics
The game will randomly spawn enemies and critters, collectively NPCs, just offscreen. When farming random spawns, the goal is to spawn NPCs as fast as possible, control where they spawn or move to, and kill or collect them as fast as possible.
Spawn Rate
By default, NPCs will spawn on average every 600 ticks[1]. The maximum spawn rate possible is once per 60 ticks, 10x faster than the default and an average of 1 spawn per second; this is the ideal for any enemy farm.
Enemy spawn rates depend on player biome, height, and buffs such as Water Candle and Battle Potion. Below are the main methods of boosting spawn rate and how much they boost spawn rate. These factors multiply together with the initial 600 tick spawn rate, rounding down at each step.
| Biome[a] | Multiplier |
|---|---|
| 0.3 | |
| 0.9›0.4 | |
| 0.2 | |
| 0.4 ~ 0.85[b] | |
| 0.65 | |
| 0.4 |
| Layer[c] | Multiplier |
|---|---|
| 0.5 | |
| 0.4 |
| Time[d] | Multiplier |
|---|---|
| Night | 0.6 |
| 0.3 | |
| 0.2 |
| Misc | Multiplier |
|---|---|
| Hardmode | 0.9 |
| 0.8 | |
| 0.5 | |
| 0.75/0.375[f] |
| Special seed interaction | Multiplier |
|---|---|
| For the worthy | 0.8[g] |
| 0.3 | |
| 0.4 |
| Event | Forced spawn rate[j] |
|---|---|
|
1/20 |
| 1/10 |
Spawn cap multipliers are not mentioned here because any setup that reaches 1/60 spawn rate will also reach the spawn rate cap. The spawn rate increases for having few enemies nearby can help some farms reach max spawn rates, but this requires enemies to be killed fast enough to keep the enemy count low.
What height you build your farm at will depend on what you are looking to farm. Harpies, for instance, require a Space layer farm, while Mimics will spawn anywhere below the surface; as the Cavern layer has the highest spawn rates of any layer, that is an ideal height for a Mimic farm. Biomes, on the other hand, can be artificially created at the desired farming spot, allowing for more control over spawn rates and farming enemies that require the player to be in a specific biome.
The Underground Desert and Jungle are especially appealing here due to their high spawn rate without overriding desired enemy spawns. Use safe, player-placed Sandstone Walls along with 1500 Sand Blocks for the desert; this will prevent underground desert enemies from spawning in the farm. Underground desert is the best biome for high spawn rates, but requires a lot of blocks and cannot be used above the surface. Artificial jungles are much easier to create by comparison, but they do not work in the underworld and have far less effect when used for critter farms. Corruption and Crimson biomes are also possible, but do not work with the Hallow, can block critter spawns, and can spawn Biome Mimics in Hardmode.
Underground and Cavern farms can reach 1/60 spawn rate through an artificial underground desert, or through an artificial jungle combined with a Battle Potion. Space farms can reach 1/60 spawn rate through an artificial jungle biome, Water Candle, and Battle Potion. Underworld farms need to use both the underground desert and a Battle Potion to reach max spawn rate, while a Surface farm cannot reach 1/60 spawn rate during the day, though jungle, a Water Candle, and a Battle Potion can reach the max spawn rate at night.
For Underworld and surface farms, consider sitting just inside the cavern or underground layers as enemies spawn below or above. This makes reaching the max spawn rate easier, but can make constructing the farm more complicated.
The Dungeon and invasion events can have much higher spawn rates than the normal cap, but their unique spawns will outprioritize almost anything else, making them only good for farming their own enemies. A cavern layer Dungeon farm with a Water Candle will have 1/60 spawn rates post-Skeletron, while invasion events will always have 1/20 spawn rates for players farming them. Pre-Skeletron, the Dungeon has a fixed 1/10 spawn rate.
Town NPCs do not decrease spawn rates, unless your farm uses a jungle. Instead, they replace normal enemy spawns with critter spawns. If farming critters, try to use an underground desert for spawn rates.
Some enemies are prevented from spawning while the player stands in front of safe walls or stands still for 5 seconds. If you want to farm these enemies, consider placing a Shadow Candle; this guarantees that they can spawn.
Water Candles can be fairly reliably obtained from the top area of the Dungeon even before Skeletron is killed. This is especially important for Space layer farms due to its increased effects there.
Farm Area
First, you want to limit enemies from spawning where you do not want them to. Enemies spawning in closed-off areas off-screen take up NPC slots and spawn attempts that should be used for the enemies you are farming. On the surface or in space, this is easy; if you are high enough above the ground, nothing can spawn except on whatever spawning area you build. Underground farms have more issues with this, though, and require the player to clear out a large open space for good efficiency. Dynamite or launcher weapons with Mini Nuke IIs are the best options for clearing large areas quickly, and Glowing Mushroom biomes are often good locations for cavern-layer farms due to mud being easy to mine.
The goal of a farm area is to make it so enemies can always reach you so you can kill them. This can be undesirable when clearing out the farm, as these enemies can be dangerous. Consider moving in 3 Town NPCs to reduce enemy spawn rates while working on the farm; you can always move them back out for enemy farming later.
Ideally, the farm area should be at least 168x92 tiles in size, so that nothing can spawn without the player providing a spawning surface. If you stand in the middle and see enemies still spawning, you can use that to find any blocks you may have missed. There are other options for preventing enemy spawns, however; Lava is a great option that prevents any enemies from spawning, background walls can prevent enemy spawns in small enclosures, and a line of blocks every 3 tiles leaves too little space for any enemies to spawn.
Some enemies can have their spawns blocked by being near Town NPCs, standing in front of safe background walls, or not moving or using an item for 5 seconds. If you want to farm these enemies, the easiest option is to use a Shadow Candle, which will forcibly allow them to spawn. The list of enemies affected by this is as follows:
 Giant Worm
 Digger
 Tomb Crawler(Desktop, Console and Mobile versions)
 Dune Splicer(Desktop, Console and Mobile versions)
 Sand Sharks(Desktop, Console and Mobile versions)
 Devourer
 World Feeder
 Floaty Gross
 Chaos Elemental
 Cursed Hammer
 Crimson Axe
 Enchanted Sword
 Pigron
 Wyvern[l]
 Ghost[m]
Spawn Location

NPCs spawn within a 168x92 tile area centered on the top left corner of the tile containing the top left corner of the player's hitbox. The game picks a tile in this area, then drops down to the first solid block (platforms are solid, but Minecart Tracks and Rope are not) and tries to spawn an enemy there. If that spawn fails, the game will usually try again, choosing up to 50 points to spawn an enemy at before giving up and wasting a spawn.
This means that if enemies have less room to spawn, they will spawn faster in that remaining area, and the more open vertical space a tile has, the more likely enemies are to spawn there. As the game tries 50 times, having too small of a spawn area can dramatically reduce the effective spawn rate; this can become a problem if you are trying to spawn enemies above them, or shortly below a ceiling.
Generally farms will aim to spawn enemies to the left or right, or below the player, to maximize the chances of a successful spawn. For a 50% chance of spawning an enemy successfully, enemies spawning below the player need at least 3 valid tiles to spawn on, while enemies spawning to the sides need at least 5; for a 90% chance of spawning an enemy successfully, a spawn platform below will need at least 9 valid tiles and a spawn platform to the side will need at least 15 valid tiles.
The goal is to kill enemies that spawn as quickly as possible and not be killed yourself. Killing enemies means either attacking them from a distance or bringing them to you, while keeping yourself safe generally entails using blocks for safety or having enough damage to kill enemies before they reach you. Many enemies will naturally walk or fly towards you, but you can speed this up by using Teleporters or hoiks. If you are killing enemies from a distance, be aware of the dropped item limit: once 400 loose dropped items are present, new items will cause the oldest item drops to despawn.
In Space, enemies will spawn in open air, rather than on ground. This makes it far more difficult to control their spawn location.
Damage
Optimized farms will spawn an average of 1 enemy per second, or 3 enemies per second during an invasion. If the player does not have enough damage to kill enemies as they spawn, the farm can fill up and lose efficiency. This is a minor concern for normal farms, with slow enemy spawns and a high spawn cap, but invasion farms start slowing down if it takes you more than 3 seconds to kill enemies.
Early on, the main options for farming enemies are Lava and Grenades. They deal high damage to any number of enemies. Dynamite can also work, but is very expensive and requires a chest or dresser (they do not need items inside them) or an explosive-proof block like Dungeon Bricks to keep the Dynamite from destroying the farm. The Explosive Trap Rod is a helpful damage boost once the player has the Tavernkeep, and minions like the Vampire Frog Staff help too.
In Hardmode, the Clinger Staff, Life Drain, and Crystal Vile Shard are all fantastic options for group damage. Hellfire or Unholy Arrows are also good options, as are maces such as Dao of Pow or minions like Spider Staff.
Lava is the easiest to use as it does not require player input, but does not work in don't dig up nor on Underworld enemies. Buckets are the easiest method for handling small amounts of lava for farms. Traps can also be used after Skeletron is defeated and the player has the Mechanic for wiring, but most traps have long cooldowns that make them difficult to use in farms.
Lava
Lava can serve 3 roles in enemy farms: preventing enemy spawns in wrong areas, killing enemies, and destroying low-value item drops, namely Copper Coins.
If you have an area where you do not want enemies to spawn, lava is the easiest way to prevent any enemies from spawning on it.
Lava can block enemy spawns in your spawn area, as well; however, you can avoid this by placing ![]() Stone Platforms(Desktop, Console and Mobile versions) on top of your spawning surface and hammering them into the down position. Lava does not break Stone Platforms, and because the platform is below the top of the tile, enemies will spawn lower than the game thinks they will in checking for lava normally. This lets enemies spawn directly inside lava. Alternatively, you can have enemies walk into lava (usually as a "volcano" design, shown later).
Stone Platforms(Desktop, Console and Mobile versions) on top of your spawning surface and hammering them into the down position. Lava does not break Stone Platforms, and because the platform is below the top of the tile, enemies will spawn lower than the game thinks they will in checking for lava normally. This lets enemies spawn directly inside lava. Alternatively, you can have enemies walk into lava (usually as a "volcano" design, shown later).
- Lava does not damage enemies in don't dig up or get fixed boi world seeds, making it largely irrelevant as a source of damage. It is still useful for controlling spawn locations, however.
Up to 400 item stacks can be present in the world at once before the oldest drops start despawning. This includes each denomination of coin, as well as drops unique to each enemy. If your farm setup does not allow you to pick up item drops as enemies die, you may want to fine-tune the lava level to destroy ![]() Copper Coins, while keeping it low enough to avoid destroying
Copper Coins, while keeping it low enough to avoid destroying ![]() Silver Coins and other more valuable drops. With no platforms, this generally requires 1 bucket of lava per 6 to 8 tiles of surface; if using platforms to spawn enemies inside lava, this requires closer to 2 buckets of lava per 3 tiles of surface. You can test if the lava is at the right height by tossing in one of each coin; the Copper Coin should be destroyed, while the Silver Coin should survive.
Silver Coins and other more valuable drops. With no platforms, this generally requires 1 bucket of lava per 6 to 8 tiles of surface; if using platforms to spawn enemies inside lava, this requires closer to 2 buckets of lava per 3 tiles of surface. You can test if the lava is at the right height by tossing in one of each coin; the Copper Coin should be destroyed, while the Silver Coin should survive.
- If you are specifically farming Lihzahrds, make sure the lava level is lower. Lihzahrd Power Cells are the same height as Copper Coins and can be destroyed by lava.
- This also applies if you are specifically looking for Golden Platforms from Pirates.
Enemy Farms
This section will cover various enemy farms and what enemies you can farm and how, helping illustrate the ideas for good enemy farming above.
Space


The Space layer spawns Harpies, Wyverns, and Martian Probes. Harpies will spawn in Pre-hardmode and drop Feathers for Featherfall Potions and Gravitation Potions, as well as Giant Harpy Feathers for Harpy Wings. Wyverns spawn in Hardmode and drop Souls of Flight, a required crafting ingredient in most Wings. Martian Probes spawn post-Golem, and summon the Martian Madness event, which itself can be farmed for its drops.
Because enemies here spawn in open air, this farm is the simplest to "build"; just move away from spawn, then use Rope to go up until Harpies start spawning. In Pre-hardmode, Harpies will not spawn within the center 10% of the world; this means you have to move away from the center first, before moving up. Minecart Tracks are also a good way to quickly get high enough. Once Harpies start spawning, continue going up around 50 blocks, so that your character is within the space layer; this will let Water Candle double the spawn rate. Then place blocks around yourself for safety, build an artificial jungle, place a Water Candle, and drink a Battle Potion for optimal results.
As enemies can spawn from any direction, killing them can be hard. A Starfury is a great option for this, while most bows and guns perform well enough. Getting a Harpy Banner makes this process much easier, as with enough Defense it lets you ignore attacks from the Harpies and focus on killing them without any blocks in your way. If you can find the 65% height mark where Harpies start spawning and the Water Candle becomes more powerful, you can also use lava to lead Harpies to fly into the lava and die this way.
Wyverns are much more dangerous, both to farm and for farming Harpies. If in Hardmode and looking to avoid Wyvern spawns, place background walls behind yourself to block their spawns. For farming Wyverns themselves, use a weapon with good pierce like the Sandgun with Ebonsand or Crimsand ammo or a Repeater with Unholy Arrows. When one spawns, the best approach is to move away; a Slimy Saddle will let a player fall faster than the Wyvern can chase them, while Lilith's Necklace will let the player run away to outspeed the Wyvern horizontally. In both cases, a Featherfall Potion is a massive help in controlling fall speed to keep pace with the Wyvern. If the Wyvern is approaching from above, you can also move to the side to make the Wyvern miss and move back above you to charge again.
Martian Probes only spawn near the edges of the world; farms for them can be built above the Ocean. They will not spawn if the player is in front of opaque walls, such as Wood Walls; use Fences or Glass Walls to allow their spawns while blocking Wyvern spawns. While the Water Candle is very important to Space farming in general, it uniquely triples the spawn rate of Probes, making them even more important in this case.
Space spawns are very high priority, even higher priority than event spawns; however, invasion events will prevent Harpies and similar from spawning entirely[2]. The Pumpkin Moon and Frost Moon do still allow space spawns, however; this allows Harpies and Wyverns to spawn at very high rates, but as these events can only be started post-Plantera, this is of limited use.
Invasions


Due to the chances of random invasions, the player may want to farm enemies for their drops, or just to get rid of the invasion so they can use Pylons again. Because rare drops from invasion events are generally best farmed from specific enemies, these two goals lead to slightly different approaches.
Invasions are unique in that they have very high, fixed spawn rates, meaning that farms only have to focus on killing enemies as fast as possible, and potentially farming rare enemy spawns later in the event. Invasion enemy farms also reach capacity much faster, placing more emphasis on killing enemies quickly than giving them a large spawn platform. Invasions will only occur on the surface[n], within 187.5 blocks of the invasion position; the invasion will move towards the center of the world over time, where it will stay afterwards. Invasion enemies will also spawn within 187.5 tiles horizontally of any NPCs you have (including the Old Man), but at a reduced rate if only a couple are present. Invasion farms should either be in the center of the world or in the same column as 3~4 or more town NPCs to maximize spawn rates.
For the Goblin Army in Pre-hardmode, just focus on limiting the enemy spawn area and tossing Grenades. In Hardmode, the Goblin Warlock can spawn, and will fly up towards you while shooting Chaos Balls at you; if you do not care about their drops, you can use a Teleporter to move away and back to instantly despawn the Warlock. If you do want its drops, you will have to fight it normally, but you can bring it into a lava-filled arena to make it die faster and prevent other goblins from spawning.
For Pirates, you can use a Clinger Staff to kill enemies faster and make Parrots less threatening. In a basic farm, Pirate's Curses can still threaten you, and Flying Dutchmen cannot spawn due to a lack of space. For the curses, teleporting away and back in is the most effective way to despawn them. For Dutchmen, once the event passes 50% completion, teleport to a wide, flat area with a wall between you and the spawn area, wait for 10 or so enemies to spawn, teleport away, then teleport back in; repeat this until a Dutchman spawns, then kill it with a Repeater with Unholy Arrows or other weapon with pierce and range, preferably one that can fire through a 1 tile gap so that the Dutchman cannot attack you back. You can repeat this process to get much better odds at rare drops like the Coin Gun compared to just killing random pirates.
For Martians, Martian Saucers have no spawn restrictions after 30% invasion progress, making them similar to Goblin Warlocks, but much more dangerous. If you choose to despawn them, you will have to wait 12.5 seconds after teleporting away, as they do not despawn instantly.
Surface


Surface farms can be built well above existing ground to make construction easier, but they can spawn Harpies if the farm is too high, especially in smaller worlds. You can avoid this by choosing a natural low point in the surface to build the farm, bombing out an area to use similar to a cavern-layer farm, or using the center 10% of the world where Harpies cannot spawn during Pre-hardmode. This last option is appealing in that it makes constructing the farm easier and makes Water Candle more effective, but you cannot farm Hardmode enemies by doing this as Harpies start spawning then.
Post-Skeletron, you can use Actuators and Timers to drastically simplify bringing the enemies to you. Placing 2 rows of blocks then hammering them to be sloped facing down and towards you will cause enemies to move towards you through repeated collision checks, which is referred to as a hoik. Actuating and deactuating these blocks through a Timer or other mechanism will cause almost all enemies to mount the hoik and be sent towards you; only Wraiths and other enemies that can move through blocks are exempt from this. This allows for extremely high efficiency farms, well beyond almost any other method, but hoiks can be considered an exploit.
Most enemies do not require a full biome to spawn them, but rather spawn on blocks associated with that biome, such as Eaters of Souls spawning on any Corrupt block. However, Ice Golem, all Sandstorm enemies, Arapaima, Devourers/World Feeders, and Corruption/Crimson aquatic enemies require the player to be in their respective biome before they can spawn. Many critter spawns also require the player to not be in Corruption or Crimson, with some also requiring the player to not be in Hallow or Snow Biome. No surface enemies will have their spawns blocked by being in the Jungle or Desert.
Prismatic Lacewing spawns are blocked by the presence of nearby Town NPCs, unlike most critters, and will immediately despawn outside of the Hallow. A Water Candle will also double the rate of Unicorn spawns.
Desert and Sandstorm enemies require Sand Blocks to spawn on, but unlike most enemies, they need more than just 1. They scan an 8x9 area starting at and centered on the spawning tile for 40 Sand Blocks (10 in don't dig up), stopping at the first non-sand block in the column below the spawn tile[3]. You can satisfy this by placing sand 5 to 8 tiles deep below the spawning surface. Sandstorm enemies also require the player to be above the surface line, as below the surface line the player is no longer considered as within a sandstorm. Unlike most enemies requiring certain blocks to spawn on, these enemies cannot spawn on platforms that are above valid spawn surfaces for them.
Gnomes and surface Mimics require natural background walls that are difficult or impossible to place artificially. You can find dirt walls by mining out a natural hill, though you should be careful with explosives, as they can destroy natural walls. For Living Wood Wall, clear out the space above a room or a corridor in a Living Tree. Place spawning blocks in front of, not below, the natural walls. You can also use Brown Solution post-Moon Lord to turn artificial, player-placed Dirt Walls into their unsafe variant, or use Green Solution on Corrupt/Crimson Grass Walls to convert them to unsafe, pure grass walls. Gnomes can spawn on any of these walls, with an increased rate on Living Wood Walls, while surface Mimics require natural dirt wall.
Blood Moons and Solar Eclipses spawn their exclusive enemies in this layer, making surface farms useful for farming these events as well. Post-Plantera, Mothrons and Deadly Spheres spawn during Eclipses and can go through blocks, making it important to include an open space where you can dodge and fight them as they spawn.
Weather can influence what enemies can spawn, particularly in the Snow Biome and Desert. Rain can also allow Worms to spawn at high rates near Towns on grass, making it a good time to farm Bait, though this can also be done below the surface without grass if the Dryad has not moved in yet.
Jungle biomes will sometimes cause Frogs and Cockatiels to spawn instead of normal enemies during the day, but the spawn rate increase is much more important.
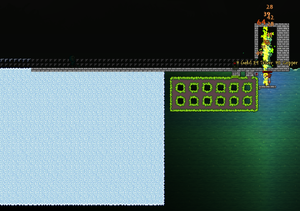
An optimized surface enemy farm using a rightward hoik to quickly move enemies into a kill chamber.
The wiring for the optimized farm. Turning on the timer causes the hoik teeth to actuate and deactuate rapidly, catching enemies in the hoik as they spawn.


Ocean

The Ocean has unique enemy spawns on Sand Blocks submerged under at least 2 tiles of Water, including Sharks whose Shark Fins can be used for Hunter Potions. These enemies only spawn off the sides of the screen, never directly below the player. They will move towards the player, if the player is in the same body of water as them, and they have line of sight.
Jungle biome can be used for increased spawn rates in Pre-hardmode, but in Hardmode this will overwrite most Ocean spawns with Arapaimas. The best options for hardmode are an artificial Corruption biome (not Crimson) or positioning the player in the Underground layer for increased spawn rates.
Ocean enemies can spawn through the underground layer as well, due to this space counting as "ocean depths".
Normal enemies will also spawn in the Ocean, if normal Ocean enemies cannot spawn. This can be a convenient way for farming Goblin Scouts, due to them only spawning in the outer 1/6ths of the world.
Underground and Caverns
Below the surface, spawn rates increase, making it easier to reach the max spawn rate. The only enemies exclusive to the Underground layer are Red and Yellow Slimes and Toxic Sludges; every other enemy found there can be farmed on the surface or in the Cavern layer instead. Tims and Rune Wizards only spawn in the bottom half of the cavern layer, and some low-priority enemy spawns like Undead Miners become drastically less common in Hardmode.
While large, open spaces like in Glowing Mushroom biomes can work for a makeshift farm, clearing out a large area is often your only option for a truly good farm in this layer. Large amounts of Dynamite are by far the best option for this, with a good Pickaxe helping to clear out small chunks the explosions miss. Placing a flat floor and covering it in a thin layer of Lava will prevent any enemies from spawning outside the intended farming area.
The cavern layer has more enemies that spawn based on what biome the player is in, but most still only require the right blocks to spawn on. Evil biome variants of underground desert enemies require their respective evil biome, Dungeon enemies require both the biome and Dungeon Bricks to spawn on, Devourers, World Feeders, Mimic variants, Beetle variants, Pigrons, Ice Tortoises, Snow Flinxes, Slimes, Bats, Icy Mermen, Armored Vikings, and Hardmode Skeleton variants all depend on the player being in the correct biome to spawn. Souls of Night and Light will drop from almost enemy killed while in an evil biome or the Hallow in the cavern layer, once the player is in Hardmode.
Many enemies require specific background walls to spawn on, namely Underground Desert enemies or Black Recluses. You can craft these walls and Shimmer them to get unsafe variants, which should then be placed behind, not above the intended spawning blocks. Lihzahrds instead require the player to stand in front of a natural Lihzahrd Brick Wall, at which point they will spawn on Lihzahrd Bricks. The Dungeon behaves a bit differently, detailed below.
Many enemies in the cavern layer will not move aggressively towards the player unless provoked. Lava works to damage Nymphs, Mimics, and the Skeleton Merchant, but Biome Mimics require either direct damage or some method of moving them towards the player so that they do not despawn. Biome Mimics are also very threatening due to their high damage and ability to go through walls, but they can be stopped by abusing line of sight.
In this layer, more enemies start to get dangerous projectiles, making line of sight an important concern. There are setups that can let you target enemies without them being able to target you, but these are position- and enemy-dependent. Having open line of sight lets you use melee weapons and whips freely in attacking enemies, but in turn lets those enemies attack you back, while breaking line of sight makes it more difficult to damage enemies, but leaves you much safer.

Truffle Worm spawns are blocked by Towns, much like Prismatic Lacewings.

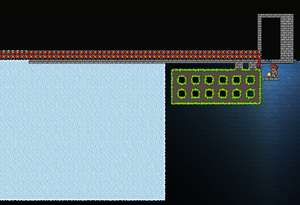
The start to an optimized hoik enemy farm. Placing a line of blocks above the teeth instead of below and hammering from the bottom right means each block can be hammered twice to reach the correct slope. The player will stand in the bottom right of this image, at the center of the overall farm.

Blockswap the lower teeth with platforms, then place blocks below them for the lower spawning surface. Blockswapping for platforms retains the slope direction of the tile, but prevents it from being desloped when a block is placed below it. The box above the player area has line of sight with the player below, so Biome Mimics will be trapped within as long as the player is centered below the hole.

Along with wiring the hoik teeth to actuate and deactuate, the space beneath the spawning surface can be used for other biomes, like snow or desert.
With the timer on, enemies will fall into the hoik and get trapped in the box, while Biome Mimics will be trapped above you, making both easy to kill. Thanks to the hammered platforms on the wall, projectiles fly right through to the enemies in the kill chamber.


Dungeon

For Dungeon enemies to spawn, the player must be in the biome and the enemy must spawn on a Dungeon Brick with any wall on the tile above it. For the player to be in the biome, there needs to be 250 Dungeon Bricks nearby, and the center of the player should be in front of any natural Dungeon Wall, which can be created artificially using Shimmer. The wall above the block is used to determine unique Dungeon enemy spawns, which is most relevant in the post-Plantera Dungeon.
If a non-Dungeon Wall is above a Dungeon Brick used for spawning, the game will default to Dungeon Brick Wall. This is useful for farming Paladins.
Dungeon Spirits can spawn from enemies killed by the player when their center is in front of natural Dungeon Walls, so you can place walls in your kill chamber to allow their spawns.
Giant Cursed Skulls are very threatening in farms due to inflicting the Cursed debuff and moving through walls. A Nazar can prevent this debuff, or an Explosive Trap Cane can be used to hit and stun them consistently. If worse comes to worst, a Starfury is a consistent option for stunning them anywhere on-screen.
Dungeon enemy spawns can be overridden by Spider Walls and Living Wood Walls, even pre-Skeletron. This allows some normal enemies to spawn at the increased 1/10 spawn rate of a pre-Skeletron Dungeon, and they can even still spawn Dungeon Spirits in this case, but this is very niche.
Underworld


Underworld enemies are unique in that they are immune to lava, requiring other methods for killing them. The wide open spaces make it easier to make a good farm location, but with the reduced spawn rate, it is easier to use the heightened spawn rates of the cavern layer and attack enemies in the farm down below.
Towns are less effective here, with 1 in 3 NPCs still spawning as enemies. If farming for critters for lava bait, you can get higher critter spawn rates and much lower enemy spawn rates by waiting in the cavern layer, which does not have this penalty.
Underworld spawning changes start when the center of the player character is 1 full block below the line separating underworld and cavern[4]. Underworld enemies start spawning 11 blocks below the layer boundary.
Bone Serpents and Fire Imps will always spawn in underworld enemy farms, even if the player stands in front of background walls. Bone Serpents become less mobile the more space is cleared out for empty air, which can reduce their threat, and Fire Imps can have their teleportation locations controlled to make them easier to kill.
Grenades are a fantastic option for killing underworld enemies due to farms generally requiring the player to stand above the enemy spawn area. They can fit through 1 block gaps if thrown straight down.
Guide Voodoo Dolls can be a problem in underworld farms if a Lava Slime dies on top of one in Expert Mode, as this can spawn the Wall of Flesh. The most consistent way around this is to kill the Guide beforehand and prevent him from moving back in again, but picking up the dolls as they drop is another option.
- Stone Platforms do not break in lava, making them a good option for draining lava from the farm while catching any drops.
Many enemies that can spawn in the cavern layer on certain block types can also spawn in the underworld if provided those blocks. This is most notable with Corruption and Crimson enemies, but also applies to Jungle enemies.
Statue Farms


Statues can spawn certain enemies that can then be farmed for their drops. This is most useful for Shark Statues and Slime Statues, which can be farmed more effectively from their statues than from optimized enemy farms, but they can be used for any enemy with a respective statue for banners and their respective loot.
As statues need to be activated by wire, farming them pre-Skeletron is more difficult, but very possible. A natural Dart Trap setup will generally give a convenient space for statue farming, with Dead Man's Chests having more wire for more control over the design in return for being more rare. Wire can activate statues from any of their tiles, and Pressure Plate Track with a Minecart provides a fast, low-effort method for spawning statue enemies. Post-Skeletron, a 1/4 second timer can quickly activate statues with less noise.
Most statue enemies need to be damaged by the player to drop items, preventing an autonomous lava setup. Statues will also be destroyed in lava if they are mined up. Minions and Grenades are good options for this, but due to statue enemies spawning in a fixed location potentially near the player, the minecart itself can rapidly kill statue spawns. In this case, make sure to equip any minecart, as this will increase your damage compared to the default minecart.
- Statue-spawned enemies will never drop coins, Souls, food, or Biome Keys. Most enemies spawned from statues can be more efficiently farmed from a normal enemy farm instead due to the reduced drop chances.
- Critters spawned from statues cannot be collected, either, though critters converted to evil forms by a Blood Moon will still drop their respective items.
- Hardmode enemies will only drop their loot in Hardmode. Mimics will only drop their banner regardless.
Up to 3 enemies can be spawned from statues at once in a local area. If you want to push statue farming further with more than 3 statues, you will need to stagger enemy spawn timings to avoid having more than 3 enemies attempting to spawn at once.
List of spawner statues
This content is transcluded from Statues.
| Statue | Enemy | Factor[5] | Notes |
|---|---|---|---|
| 0.2 | |||
| (Desktop, Console and Mobile versions) 0.2 (Old-gen console and 3DS versions) n/a |
| ||
| 0.05 |
| ||
| 0.2 |
| ||
| 0 |
| ||
| 0.05 | |||
| n/a |
| ||
| 0.05 |
| ||
| 0.05 | |||
| 0.01 | |||
| 0.2 | |||
 Harpy Harpy
|
0.05 | ||
| 0.05 | |||
| 0.05 | |||
| 0.05 | |||
| (Desktop, Console and Mobile versions) 0.2 (Old-gen console and 3DS versions) n/a |
|||
| 0.05 |
| ||
 Pigron(Any) Pigron(Any)
|
0.05 |
| |
| (Desktop, Console and Mobile versions) 0.2 (Old-gen console and 3DS versions) n/a |
|||
| (Desktop, Console and Mobile versions) 0.2 (Old-gen console and 3DS versions) n/a |
|||
| (Desktop, Console and Mobile versions) 0.2 (Old-gen console and 3DS versions) n/a |
|||
| n/a |
| ||
| 0.25 | |||
 Unicorn Unicorn
|
0.05 |
| |
 Wall Creeper Wall Creeper
|
n/a |
| |
| 0.05 |
|
Blood Moon Fishing

During a Blood Moon, you can fish up various enemies and kill them for unique loot.
To fish up Blood Moon enemies quickly, use as much fishing power as you can and a Chum Caster if you have one. In Pre-hardmode, it is easy to make a fishing pond where fished enemies cannot reach you nor escape the pond to despawn, letting you fish up several enemies quickly then kill them all at once.
In Hardmode, fishing enemies get a lot more threatening due to Blood Eels and Dreadnautilus moving through blocks. You can use a Sonar Potion to avoid fishing up one or both of these enemies if you do not want to deal with them. Otherwise, make sure you have adequate room to move around in to fight them; Water Walking Potions are an option to prevent most other enemies from reaching you, though Wraiths can still be a problem in this case.
Hemogoblin Sharks are tall and will not fall through platforms if they are at the player's height or below. This means they can be stopped by a 3 tile high corridor that you can easily attack out of. Blood Eels behave as faster Wyverns, letting you dodge them with movement speed buffs to let you outmaneuver their turning radius.
Killing Town NPCs
Many Town NPCs drop weapons on death, and on Hardcore mode, they are also the only useful source of tombstones.
For individual kills, a Lava Bucket or Flymeal is generally most convenient. The Flymeal requires gathering Stinkbugs, finding honey, and gathering enough Gold or Platinum, so lava is generally easier to get, but the Flymeal can be more convenient. For lava, surround the NPC in solid blocks to prevent their escape, pour the lava over them, then collect it right as the NPC dies; this is important for the Peddler's Hat due to that being white rarity and thus destroyed by lava. If you want a tombstone to place, mine the blocks the NPC was trapped in so it has more room to land.
You can also create valid houses with lava in them to automatically kill NPCs as they move in. If you set an NPC to move into a given house, they will always move into that house when they respawn, and if the house is not on-screen when they do so, they will spawn in front of their house tile. This means NPCs can consistently move in directly onto lava, killing them without any player intervention. This will become slower lategame, as NPC defense increases, but unless the player stacks every single defense bonus for NPCs, they will take more than 1 damage and die in a reasonable amount of time.
Lava does not work on the Tax Collector and, if the Guide is in the underworld, killing him with lava will cause the Wall of Flesh to spawn.
Sand Blocks can also work for killing NPCs, dropping them on a Torch so they return to your inventory, but this is generally slower than other methods.
Examples

A basic "Volcano Farm" made for Underground enemies.

- ↑ A tick is a time unit countable by the software. Most of Terraria's updating logic happens every tick. A tick has the length of 1/60th of a second, hence there are 60 ticks in a second and 3600 ticks in a minute.
- ↑ Information taken from the
 Desktop 1.4.4.9 source code, method
 SpawnNPC()inNPC.cs. - ↑ Information taken from the Desktop 1.3.5.3 source code, 1.4.4.9 There may be inaccuracies, as the current Desktop version is 1.4.4.9.
- ↑ Information taken from the Desktop 1.3.5.3 source code, Player.UpdateBiomes There may be inaccuracies, as the current Desktop version is 1.4.4.9.
- ↑ Drop chance reduction factor. The actual item drop chance can be calculated via multiplying the original chance by this factor. If there is no factor, then the drop chance is unchanged. Information taken from the Desktop 1.4.3.6 source code, field
Sets.StatueSpawnedDropRarityinTerraria.ID.NPCID.cs. There may be inaccuracies, as the current Desktop version is 1.4.4.9.
Cite error: <ref> tags exist for a group named "lower-alpha", but no corresponding <references group="lower-alpha"/> tag was found