Guide:Moon Lord strategies
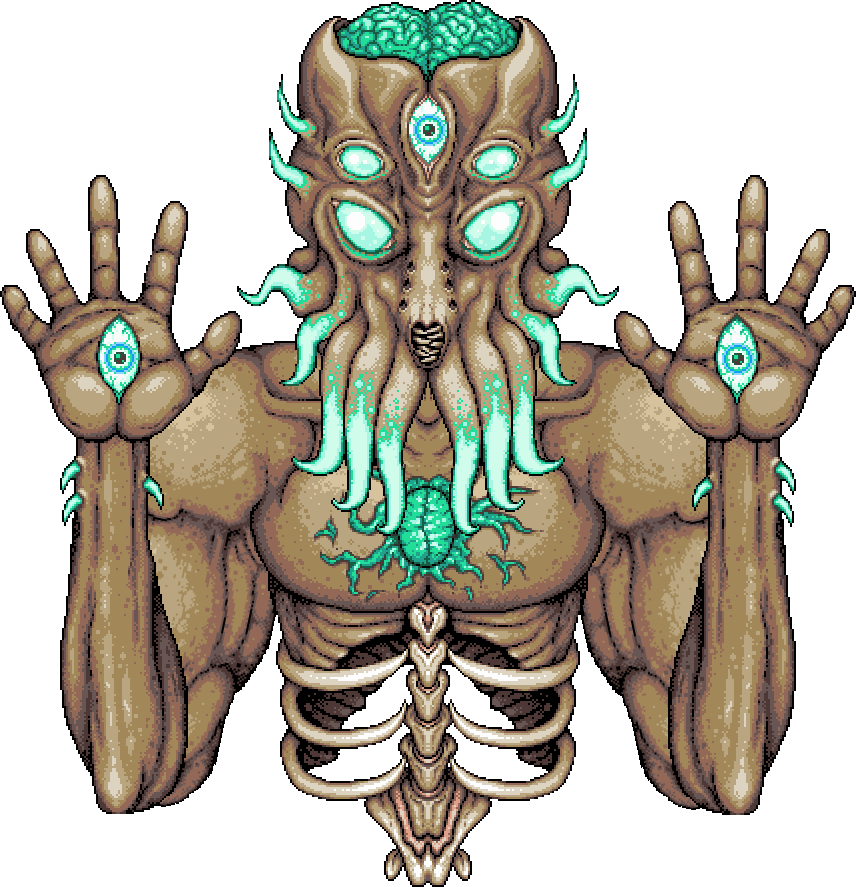
The Moon Lord is the final boss in Terraria. Because of its high health and its numerous, highly damaging attacks, it is generally considered one of the hardest bosses in the game.
The following strategies will give players an easier time defeating him.
| Type | |
|---|---|
| Environment | |
| AI Type | Moon Lord AI |
| Damage | (Varies per attack) |
| Max Life | 145000217500277311 (total) |
| Defense | (Varies per part) |
| KB Resist | 100% |
| Immune to |
| Debuff | |
|---|---|
| Debuff tooltip | You are unable to absorb healing effects |
| Duration | 14 seconds16 seconds |
| Coins | 1 PC2 PC50 GC |
|---|
- Item (Quantity)Rate
 Portal Gun(Desktop, Console and Mobile versions)100%
 Luminite(Desktop, Console and Mobile versions) (70–90)100%
- Two of the following 9 weapons will always drop [1]
 Meowmere(Desktop, Console and Mobile versions)22.2%
 Terrarian(Desktop, Console and Mobile versions)22.2%
 Star Wrath(Desktop, Console and Mobile versions)22.2%
 S.D.M.G.(Desktop, Console and Mobile versions)22.2%
 Celebration Mk2(Desktop, Console and Mobile versions)22.2%
 Last Prism(Desktop, Console and Mobile versions)22.2%
 Lunar Flare(Desktop, Console and Mobile versions)22.2%
 Rainbow Crystal Staff(Desktop, Console and Mobile versions)22.2%
 Lunar Portal Staff(Desktop, Console and Mobile versions)22.2%
 Meowmere Minecart(Desktop, Console and Mobile versions)10%
 Super Healing Potion(Desktop, Console and Mobile versions) (5–15)100%
 Moon Lord Mask(Desktop, Console and Mobile versions)14.29%
 Moon Lord Trophy(Desktop, Console and Mobile versions)10%
 Treasure Bag(Desktop, Console and Mobile versions)(Moon Lord)
 Gravity Globe(Desktop, Console and Mobile versions)100%
 Suspicious Looking Tentacle(Desktop, Console and Mobile versions)100%
 Celestial Starboard(Desktop, Console and Mobile versions)100%
- Moon Lord Mask(Desktop, Console and Mobile versions)14.29%
- Two of the following 9 weapons will always drop
- Meowmere(Desktop, Console and Mobile versions)22.2%
- Terrarian(Desktop, Console and Mobile versions)22.2%
- Star Wrath(Desktop, Console and Mobile versions)22.2%
- S.D.M.G.(Desktop, Console and Mobile versions)22.2%
- Celebration Mk2(Desktop, Console and Mobile versions)22.2%
- Last Prism(Desktop, Console and Mobile versions)22.2%
- Lunar Flare(Desktop, Console and Mobile versions)22.2%
- Rainbow Crystal Staff(Desktop, Console and Mobile versions)22.2%
- Lunar Portal Staff(Desktop, Console and Mobile versions)22.2%
- Portal Gun(Desktop, Console and Mobile versions)(when no Portal Gun in inventory)100%
- Luminite(Desktop, Console and Mobile versions) (90–110)100%
- Meowmere Minecart(Desktop, Console and Mobile versions)10%
 Piece of Moon Squid(Desktop, Console and Mobile versions)
 Moon Lord Relic(Desktop, Console and Mobile versions)
| Hurt | |
|---|---|
| Killed | |
| Summoned | |
| Phantasmal Sphere | |
| Phantasmal Eye | |
| Phantasmal Bolt | |
| Phantasmal Deathray | |
| Idle |
- Internal Buff ID: 145
The Fight
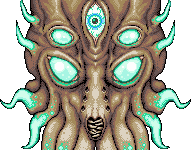
The Moon Lord's main attacks come from the Eyes on its hands and forehead, which are also the only parts that can be damaged.
When the eyes on the hands are exposed, they will alternate between spawning Phantasmal Eyes and shooting Phantasmal Spheres. The eye on its forehead will instead charge up the Phantasmal Deathray, and then fire it based on the player's position.
In the Get fixed boi seed, the Moon Lord erupts 30 ![]() Moon Boulders from its head eye after each Phantasmal Deathray attack. [2] These boulders share similar behaviors to Bouncy Boulders, which ricochet on solid blocks, and can exist for a relatively long time. However, they are much faster than Bouncy Boulders.
Moon Boulders from its head eye after each Phantasmal Deathray attack. [2] These boulders share similar behaviors to Bouncy Boulders, which ricochet on solid blocks, and can exist for a relatively long time. However, they are much faster than Bouncy Boulders.
The eyes can only be damaged on their "active" state and they will always shoot 2 Phantasmal Bolts before closing.
When an eye is defeated, it will detach from the main body and spawn a True Eye of Cthulhu, an unkillable enemy that uses weaker versions of the Moon Lord's attacks. The empty eye sockets will also reveal fangs which do contact damage if touched, but the Moon Lord won't directly attack with them.
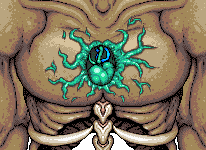
Occasionally, a tongue will spawn from its mouth and try to lick the player. If it connects, it will inflict the Moon Bite debuff, which prevents healing from the Vampire Knives and the Spectre Hood. The Moon Leech Clots spawned from the tongue will heal one of the Moon Lord's unkilled parts for 1000 HP if they reach its mouth. It will not heal or replace any eyes in its hands or forehead if these have already been defeated.
The Phantasmal Deathray is one of the strongest attacks in the game, and the player must always watch out for it, especially on Expert Mode. It can very easily finish off a player at around half health, so it must be dodged at all costs. It is only fired by the eye on its forehead, so you must be prepared for it when it opens. The safest way to dodge it is by flying over him with a mount such as the Witch's Broom or with Wings, preferably Fishron's or the Empress of Light's. It can also be dodged with a Rod of Discord by teleporting out of its path. Because of this attack it is a bad idea to keep the Moon Lord offscreen, as the player won't be able to see it coming.
The Phantasmal Sphere is the boss’s second strongest attack. It is difficult to escape its range, so mobility is important. The directional dodge provided by the Master Ninja Gear can help significantly, as can a mount.
The Phantasmal Bolts don't do a lot of damage, but they are hard to dodge as the Moon Lord doesn't shoot directly at the player; it instead tries to predict their position, and does so very accurately. The eyes will look at the player when preparing the attack, so you can predict it as well.
After all 3 eyes are defeated, the Moon Lord's core will be revealed, and what is arguably the hardest part of the fight will begin. The True Eyes of Cthulhu attack very frequently, quickly overwhelming even skilled players. Running away in this case is better, as the True Eyes' Deathrays have much shorter reach compared to the Moon Lord's.
Parts

General Strategies
General tips
This content is transcluded from Guide:Practical tips § Combat.
- Boss battles can be won or lost before the battle ever starts. Choose your equipment and have it ready; find and/or make potions and placed buffs; use the highest-tier food you have available; set up an arena appropriate to the boss; learn the strategies for the boss you're facing.
- Prepare your Boss-fighting arena with adequate lighting,
 Campfires and
  Heart Lanterns for health regeneration, and
  Stars in Bottles for mana regeneration if you use magic.
  Bast Statues(Desktop, Console and Mobile versions) will provide a significant defensive boost.
  Garden Gnomes(Desktop, Console and Mobile versions) and (Desktop, Console and Mobile versions) (if underground) proper torch placement will reduce damage taken and increase damage dealt due to the luck. The Torch God's Favor(Desktop, Console and Mobile versions) helps with this.
  Honey pools can also be used for extra health regeneration.
 - (Desktop, Console and Mobile versions)
 Sunflowers provide the
  Happy!(Desktop, Console and Mobile versions) buff to nearby players, which grants a +10% movement speed bonus and 17% reduction in enemy spawn rate.
 - Always carry around a stack of the highest-tier healing potion available, as relying only on natural Health Regeneration is not a good idea. Depending on the game stage, this can include items such as
 Lesser Healing Potions or
  Honeyfins. On the
  Desktop,
  Console, and
  Mobile versions,
  Restoration Potions are healing potions with a shorter cooldown.
- Likewise carry mana potions, if you use Magic.
- The
 Strange Brew(Desktop, Console and Mobile versions) is also an option, which yields very similar healing abilities to Healing Potion with added chances to trigger periods of invulnerability upon consumption.
 - On the
 Old-gen console version and Nintendo
  version, Restoration Potions can save a slot, but will likewise trigger both cooldowns.
- It is suggested to build houses for the
 Dryad and the
  Nurse NPCs in your arena. The former casts the
  Dryad's Blessing(Desktop, Console and Mobile versions) buff, which increases your defense and provides you with a thorns-like effect, while the latter can heal and remove debuffs instantly, at the cost of some
  coins.
 - Bosses are displayed on the Minimap: Follow the boss's icon to track it when you're struggling to find it. You can identify the boss icons by checking their respective wiki pages.
- Once you have freed the
 Mechanic in the Dungeon, you can use
  Wire to enhance your arena with
  Traps and helpful
  Heart and
  Star Statues. The former helps to damage the enemies, though be careful to set them up correctly in order not to hurt yourself during the battle. The latter will spawn heart and star pickups, respectively. Connect these devices to
  timers to activate them infinitely.
 - In Hardmode, the
 Brand of the Inferno(Desktop, Console and Mobile versions) and
  Sergeant United Shield(Desktop, Console and Mobile versions) can be used to parry incoming contact damage.
 - It may be useful to summon and kill the Eye of Cthulhu or King Slime before summoning any harder boss in order to spawn an extra one-use pool of Hearts. Note that this will take up a big chunk of the spawnable healing Hearts, which will cause Heart Statues to not spawn as many/any Hearts.
- Remember to use the
 Sharpening Station(Desktop, Console and Mobile versions),
  Ammo Box(Desktop, Console, Old-gen console and Mobile versions),
  Crystal Ball,
  Bewitching Table(Desktop, Console and Mobile versions),
  War Table(Desktop, Console and Mobile versions), and
  Slice of Cake(Desktop, Console and Mobile versions) before you go to explore or battle bosses/invasions. These will give boosts that are useful to have, with the first five being class-specific. They give
  Sharpened(Desktop, Console and Mobile versions),
  Ammo Box(Desktop, Console, Old-gen console and Mobile versions),
  Clairvoyance,
  Bewitched(Desktop, Console and Mobile versions),
  Strategist(Desktop, Console and Mobile versions), and
  Sugar Rush(Desktop, Console and Mobile versions), respectively.
Terrain preparation
If one is having problems fighting the Moon Lord, a skybridge can be built to make the fight significantly easier. Ideally, it should extend quite far from either side of your spawn point (700-1000 platform blocks should suffice). The Moon Lord will not despawn unless all players are dead, meaning you can outrun him and heal for a while if needed. However, straying too far will cause the Moon Lord to teleport on top of you, so careful spacing is required. This is of less concern in multiplayer, as the Moon Lord will only chase one player at a time, giving the others time to retreat and heal up if necessary. A long straight Minecart Track paired with the Mechanical Minecart will help you avoid most of his attacks. Make sure to hammer the ends for bumpers or make a loop to return to the straight track. Asphalt can be used as a sky bridge material to outrun the boss and dodge its tongue if you value the ability to use Vampire Knives. When the Moon Lord teleports with his tongue already chasing you, the tip of the tongue will not teleport with him. This allows you to completely outrun the tongue, avoiding Moon Bite and allowing Vampire Knives/Spectre armor to work normally.
Terrain prep can be skipped by using a form of infinite flight, such as the Witch's Broom or UFO Mount or a pair of late-hardmode wings coupled with the Soaring Insignia, although it is still wise to build a nearby house for the Nurse.
Gearing up
Armor
 Hallowed Mask,
  Valhalla Knight's Breastplate, and
  Valhalla Knight's Greaves is the best armor combination available to melee users.
 Monk's Shirt,
  Shinobi Infiltrator's Torso, or
  Beetle Shell can be used in the chest slot for more melee stats, though the loss of regeneration will be noticeable.
 Beetle armor can be used as a simpler option. The defensive version can be used by other classes as well.


 Shroomite armor with
  Red Riding Leggings is the best option for ranged users.
- The
 Red Riding Dress has roughly the same ranged stats as the Shroomite Breastplate with significantly higher summon damage, and should be used if using minions.
 - The leggings may be substituted with
 Spooky Leggings or
  Tiki Pants for more minion capacity, since there are no especially powerful ranged leg armor pieces.
- The
 Spectre Mask,
  Dark Artist's Robes, and
  Dark Artist's Leggings is the best armor combination available to magic users. The increased raw stats provide higher overall DPS than offensive Spectre armor, which only provides a fixed 400 DPS.
 Hallowed Headgear can be substituted for slightly higher magic stats, but significantly lower defense.
- The healing version of
 Spectre armor is usable only with specific strategies to avoid the Moon Bite debuff (see below).
 Spooky armor is the best option for summoners.
 Tiki armor can be used for more whip range, allowing players to fight at greater distances.
- For increased tankiness, any combination of Valhalla Knight armor (including the full set) can be substituted onto Spooky armor.
- The Valhalla Knight's Breastplate can be substituted onto any mixed set for greater survivability.
Weapons
For Melee users:
- The
 Daybreak is the safer of the two solar weapons, as it has longer range. Its projectiles explode when each spear expires or the eye it is attached to closes, effectively doubling its base damage.
 - The
 Solar Eruption is the strongest melee weapon available, dealing massive piercing damage to all parts of the boss. However, it requires remaining close to the boss to reach its full potential.
- The
 Starlight is effective at the same range as the Solar Eruption.
- The
- The
 Terra Blade and
  Flying Dragon are stronger than the Daybreak in the first phase as long as they are hitting more than one of the Moon Lord's parts.
For Ranged users:
- The
 Vortex Beater is the strongest gun available.
  Crystal Bullets provide the highest DPS, while
  Chlorophyte Bullets are more useful for the second phase, in which you are practically forced to retreat. They also allow you to focus more on dodging the attacks, as they home in on targets.
 - The
 Phantasm with
  Holy Arrows provides the highest DPS of any primary weapon, but the low velocity of Holy Arrows will hurt your accuracy unless using a
  Magic Quiver or one of its upgrades. If not using a Magic Quiver,
  Ichor Arrows or
  Venom Arrows should be used for their high velocity, making them easier to aim.
- The Aerial Bane is a strong alternative to the Phantasm, dealing bonus damage to airborne enemies and shooting multiple explosive arrows. Though, it requires the player to get close to their target to work due to the explosive arrow's high gravitational falloff.
- The Electrosphere Launcher is the strongest launcher available. Its electrosphere ability makes it capable of reaching great DPS.
- The Snowman Cannon can be useful for the second phase due to its homing nature.
For Magic users:
- The
 Nebula Blaze deals decent DPS and is accurate, but has a high mana cost.
 - The
 Razorpine and
  Blizzard Staff have higher DPS than the Nebula Blaze and lower mana cost, but lack its homing effect. The Blizzard Staff also tends to fail hitting smaller targets due to its high spread of projectiles.
 - The
 Nebula Arcanum deals extremely high DPS if you can manipulate the Moon Lord into staying in roughly the same position. It also doesn't need to be aimed.
 - The
 Razorblade Typhoon has a fast, mana efficient projectile which can hit all 3 parts with the same shot. However, its single-target DPS is not as great as the other four.
 - The
 Betsy's Wrath inflicts a potent defense-lowering debuff that the Moon Lord is not immune to. It should always be used if available, regardless of primary class.
For Summoners:
- The
 Stardust Dragon Staff is the strongest minion that can be used against the Moon Lord, with the highest DPS and tracking distance. It pairs well with the
  Firecracker during the first phase, and can damage the Moon Lord from afar during the final phase without the assistance of whips.
 - The
 Terraprisma is also viable for the first phase, but it cannot be used against the final phase while remaining out of range from the Moon Lord's miniature deathrays.
 - The
 Stardust Cell Staff will fire additional shots if the target is struck by another weapon, which is mainly useful if using a gun with Chlorophyte Bullets and attacking the Moon Lord from far off-screen.
 - The
 Staff of the Frost Hydra or
  Ballista Staff is the best sentry available, but it only works if you remain in one area. It is unlikely to contribute significantly to your DPS, but there is no drawback for using it.
 - The
 Kaleidoscope is the best whip available. However, the damage increase from Kaleidoscope is generally not as high as using a secondary weapon from another class and requires dangerous proximity to the Moon Lord. When used with the Valhalla Knight armor, it can serve as a primary weapon, taking advantage of the armor's regeneration, high defense and boosts to summon damage.[3]
 - The
 Dark Harvest and
  Durendal can be used in tandem with the Kaleidoscope to stack their tag damage boosts. The
  Firecracker can also be used in conjunction with the Stardust Dragon Staff, as its tag effect pairs well with the dragon's insane damage per hit.
Accessories
- Wings are almost a requirement when dodging the Moon Lord's attacks, unless the player is using a flying mount. The
 Fishron Wings, the
  Betsy's Wings, and the
  Empress Wings are the best wings available before defeating him for the first time. The
  Steampunk Wings are a weaker but more accessible option for those who do not want to farm Duke Fishron or Betsy for the random wings drop.
- The Betsy's Wing can hover with great speed when paired with the
 Soaring Insignia, allowing the player to outrun the attacks trivially by flying in one direction.
 - The Empress Wing's vertical boosting can aid in flying over the Phantasmal Deathray.
- The Fishron Wing does not have the features of the other two wings, but has better base stats than both of them.
- The Betsy's Wing can hover with great speed when paired with the
- The Soaring Insignia is by far the most important movement accessory after any wings in Expert and Master Mode. Unlimited flight time and greatly increased ascent, flight, and ground movement speed will allow a far easier time evading any attacks.
- The
 Frog Leg, any of its upgrades, or any balloon accessory will make wings ascend significantly faster, which helps a lot when dodging projectiles or racing against the Phantasmal Deathray.
 - The
 Fire Gauntlet is recommended for Melee users as it provides a variety of useful melee bonuses.
 - The
 Stalker's Quiver or
  Recon Scope are recommended for Ranged users, depending on whether they use arrows or bullets, due to their wide array of ranged bonuses.
- The decrease in aggro is useless in single player, where the Stalker's Quiver can be substituted with the
 Magic Quiver or
  Molten Quiver, and the Recon Scope can be substituted with the
  Sniper Scope.
 - The bonuses of the Recon Scope and the Sniper Scope stack, for a total of 20% ranged damage and 20% critical strike chance if both are equipped. For the quivers, only the arrow damage stacks, making the combination less useful.
- The decrease in aggro is useless in single player, where the Stalker's Quiver can be substituted with the
- Equipping the
 Mana Flower or one of its tinkers is useful for Magic users to avoid having to manually consume mana potions.
- The combination of the
 Mana Cloak and the
  Celestial Emblem is particularly useful for the variety of magic bonuses they provide together.
- The combination of the
- The
 Papyrus Scarab is recommended for Summoners. It can be equipped with either or both the
  Hercules Beetle and the
  Necromantic Scroll as the effect of these accessories stack.
 - The
 Warrior Emblem,
  Ranger Emblem,
  Sorcerer Emblem, and the
  Summoner Emblem are still viable at this point in the game and can be used to supplement whatever accessories you have equipped for your class if you wish to maximize your damage. However the Destroyer Emblem is generally better.
 - The
 Master Ninja Gear offers a dash for horizontal dodging and a 10% chance to not take damage from a hit.
 - The
 Celestial Shell is the best general purpose accessory, providing decent combat, defense, and healing boosts, more so during night.
 - The
 Charm of Myths is a great accessory to use in boss fights as it offers increased health regeneration and reduces the
  Potion Sickness debuff by 25%.
 - The
 Cross Necklace or the
  Star Veil will double the immunity time after taking damage, allowing you to potentially dodge some hits entirely.
 - The
 Frozen Shield provides crucial knockback immunity that will allow you to avoid being thrown around by enemy attacks. It also provides a nice 25% damage reduction when below half health as well as 6 defense.
- Other shield accessories that also provide knockback immunity, such as the
 Ankh Shield, can act as very viable replacements. It is worth noting that the Moon Lord does not inflict any debuff that the Ankh shield covers.
- Other shield accessories that also provide knockback immunity, such as the
- The
 Worm Scarf provides a 17% damage reduction that always helps with survivability in Expert and Master mode.
 - The
 Brain of Confusion provides a 1 in 6 chance of not taking damage, which roughly results on average to a 17% damage reduction, however it can be the difference between life and death when the individual attacks are as strong as Moon Lord's are. The 10% critical strike chance and summon damage boost when the dodge activates increases DPS significantly.
Every accessory should have the Warding, Lucky or Menacing Modifier. Menacing is generally preferred over Lucky due to boosting summon damage and offsetting the high defense of the Moon Lord's core. If using any Warding accessories, it is best to reforge them all to Warding.
Potions
 Super Healing Potions are absolutely worth the Celestial Fragments required to craft them, and you shouldn't need more than four.
 Regeneration Potion,
  Endurance Potion,
  Lifeforce Potion, and to a lesser extent,
  Ironskin Potion will greatly increase survivability.
- Any food item that provides the
 Well Fed/
  Exquisitely Stuffed buff will work.
  Mana Regeneration Potion is absolutely mandatory for mages.
 Rage Potion,
  Summoning Potion, and
  Wrath Potion will improve DPS.
 Magic Power Potion,
  Archery Potion, and
  Ale or
  Sake will further improve damage output for magic, ranged, and melee users respectively.
Others
- As mentioned above, the
 Rod of Discord is another way to avoid the Phantasmal Deathray. There is no need to worry about Chaos State, as the Moon Lord uses the attack on a timed interval, allowing for the teleport debuff to wear off.
 - An infinite flying mount can be invaluable for this fight by providing mid-air mobility while freeing accessory slots that would otherwise be occupied by wings and a Soaring Insignia.
- The
 Shrimpy Truffle is your best option in Expert Mode as it provides both great speed and a damage boost. It will however require that the boss be fought in a large water arena, or during rain on the Desktop version, Console version, and Mobile version.
 - The
 Witch's Broom is your second best option in Expert Mode, and has the advantage of not requiring water to reach its full speed.
 - The
 Cosmic Car Key is slower than both the Witch's Broom and the Shrimpy Truffle (when wet), however it is the only infinite flying mount available if you're playing in Classic Mode.
- The
- If you're using an asphalt bridge in Master Mode, the
 Hexxed Branch is an alternative for extra speed when running from the Moon Lord.
- However, one should take care not to run too fast in order to prevent the Moon Lord from teleporting onto the player.
- If more agility is preferred, a
 Slimy Saddle or
  Gelatinous Pillion can be used to return to the ground quickly and reset your flight time, and also serves as a makeshift downward dodge.
Specific Strategies
Regenerative Facetank
It is possible to defeat the Moon Lord while making no attempt to dodge its attacks whatsoever. While wearing a Squire's Great Helm, Valhalla Knight's Breastplate, and Cross Necklace while fully buffed, one can heal off all the damage that the Moon Lord deals without ever being in too much danger. The leg slot can be filled with Valhalla Knight's Greaves, Spooky Leggings or Dark Artist's Leggings to boost melee, summoning, or magic damage output, respectively. (Ranged has no good bonuses in the leg slot.) In Classic Mode, if you do not have access to the Old One's Army, simply wearing armor pieces that provide the highest available defense will also work, as long as you are buffed with Regeneration, Lifeforce, Endurance, Ironskin, Well Fed, and a Luck Potion (optional).
Simply stand in a pool of honey, grapple yourself in place, and chip away at the Moon Lord’s exposed parts. Most weapons will be far easier to aim now that the Moon Lord is no longer moving around. Since you will be immobile for this fight, you can use accessories specialized entirely towards damage mitigation, regeneration, and damage output, with your priorities roughly in that order.
For the leg slot, Valhalla Knight's Greaves is recommended, since it has the highest defense. All accessory slots should be filled with defensive accessories, all reforged to Warding. In Normal Mode, Celestial Stone (Celestial Shell), Star Veil (Cross Necklace), Frozen Shield, and other two defensive accessories (such as Hero Shield or Black Belt) with buff potions mentioned above will let you safely kill the Moon Lord while maintaining almost full health.
In Expert Mode, this strategy still works, with additional requirements: Worm Scarf and/or Brain of Confusion, and an arena consisting of a Campfire, a Heart Lantern, Honey, a Bast Statue, a Garden Gnome, some form of Torch Luck, and the Dryad to benefit from Dryad's Blessing. Since the effect of damage reduction and dodge chance is proportional to the damage of the enemy, it is much more effective in Master Mode. For the Master Mode accessories, Cross Necklace (Star Veil), Frozen Shield, and Worm Scarf are necessary. Brain of Confusion, Black Belt (Master Ninja Gear), and Shiny Stone are recommended. For the remaining slot, Charm of Myths or Hero Shield is a good choice.
Avoiding Moon Bite
By building a minimalistic house with a Bed to set one's spawn point, it is possible to use a Recall Potion to dodge all of the Moon Lord's attempts to inflict the Moon Bite debuff. Simply switch to the Recall Potion and use it right before the tongue touches you, then after the Moon Lord teleports to your position, move in the opposite direction that the tongue was coming from. This works because the Moon Lord's tongue does not teleport along with him. This strategy allows the unobstructed use of weapons with lifesteal properties, like Vampire Knives and magic weapons paired with Spectre armor.
True Eye of Cthulhu Sync
For those who want to fight the Moon Lord as safely as possible, it is highly recommended to synchronize the release of the True Eyes of Cthulhu. To do this, the health of the Moon Lord's head and hands must be brought to zero at a very precise moment in the True Eye of Cthulhu's attack pattern. Prepare by bringing all three of the Moon Lord's eyes to a very low amount of health (removing your minions if necessary), then release one. After the True Eye of Cthulhu fires a Phantasmal Deathray, another True Eye of Cthulhu must be released during the Phantasmal Sphere attack that immediately follows the Deathray. The timing is indicated by a unique noise. If done correctly, the newly released True Eyes of Cthulhu will attack in the same pattern, making them far simpler to dodge.
Hoik Method
This is the easiest, but longest way of fighting/farming the Moon Lord. It doesn't require much in the means of equipment, other than what you would probably have already at this point in the game. It will require patience as the battle will be lengthy, but this is a sure-fire way of winning that only requires clicking the mouse to use.
A full write and example can be found here.
Cavalry Method
Similarly to the minecart method, using a fast mount, like the Blessed Apple can make the fight easier. By setting up teleporters at the end of a long skybridge while using a weapon with tracking capabilities will allow you to outrun most of his attacks. Asphalt can be used for greater speed, at the cost of a speed reset when flying.
Ramming into Eye Sockets (Master Mode Only)
In Master Mode, all attacks of the Moon Lord have their damage tripled, except for the contact damage of the eye socket, which deals 80 as in Normal Mode. It means that if your defense is higher or equal to 79, you will only take 1 damage from it while triggering invincibility frames. To utilize this, you need: armor and accessories setup with at least 79 defense, A Cross Necklace (Star Veil) which elongates invincibility frames, a shield that prevents knockback, and enough mobility (infinite flight) to keep up with the movement of the eye socket. You will have to somehow take out one eye to use this strategy, though. After that, you can just follow and touch the empty eye socket while shooting at other parts of the boss.
Nurse strategy
The Nurse can heal you anytime you take damage, so by utilizing her the player will not have to worry about damage at all. The Nurse has a low chance of dying in that all NPCs take reduced damage. Furthermore, the Nurse's ability to heal herself makes damage she takes minimal. To use this to the best effect, build a house for the Nurse, turn on autopause, and use a powerful summon such as the Stardust Dragon. Just stay in the Nurse's house, healing whenever you take a lot of damage, and let the summon do all the work. You won't have to worry about dying, and the summon will kill the Moon Lord eventually. As of version 1.4, the cost of healing with the Nurse was re-balanced and is now much much more expensive, up to 30 gold per heal in the worst case scenario. If you consider using this strategy, be sure to prepare with lots of money to spare.
Asphalt Skybridge
Using asphalt as a base for a skybridge can help in evading the Moon Lord's attacks as well as provide time for health regeneration. By putting pools of honey along with campfires and heart statues you can take more damage and heal faster. Ranged weapons work best for this strategy such as the Daybreak for melee, Vortex Beater for ranger, Stardust Dragon Staff for summoner (along with a whip to target parts of the Moon Lord while you are running), and the Nebula Blaze for mage. If you get too far away from the Moon Lord and he teleports to you, fly up and around him and continue running away.
- ↑ Information taken from the Desktop 1.4.0.5 source code, method
RegisterBoss_MoonLord()inTerraria.GameContent.ItemDropRules.ItemDropDatabase.cs. There may be inaccuracies, as the current Desktop version is 1.4.4.9.
- ↑ Information taken from the Desktop 1.4.4.7 source code, method
AI()inTerraria.NPC.cs. There may be inaccuracies, as the current Desktop version is 1.4.4.9.
- ↑ https://www.youtube.com/watch?v=xXpPsYyrDI4