Guide:Travel
Due to the many important biomes and structures in the world, exploration is a big part of Terraria. However, since most of them are far from the spawn point, travelling can be very time consuming.
Below are often-used methods that can make exploration far easier and faster.
Because of the fact that the world's surface is not fully flat, it can be quite difficult to travel from one side of the map to another in order to visit points of interest, such as the Jungle or the Dungeon.
Equipment
This content is transcluded from Guide:Practical tips § Travel.
- There are various items and accessories that can affect movement speed:
- The various Boots, allow the player to run faster, cutting travel time. Various upgrades provide a double-jump and other mobility features.
 Swiftness Potions are common and easily brewed, and sharply increase movement speed (for a limited time). With boots, they allow reaching sprint speed more quickly.
- The
 Aglet and
  Anklet of the Wind improve movement speed by 5% and 10%, respectively. Both stack with each other, and even with a Swiftness Potion. Once you get the Tinkerer's Workshop both accessories can be combined into
  Lightning Boots.
 - The
 Magiluminescence(Desktop, Console and Mobile versions) improves movement speed by 15% and stacks with the Aglet, Anklet of the Wind, Swiftness Potions, and the various Boots.
 - Any accessory can provide a minor movement-speed modifier: In order of increasing speed, these modifiers include Brisk, Fleeting, Hasty, and Quick.
 Sunflowers increase movement speed whilst in their vicinity, and the
  Slice of Cake(Desktop, Console and Mobile versions) increases movement speed for two minutes.
 Asphalt Blocks become available in hardmode, and dramatically increase the players speed when running across them.
- Several items are used for mostly-vertical travel: Jumping, safe falling, and/or flying.
- If you can withstand screen flips,
 Gravitation Potions can be your best friend for vertical mobility. With precautions and practice, this can easily eliminate the need for an arena and can save you some resources to explore the Space biome.
 - A
 Featherfall Potion or an
  Umbrella effectively extends flight time by causing players to fall slower; the effects of Featherfall potions are even more pronounced when holding the UP directional key. This will also eliminate all fall damage risk from using a Gravitation Potion. The
  Djinn's Curse(Desktop, Console and Mobile versions) acts as a permanent Featherfall Potion when worn in the armor slot.
 - Several "Bottles" provide an extra jump of varying strengths:
 Cloud in a Bottle,
  Blizzard in a Bottle,
  Sandstorm in a Bottle,
 Tsunami in a Bottle(Desktop, Console and Mobile versions), or
  Fart in a Jar. (Comparison)
- The bottles can be tinkered with a
 Shiny Red Balloon (or
  Balloon Pufferfish(Desktop, Console and Mobile versions) for the Tsumani in a Bottle.) for their Balloon variants, which add extra jump speed and height, and can be further tinkered with a
  Lucky Horseshoe to get fall damage protection. You can combine the Cloud, Blizzard, and Sandstorm balloons to create a
  Bundle of Balloons. On the
  Desktop version,
  Console version, and
  Mobile version, you can combine the bundle of balloons with a lucky horseshoe to make a
  Bundle of Horseshoe Balloons(Desktop, Console and Mobile versions)
- The bottles can be tinkered with a
- The ascent speed of
 Wings can be greatly increased by equipping a
  Frog Leg. Balloon accessories provide a similar, though less dramatic bonus.
- If you can withstand screen flips,
- A
 Hook can be used to grapple across gaps, including upward and downward. On flat open areas they can be used to pull a player across the ground, by shooting it at the ground ahead and then releasing it while being pulled in. This allows the various Boots to get to full speed without having to build up beforehand.
 - There are several options for teleportation, each with different limits and trade offs:
- Several items allow teleportation to the player’s spawn point:
 Magic Mirror/
 Ice Mirror(Desktop, Console and Mobile versions),
  Cell Phone(Desktop, Console and Mobile versions),
  Shellphone(Desktop, Console and Mobile versions),
  Recall Potion,
  Potion of Return(Desktop, Console and Mobile versions). This point defaults to the middle of the map at the surface, but the player can choose almost any other point using a bed. The Potion of Return also supplies a return portal.
 - The
 Magic Conch(Desktop, Console and Mobile versions) allows teleporting to either seashore (the outermost standable block). The
  Demon Conch(Desktop, Console and Mobile versions) allows going to the middle of the Underworld, but the player may need to provide a surface there.
 - The Shellphone(Desktop, Console and Mobile versions) is the combination of the Cell Phone(Desktop, Console and Mobile versions), Magic Conch(Desktop, Console and Mobile versions), and the Demon Conch(Desktop, Console and Mobile versions), with an added ability to travel to the
 World's Spawn Point.
 - The
 Pylons(Desktop, Console and Mobile versions) provide a point-to-point network. You can place one pylon per major biome, plus one more for underground. Each pylon requires 2 NPCs nearby in order to work.
  Teleporters can be used to setup point-to-point links or complex networks. The main catch is that you need to place wire between the teleporters. On Desktop, Console, and Mobile, Teleporters become available post-Skeletron, while on
  Old-gen console and
  , they are Hardmode-exclusive.
- Several items allow teleportation to the player’s spawn point:
- Various mounts can be used to travel faster, whether that's on land, in liquid, or in the air.
 Minecarts can also be used to travel faster, although they are restricted to minecart tracks.
- While flying with Wings, an Ice Rod can be used while gliding, as touching its Ice block will reset the Wings' flight.
Terraforming
Players can flatten the uneven terrain by mining: you can flatten the top of small rises, fill in small dips in the ground, tunnel through larger natural elements like Mountains or Hills, and build bridges with Platforms on chasms and lakes.
Early on, hammering the top of a two-block-tall pillar to the slanted variant allows for very steep climbs. In the case of a taller, steeper mountain, it is easier to place Ropes or Platforms for faster climbing.
Minecarts
One of the simplest yet fastest forms of travel. A Rail track can be easily built above ground or inside an underground tunnel.
Basics
There are 3 track components:
- Minecart Track, made with Iron Bars and Wood at an Anvil.
- Booster Track, purchased from the Mechanic for 50 SC each. Direction of boost can be switched using Mechanisms or a Hammer. Mainly used to instantly accelerate or decelerate a Minecart.
- Pressure Plate Track, made out of a regular Track segment, and a Pressure Plate. They can only be placed horizontally.
Tracks can be laid in the air without support. You can grapple to them, but you will pass through them when walking or flying normally.
Behavior
Hammering the rails at the end of a track changes its behavior:
- Closed: The default option, stops the Minecart in place.
- Bumper: It reverses the travel direction.
- Open: It's an unprotected track, causing the Minecart to fall.
When two tracks intersect it is possible to switch branch by using a Hammer or a wire signal. Hammering or signaling an intersection repeatedly will cycle through the possible branches of the intersection. Using a Hammer eventually disconnects the intersection, although this will not happen with a wire signal.
Holding down ▲ Up or ▼ Down button will force the Minecart to take the upper or lower path of a switch track regardless of the current state. This allows a branching rail network to be easily navigated.
Advanced Rail systems
- Pressure Plate Tracks only work on horizontal tracks, and will cause a cart to derail if they are laid on a diagonal section. If you need to place a Pressure Plate on a diagonal track, place a Platform in the air next to the track on the side you will pass by, and put a regular Pressure Plate on top of it.
- You can make a safe track section that leaves a house by putting it in its own room with a door made with Actuated blocks triggered by Pressure Plate Tracks. However, the space left by the Minecart Track will make the house unsuitable for NPCs.
- On a Track intersection, you can use a Switch or Lever to cycle through the different branches. Additionally, Colored Torches can be used to indicate the branch that is currently active.
- To make a single Bumper end Track that can send you both up and down without manual input, you will need to build two rows of 3 Rail tracks on top of each other, and then hammer each one a certain amount of times (see picture)
- Open ended tracks can be hammered upwards to make jumps. With trial and error, many different jumps can be chained together for much faster travel. You can also hold an Umbrella to greatly extend the distance gained from jumps.
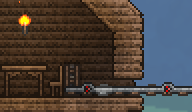
A Room with a Minecart exit, made with Actuators and Pressure Plate Tracks.
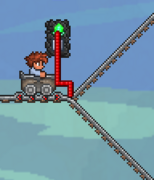
A basic mechanism to cycle through two branches.
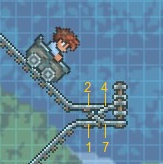
The Bidirectional switch design.


Sky Bridges
A Sky Bridge is a long bridge built high up in the sky, usually with only a single layer of blocks or Platforms. Besides the travel advantages, it can also let you intercept Fallen Stars for easier collection as well.
Note that some blocks will also change the biome of the bridge, and this can spawn more dangerous enemies on top of it. If the bridge is too high, Harpies (and in Hardmode, Wyverns) will spawn as well. Even if the bridge is below the Sky Layer, these Sky enemies can spawn above you.
- Dirt Blocks are easy to get, and allows your bridge to grow different Herbs and Strange Plants.
- Snow is almost as easy, and allows you to grow Boreal Wood.
- Mud likewise allows for growing Rich Mahogany or Glowing Mushrooms. However, the resulting Jungle Biome or Glowing Mushroom biome can produce various dangerous enemies.
- If the world is in Hardmode, Asphalt offers a massive speed boost to walking speed.
- Ice is a simple substitute for Asphalt if the player has the Ice Skates.
- Using sand blocks and Dunerider Boots also works as an Asphalt substitute.
- A bridge made of frozen slime blocks makes for a fast, hands-free method of travel, similar to a minetrack. This is especially effective when using a grappling hook to accelerate, and even more so if using a Portal Gun.
A skybridge can also make an effective boss arena, maximizing mobility in all directions and leaving a clear line of fire to the boss.
Subway
A Subway is an underground tunnel that is built by digging a long horizontal shaft. As with the Skybridge, Boots can be used to quickly travel through the subway, and Asphalt can be used as flooring.
For ease of returning to the surface from the subway, Junctions can be built at desired places on the map by mining branched shafts. A vertical exit can be made with a Rope or as a long Platforms stairway.
Subways can double as a barrier to prevent the spread of Evil or Hallowed biomes: in order to work as one, it must be at least 7 blocks tall, and must not contain any Corruptible soil.
The Digging Molecart is perfect for digging subways, as it places tracks and mines blocks itself, and is meant to be used underground.
Note, that if for some reason you need or want to tunnel through the desert (though this is a good reason why tunnels should be a good distance below any deserts, it's always a good idea to survey the landscape before you embark on any major construction projects), there is a way to tunnel through the desert biome without mining everything above, and it involves bombs. Because there is a delay in ticks between the sand blocks falling and forming, it is possible that with a grappling hook, position yourself at the top of some tunnel, set a bomb to go off near the edge, and quickly place dirt blocks or another solid block as soon as the explosives go off. This will be very slow, but it is possible. However, if you just dig a little deeper, you should hit hardened sand and sandstone blocks, which can be easily tunneled through. On the ![]() Desktop version,
Desktop version, ![]() Console version, and
Console version, and ![]() Mobile version, if equipped with a Cobalt Pickaxe or stronger, you can use Block Swap and place blocks not affected by gravity above you. This stops the sand from falling down.
Mobile version, if equipped with a Cobalt Pickaxe or stronger, you can use Block Swap and place blocks not affected by gravity above you. This stops the sand from falling down.
Hell Bridge
A Hell Bridge is a bridge constructed in The Underworld. Its main use is to avoid Lava lakes, although it can also double as a farm to gather Fireblossoms if the bridge is made out of Ash Blocks, Blinkroots if the bridge is made out of Dirt Blocks, or Souls if made with Ebonstone, Crimstone or Pearlstone Blocks.
The bridge can also be used to fight the Wall of Flesh more easily without falling in Lava or getting stuck in uneven terrain. It also works as a good farming spot for Underworld enemies, such as Voodoo Demons and Mimics.
Hellevator
A Hellevator is a vertical shaft of mined blocks that generally extends all the way from the surface to the Underworld.
It can be easily built with explosives or with the use of Mining Potions. Gills Potions will greatly help when digging through water, while Obsidian Skin Potions do the same for lava lakes. Avoid building the hellevator near the Jungle; you may reach the Jungle Temple, which is made of Lihzahrd Bricks that cannot be mined until a Picksaw is obtained. Alternatively, if the player has already located the Jungle Temple and has a Gravedigger's Shovel handy, the Jungle can be the best place to construct your hellevator. The Jungle and Underground Jungle are both comprised primarily of mud, which can be easily dug through by the Shovel; this will cut down your construction time immensely, so long as you start digging somewhere with a clear line from the surface to the Underworld.
While a simple hellevator only consists of a hollow shaft, it can also be equipped with periodic rows of platforms, a line of Rope, or a hoik, which can facilitate upward travel. Note that platforms often slow down the descent speed and that using a hoik will still require a mean of negating fall damage (see below). Riding the Slime Mount(Desktop, Console, Old-gen console and Mobile versions) or holding a Portal Gun(Desktop, Console and Mobile versions) greatly increases falling speed, which reduces travel time.
Depending on how the end of the shaft is reached, fall damage may be a problem. However, there are many ways to avert it:
- A small pool of water or honey just above the Underworld, where it does not evaporate yet, cancels the fall damage. Pink Slime Blocks(Desktop, Console and Mobile versions) or Clouds can be used alternatively.
- The Lucky Horseshoe (or upgrades) or wings eliminate fall damage entirely.
- The buff of the Featherfall Potion negates all fall damage as well. Holding ▼ Down while falling will accelerate the fall to the normal speed.
- If you're lucky, you may find a umbrella in the surface chests. This has the same effects as the Featherfall Potion but is useful when you're running out of those potions
- The Cloud in a Bottle (or upgrades), Flying Carpet, Rocket Boots (or upgrades), or any hook can be engaged just before landing, though this requires precise timing. A Depth Meter is useful for noting when you will be approaching the bottom.
- Running a line of any Rope type down the hellevator is a safe way of averting fall damage.
- Switching to the Bunny Mount at the end will negate all fall damage.
- Using Shoe Spikes and/or Climbing Claws will allow you to slide down walls. This could also be helpful for getting back up as these items (especially in combination) allows you to wall jump.
The Cobalt Shield or any of its upgrades will prevent knockback by any enemies who find their way into the shaft through side entrances. Getting hit by an enemy can knock the player out of the shaft, interrupting travel and (if fall damage is not negated) often causing instant death.
Similar to the subway, the hellevator can also be incorporated as part of your defense against the spread of the Evil or Hallow biomes. In this case, the hellevator must be at least 3 blocks wide to prevent the biomes from spreading through it.
Skylift
A skylift is a tower-like construct, used to get to Space more easily.
There are five types of skylifts:
- Ladder: A skylift built with Platforms.
- Rope: A skylift built with Rope. A player climbs the rope.
- Teleporter: A skylift built with two Teleporters linked via Mechanisms. Player stands on the Teleporter, triggers the switch, and is instantaneously transported to the other one.
- Hoik: A skylift constructed by using Hammered and Actuated blocks.
- A Stair elevator - A skylift constructed from stairs (platforms) placed above each other.
Teleporters

Teleporters are among the fastest forms of travel, but also the one of the most expensive and time-consuming, as they require a large amount of Wire for greater distances.
To use, you must wire two Teleporters together and then trigger them with a signal, such as that from a Pressure Plate or Switch. With one wire color, each end of a Teleporter pad can be wired to one destination each, making two possible destinations (each must have its own triggering mechanism). Using all four wire colors, each end of the Teleporter can be wired to four destinations each, for a total of eight possible destinations (two red, two blue, two green, and (Desktop, Console and Mobile versions) two yellow).
The Grand Design(Desktop, Console and Mobile versions) is incredibly helpful when wiring Teleporters at long distances, as it can instantly place Wire over the world.
Spawn
The player's spawn point can also facilitate travel. There are numerous methods to quickly teleport to your current spawn (Recall Potions, Magic Mirror and its upgrades, or even just exiting the world), and Potion of Return(Desktop, Console and Mobile versions) even allows two-way travel. Therefore, it's advantageous to place your spawn point near the places you visit most often, and any transportation network you build should be connected to it as well.
Furthermore, it's possible to arrange two-way teleportation between a custom-made spawn point (a clicked-on bed in a valid house) and the world spawn. To do so, install a Weighted Pressure Plate in the house so that stepping on it will actuate part of the wall, making the house (and the spawn point) invalid. (An example.) Then, using a magic mirror or a similar item while standing on the pressure plate will teleport you to the world spawn, while using it anywhere else will teleport you to the bed. If your main base is at the world spawn, this allows easily teleporting between it and the currently explored area.
Hoik
Hoiks are exploits in which sloped blocks are used for fast travel. This occurs when a character sprite shares space with a sloped block: The character is immediately displaced a couple of tiles in a predictable direction.
By chaining Hoiks together with a line of strategically placed shaped blocks, entities can be moved rapidly in any direction. Hoiks have a horizontal travel speed of 60 to 120 tiles per second, while vertical travel speed is 180 tiles per second.
Pylons
Pylons allow the player to teleport around the world via the different pylons in the game. They are purchased from an NPC with at least 90% happiness for a base price of 10 gold, for example putting the merchant in the forest will satisfy the requirements and the merchant will sell the forest pylon.
To use pylons there must be at least 2 NPCs nearby and there must not be an active boss or invasion. Pylons can almost be a replacement for standard teleporters in a world, but note the there can only be one of each type of pylon in a given world.
Pylons have many advantages as well as disadvantages.
Advantages:
- They do not require any wiring
- They can be obtained pre-boss
- They allow instant travel
Disadvantages:
- They require at least 2 NPCs nearby to be functional
- There can only be one of each type per world.
- They can't be used during any Boss fight or invasion.